The summer between my junior and senior years of high school, I had to take a cooking course for my occupational credits. My mom and I had just moved back to Washington and it was a graduation requirement, so off to summer school I went. The course was 8 hours a day for a month and we used a full sized professional kitchen. It was SO much fun and I learned a lot about cooking! During that course is when I made frosting for the first time. Another girl and I were handed a recipe for cream cheese frosting, and we whipped up about a gallon of it to frost several giant pineapple carrot cakes. It ended up being easily the best frosting I've ever had, and the cake was incredible as well.
Unfortunately for me, I did not save the recipe for either. I just assumed that all cream cheese frostings would be as delicious since the ingredients were only cream cheese, butter, powdered sugar, and vanilla extract. Easy, right?! Yes, definitely, but I have NEVER had cream cheese frosting turn out as perfectly since and I have no idea why! They've basically all been big flops for me. Vanilla frosting, too. Maybe the powdered sugar I used in the cooking course was a different kind? I've mentioned before on this blog that powdered sugar has a strong, strange flavor that completely turns me off, I think it's the cornstarch they add to it. Whatever the reason, I was never completely happy with another homemade non-chocolate frosting recipe until I tried this one from Southern Plate. It's nice and sweet, not too tart (but still obviously cream cheese based), and has a rather interesting addition: butter flavoring! Lucky for me, the addition of butter flavoring completely masks the unappealing powdered sugar flavor. You can either try it with the butter extract or just use vanilla if you like.
Cream Cheese Frosting
1 stick salted butter, softened
8 oz cream cheese, softened
1 t butter flavoring or vanilla extract
3 1/2 to 4 C powdered sugar
Beat together butter, cream cheese, and flavoring until fluffy. Beat in powdered sugar until frosting is thick and has the desired consistency, you will probably use the full amount. You can add more powdered sugar 1/4 C at a time if necessary, or thin it with about a teaspoon of milk at a time. Use immediately.
Yield: Enough to frost a 2 layer cake, or a 9 by 13 cake with some leftover.

Monday, December 31, 2012
Hershey's Red Velvet Cake
Well, it looks like 2012 is almost over! My first complete calendar year of having this blog. I haven't shared a lot of recipes this month, but I HAVE cooked lots of good ones. This is the red velvet cake that I made for our Christmas dessert. It's not the first red velvet recipe I've tried, but is definitely the best! It turns out that red velvet is kind of hard to make really good, it always seems to have an odd texture or flavor. This recipe though is not just good, it's great. Moist, tender, fluffy, and sweet with a hint of chocolate flavor. It also stayed fresh for a good 5 days! If you want to try a red velvet cake recipe, I suggest you try this one! Normally red velvet cake is topped with cream cheese frosting, my favorite recipe is here. Sorry there aren't any photos, we loved it so much and devoured the whole thing rather quickly. I do believe it will become a Christmas tradition here!
This recipe is from the Hershey company and can be found here. My only changes were to halve the amount of salt because I thought 1 teaspoon sounded like too much and to bake in a pair of round cake pans.
Hershey's Red Velvet Cake
1 stick butter, softened
1 1/2 C sugar
2 eggs
1 t vanilla extract
2 C flour
1/2 t salt
1/3 C cocoa powder
1 C buttermilk (or 1 C milk with 1 T vinegar added and allowed to sit 10 minutes)
1 oz bottle red food coloring
1 1/2 t baking soda
1 T white vinegar
Heat oven to 350 and grease 2 round 8 or 9 inch cake pans. I used nonstick pans and Baker's Joy spray, my cakes came out of the pans perfectly after cooling!
Beat together butter and sugar, then beat in eggs and vanilla extract. In another bowl, stir together flour, salt, and cocoa powder. In a measuring cup, stir together buttermilk and food coloring. Beat in a third of the dry ingredients, then a third of the buttermilk mixture, and repeat until both have been completely incorporated into the batter and batter is smooth. Add baking soda and vinegar, then mix thoroughly.
Evenly divide batter between pans and bake until a toothpick inserted into the center of each cake comes out clean, about 20 to 30 minutes. Allow cakes to cool completely before frosting with cream cheese frosting.
Saturday, December 15, 2012
Olive and Caper Tomato Sauce
As much as I love tomato based sauces and pasta (as evidenced by the large number of this kind of recipe on my blog!), I am kind of particular about tomato sauce. In my experience, usually they have to cook for a long time to be very good. Over the years I have tried many quick recipes and they nearly always end up kind of blah. Not bad by any means, but lacking character and any level of deep or complex flavor. What I usually do is make up a great big batch of bolognese sauce or meatless marinara and freeze it since they take quite a while to make and it's easy to make big batches.
This recipe, however, is a sauce that only takes about half an hour to make (chopping time included) and is really, really good! How can it not be when it's full of olives and capers, then simmered until thick? I got this recipe from Giada de Laurentiis' book Everyday Italian and have made it several times over the past couple of years. The recipe is called "Spicy Tomato Sauce" in her book and is apparently her version of arrabbiata sauce, but it honestly does not seem spicy to us at all with just a big pinch of red pepper flakes for heat. It's really good though without being hot and you can add as much pepper flakes as you want. Even olive haters may be alright with this one. My husband only likes plain black olives you buy in a can, but he enjoys the salty, briny flavor of kalamata olives and capers in this recipe. This sauce is astonishingly good, as good as any sauce I've had that was simmered all day. As another bonus, you can keep the ingredients on hand and whip it up really quickly!
Quick note: This is a great choice for a vegan meal if you use eggless pasta and don't add any parmesan.

Olive and Caper Tomato Sauce
3 T olive oil
1 small onion, chopped finely
2 cloves garlic, minced
1/2 C pitted kalamata olives, chopped coarsely
2 T drained capers
large pinch of red pepper flakes (or more if you like it spicy!)
salt to taste (recipe calls for 1/2 t but canned tomatoes, olives, and capers are already salty)
28 oz can crushed tomatoes
Heat olive oil over medium high and saute onion until it begins to brown, then add everything but the crushed tomatoes. Saute for a minute or two, then stir in the tomatoes. Reduce the heat and simmer, stirring occasionally, until thickened, about 20 minutes. Serve over your favorite pasta, we like linguine. A sprinkle of parmesan on top does not hurt!
Yield: 4 to 6 servings
Friday, December 14, 2012
Raspberry Almond Shortbread Thumbprint Cookies
I absolutely love making all kinds of cookies and treats during the Christmas season, and this is the recipe I picked to kick things off! It is from AllRecipes and is virtually unchanged. Only difference is I did not make the glaze. Mine may not have turned out super pretty, but they taste like they were sent down from cookie heaven. The tart, sweet, kind of gooey (but not wet) jelly in the middle of the cookie goes perfectly with the sweet, mild, slightly almond flavored cookie. They are proof that simple things are often the best as they only have 5 ingredients and are really quick and easy to make! Also, to my surprise, the cookies are still fantastic several days after they were baked. The jelly center has not made the cookie soggy at all and the cookie part is still wonderfully crisp. If you like crunchy shortbread, these are a surefire hit! My husband is a purist when it comes to cookies, pretty much only likes his family's recipe for chocolate chip cookies, AND hates crunchy cookies, but he still liked these. Oh and they are an even tastier version of Pepperidge Farm Verona Cookies.
If you make these, my one tip is to use more jelly in the center than you think you will need. It will melt down in the oven and some of the liquid will boil off, so you need enough jelly. Other reviewers cautioned about making the thumb print too deep, but I did not run into any problems at all, and to make sure to bake the cookies until light golden so that the bottoms are cooked enough to stand up to the jelly.

Raspberry Almond Shortbread Thumbprints
1 C salted butter, softened
2/3 C sugar
1/2 t almond extract (can use more if you want them really almondy but we liked them as is)
2 C flour
about 1/2 C seedless raspberry jam or jelly (or another flavor if you prefer)
optional: about 1/4 C sugar to roll the dough balls in
Preheat oven to 350 and line cookie sheets with parchment paper (the parchment paper is important in case you have jelly overflow!). Cream together the butter, sugar, and almond extract, then stir in the flour, being careful not to over mix. Form dough into 1 1/2 inch balls, roll balls in granulated sugar if desired, and place 2 inches apart on the prepared cookie sheets. Carefully make a large thumb print (not too deep!) on each dough ball and fill the thumbprint with jelly. Bake until cookies are light golden and center is bubbling, about 15 to 20 minutes. Let cool completely before tasting as that jelly is molten! When cookies have cooled, stack them in an airtight container. They will stay fresh for at least several days.
Yield: About 28 to 36 cookies (I got 28, the original recipe says 36)
Tuesday, November 20, 2012
Black Bean, Corn, and Potato Burritos
This burrito filling is something I just tossed together for dinner
using ingredients in the fridge and pantry that I'm trying to use up in
preparation for all the Thanksgiving leftovers. It's very simple and
may sound boring, but it's surprisingly good! My husband declared them
to be magical because the ingredients on their own are kind of plain,
but they combine to make something really tasty. This is also a VERY
cheap vegetarian or vegan meal, especially if you serve them with homemade tortillas and go easy on the array of burrito toppings. I
think it would also actually be good served as a sort of hash by leaving
the mixture in the skillet, pressing in some indentations, cracking
eggs into the indentations, replacing the lid, and cooking until the egg
is set. Yummy!
Quick note: You can easily use diced onion and garlic instead of the powders, I just didn't have any. Add the onion about halfway through the cooking time of the potatoes and add the garlic when the potatoes only have a couple of minutes left. Also, don't add any cheese if you want the burritos to be vegan!
Behold, my burrito with monterey jack cheese and salsa verde:

Black Bean, Corn, and Potato Burritos
2 medium-large baking potatoes (each about 12 oz)
2-3 T butter (can use olive oil to make it vegan)
16 oz can black beans, drained
2 C frozen corn
salt and pepper to taste
1/2 t chili powder
1/4 t cumin
1/2 t onion powder
1/4 t garlic powder
tortillas and your favorite burrito toppings
Wash potatoes and cut into small cubes, each about 1/3 inches wide. Melt butter in a large skillet over medium, add the potatoes, and toss to coat. Cover pan and cook, tossing every couple of minutes, for about 10 minutes or until the potatoes begin to soften. Remove lid and cook about 5 minutes more or until cooked through and nicely golden. Add salt and pepper to taste. Add drained beans, corn, and spices, and cook through. Taste and add more salt if necessary. Serve in tortillas with your favorite toppings.
Yield: about 6 servings
Tuesdays with Dorie: Best Ever Brownies
This week's recipe is for brownies! I have to admit that homemade brownies and I do not have a good track record and I've always been a die hard fan of brownie mix. It's the only dessert that I thought was better from a package than homemade. I've only tried making them from scratch a couple of times, and they were always exceedingly "blah." I've had other people's homemade brownies, too, and no matter how much they brag about them, they too are unremarkable, or at least not as good as the kind from a mix.
Well, my friends, all that has changed with this recipe for Best Ever Brownies! Theoretically we only have to make one Tuesdays with Dorie recipe each month and I already did mine for November, but since I have had exceedingly good results with all but one recipe from the Baking with Julia book, I decided to go for it! Absolutely no regrets because these really ARE the best brownies either of us have ever had. Rich, chocolaty, very fudgy, a little chewy, moist, and with that perfect crackled brownie top. They also stay good for several days, which is a bonus since we don't feel pressured to eat the entire pan in a day :oD I am also very happy at the prospect of leaving boxed brownie mix behind forever (or mostly, at least- I have a super easy PB Brownie Bites recipe I'll be sharing soon).
You can view the recipe over at A Beautiful Mess. The only change I made was to use all semisweet chocolate chips for the chocolate. It turned out delicious this way, but next time I will definitely use the unsweetened and bittersweet chocolates specified in the recipe so it will have even more chocolate flavor. I also had to bake the recipe a full 50 minutes, basically twice as long as the recipe said. This was a common issue other TWD people encountered. I'm certain my brownies were not overbaked- they were completely liquid at 25 minutes and it wasn't until 50 minutes that my toothpick came out gooey rather than covered with runny batter. To counteract this, I'd like to try baking the batter in a 9 by 13 pan since the brownies were quite thick anyway, and I will DEFINITELY grease the pan (the recipe said not to) since they stuck to the bottom some. Those little issues aside, this recipe is awesome and I will definitely make them again and again (and again)!

Saturday, November 17, 2012
Creamy Herb and Tomato Shell Casserole
Do you love cheese and noodles? That's probably a "yes" since you ended up at this blog! If you do, you would probably really like this recipe. It has tender shell noodles that curl around each other, and lots of creamy, cheesy, herby sauce studded with the occasional tomato chunk. If I may say, this is a restaurant quality pasta dish and is even prettier than the average casserole (not that you can tell from my photos!). It's funny because before I baked it, I wasn't sure how great it was going to be. The sauce mixed with the pasta tasted fine, but not amazing. Something magical happened in the oven, though. The flavors combined and mellowed- and ended up being something wonderful!
This is a recipe I kinda sorta thought up a couple of weeks ago and finally made last night. I say "kinda sorta" made it up because it was inspired by this Baked Macaroni and Cheese recipe from Food.com. If you take a peek at the original you can see that it is VERY different from what I actually made and I've basically made it unrecognizable! That's just what I do :oD I think it's different enough that I can call it my own recipe!
Quick note: The shells I used for this were bigger than normal. Certainly not as big as the kind you use for stuffed shells, but bigger than the ones I normally see. If you can find those, buy 'em, because they're perfect for holding all the yummy sauce!


Creamy Herb and Tomato Shell Casserole
1 lb shell pasta
4 T butter
3 cloves garlic, minced
1 t salt, plus more
1/2 t crushed red pepper flakes
2 t dried basil
1 t dried oregano
4 C milk, divided
4 T cornstarch
8 oz freshly grated parmesan, divided
8 oz grated monterey jack cheese (or mozzarella), divided
16 oz can Italian stewed tomatoes with some of the juice drained off
Preheat oven to 350 and grease a 9 by 13 baking dish. In a large pot of lightly salted water, boil pasta until just before al dente. It will continue cooking in the oven. Drain, return to pot, and cover.
While pasta cooks, melt butter in a medium sauce pan over medium heat and saute garlic until golden. Add seasonings and cook a few seconds. Add 3 1/2 C milk and heat almost to a simmer. In a measuring cup, stir together remaining 1/2 C milk and cornstarch until smooth. Stir into sauce and stir constantly until sauce thickens, then continue cooking and stirring for another minute. Remove from heat and stir in all but 1/2 cup of the parmesan until melted.
Add sauce to pasta and stir to coat. Taste and add more salt if if needs it (I ended up adding another teaspoon). Pour half of the pasta into the baking dish and top evenly with the stewed tomatoes and 1 cup of the monterey jack cheese. Top with remaining pasta, the rest of the parmesan, and the rest of the monterey jack.
Bake until lightly golden and bubbly, about 40 minutes. Let sit for 10 minutes before serving.
Yield: About 10 servings
Saturday, November 10, 2012
Cheater's Pie Crust
Are you really bad at rolling out pie crusts, or just don't like the hassle? And when it comes to pie, are you more interested in what's in the pie rather than the crust? If so, then this is the pie crust for you! If you're fantastic at making pie crusts and/or love traditional pie crust with a passion, you will probably want to pass on this recipe. It's not bad by any means- I wouldn't make it if it was a bad recipe- but it doesn't have the flaky thing going on that so many people love. It's more like a vaguely tasty delivery system for luscious pie filling and lets what's in the pie take center stage.
Now, to the recipe. I first made it with this pie from AllRecipes 10 years ago and have been making it ever since, with a few minor changes. If I'm making a pie with just 1 crust and a gingersnap or graham cracker crust won't cut it, or it's something savory like quiche, then this is the recipe I use.
Sorry there's not a picture of the plain crust, I meant to take one tonight but I forgot and went ahead and poured in the filling! Here's a picture of it once filled and baked though, you can see that it holds up just fine to being cut and served:

Cheater's Pie Crust
1 1/2 C flour
1 1/2 t sugar
1/2 t salt
1/2 C oil
2 T water
Place first 3 ingredients in a pie plate and toss with a fork to combine. Add oil and water and mix with the fork as much as you can, then dive in with your hands to finish mixing in the flour. Try not to over work it. Press some of the dough up the sides of the pan, then crumble the rest into little pieces evenly into the bottom of the pan. Press the dough down to form a solid crust without any holes or cracks. Proceed with your recipe as if it were a regular pie crust.
Thursday, November 8, 2012
Homemade Taco Seasoning
If you've never mixed up your own taco seasoning, you should really give it a try! I have been making it myself since I came across this recipe on AllRecipes a couple of years ago. If you have tacos a lot, you will save yourself quite a bit of money, especially if you buy spices in bulk. This mix also tastes better than packaged seasoning and doesn't have any weird ingredients. And if you need any more convincing, it doesn't take any more time to cook taco meat with this than the packaged kind. If you mix up a big batch of the seasoning, all you have to do when you're cooking the meat is measure out the taco seasoning, sprinkle on a little flour, add water, and cook and stir. Easy peasy! Oh, and great served on homemade tortillas.
This base recipe is pretty mild heat wise, though that will depend on your chili powder and other ingredients to some extent. It shouldn't be too hot for kids or people who don't like spicy. If you want it hotter, just add more cayenne! You can also leave out the salt (though I already cut down on the salt by 1/3 in the recipe I posted) or change any other ingredients. Maybe even add a smidge of cocoa powder. There are lots of options. Oh, and you can use this for things other than meat- I'll bet it would be good in chili or sprinkled on popcorn or french fries. In a couple weeks I plan to make roasted cashews sprinkled with this taco seasoning. Yum!
Seasoning all mixed up:


Homemade Taco Seasoning
4 T chili powder
3 1/2 T paprika
3 T cumin
2 T onion powder
2 T garlic powder
4 t salt
1/4 t cayenne pepper
Place ingredients in a glass jar, put on the lid, and shake to mix. To make taco meat, brown 1 lb ground beef or turkey in a large skillet. Drain off fat. Sprinkle on 2 T taco seasoning and 1 scant T flour (about 3/4 T). Stir well until meat is coated, then add 3/4 C water and cook, stirring, until liquid has thickened, about 2 minutes. Serve however you would regularly serve taco meat.
Yield: Enough taco seasoning for about 8 lbs of meat.
This base recipe is pretty mild heat wise, though that will depend on your chili powder and other ingredients to some extent. It shouldn't be too hot for kids or people who don't like spicy. If you want it hotter, just add more cayenne! You can also leave out the salt (though I already cut down on the salt by 1/3 in the recipe I posted) or change any other ingredients. Maybe even add a smidge of cocoa powder. There are lots of options. Oh, and you can use this for things other than meat- I'll bet it would be good in chili or sprinkled on popcorn or french fries. In a couple weeks I plan to make roasted cashews sprinkled with this taco seasoning. Yum!
Seasoning all mixed up:

and cooked with ground turkey:

Homemade Taco Seasoning
4 T chili powder
3 1/2 T paprika
3 T cumin
2 T onion powder
2 T garlic powder
4 t salt
1/4 t cayenne pepper
Place ingredients in a glass jar, put on the lid, and shake to mix. To make taco meat, brown 1 lb ground beef or turkey in a large skillet. Drain off fat. Sprinkle on 2 T taco seasoning and 1 scant T flour (about 3/4 T). Stir well until meat is coated, then add 3/4 C water and cook, stirring, until liquid has thickened, about 2 minutes. Serve however you would regularly serve taco meat.
Yield: Enough taco seasoning for about 8 lbs of meat.
Tuesday, November 6, 2012
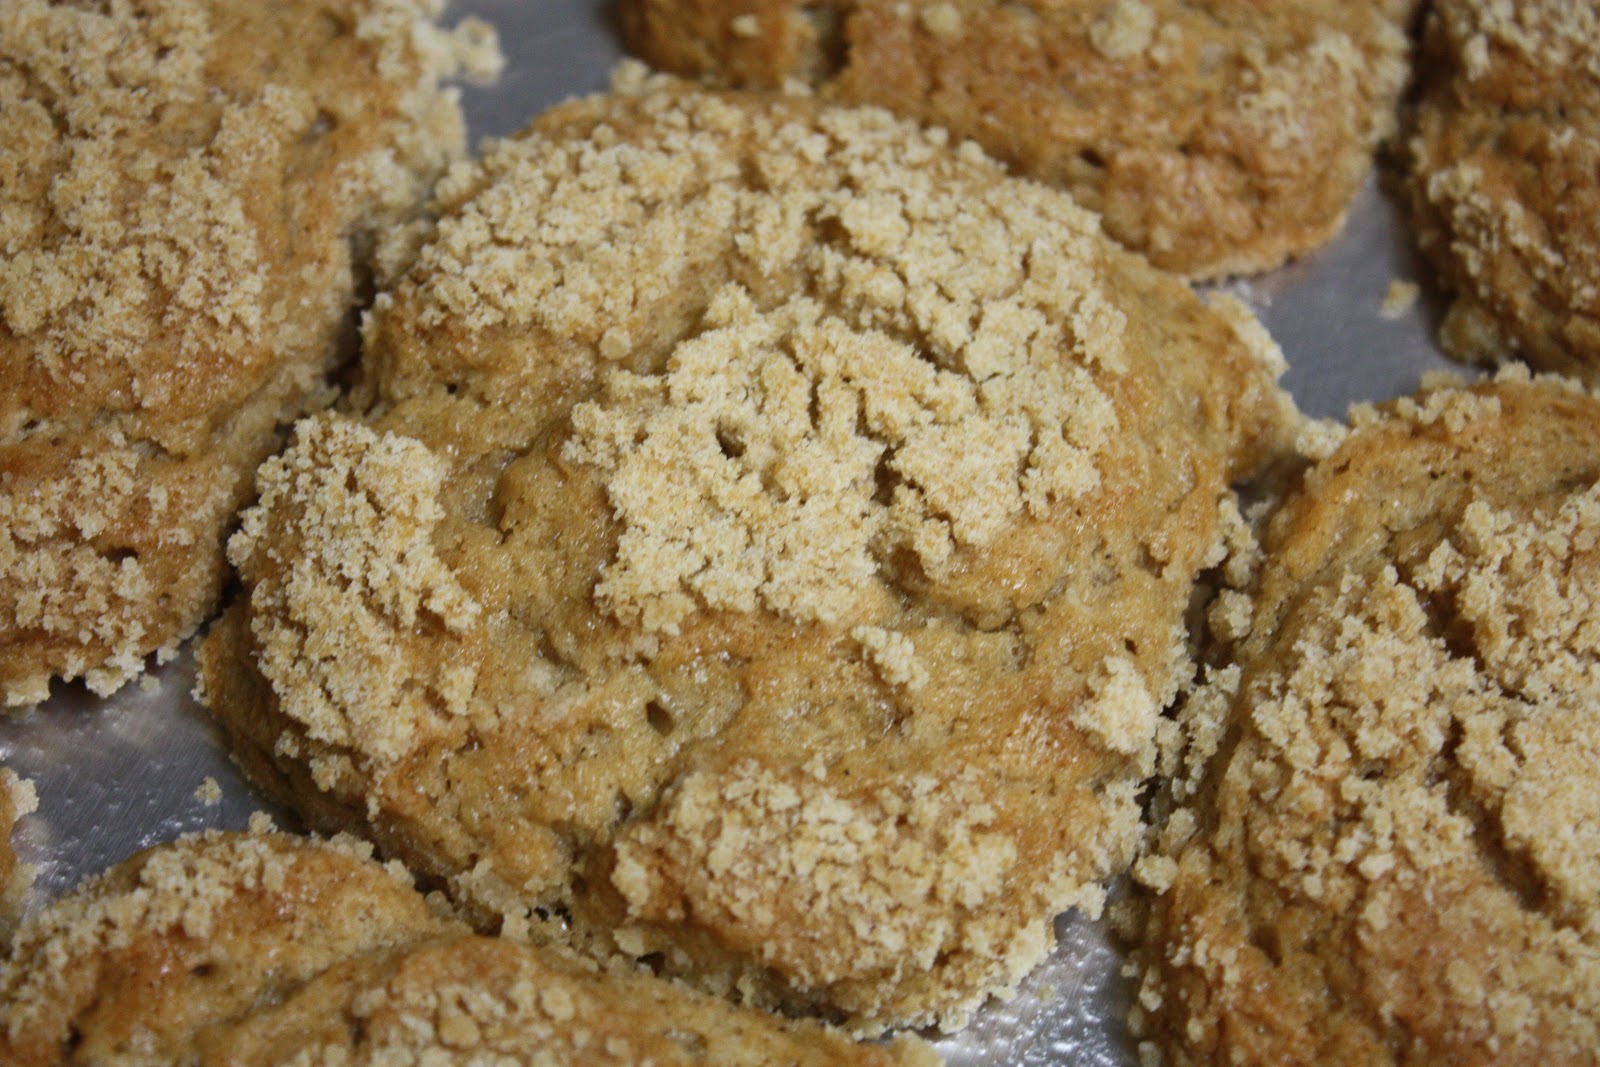
Tuesdays with Dorie: Buttermilk Crumb Muffins
This week's TWD recipe is for Buttermilk Crumb Muffins. The recipe is courtesy of Marion Cunningham, a lady who published several well known baking books. If you'd like to read the recipe, it's hosted over on the blog Easier Than Pie, and you can also watch Marion Cunningham and Julia Child make the recipe together here. Usually I'm not a fan of cooking shows, but I do enjoy watching the video for Tuesdays with Dorie recipes!
Now, to business. This was a pretty straight forward endeavor. I followed the recipe exactly and even mixed up the flour and brown sugar with my fingers like Marion in the video. Normally I don't like getting stuff on my hands but this was kind of fun! In the video, they get exactly 12 big muffins by filling the tins almost all the way to the top. I did the same and my batter loving husband ate what little batter remained, but really it would probably be just as well to make 16 or so muffins instead of 12.
This is what my muffins looked like- just like the video, huh?


Not the prettiest things, but know what? They sure were good! They taste very homey and old fashioned. The cinnamon and nutmeg are pretty mild and the brown sugar gives them a nice, full flavor. Perhaps not the most exciting muffins ever, but they were FAR from boring. They actually remind me quite a bit of the glorious Allspice Apple Crumb muffins, only without the apples, a slightly different flavor profile, a different type of crumb topping, and a lot less work. Admittedly, they are not on the same level as Allspice Apple Crumb muffins, but I can be a bit particular about muffins and I thought these guys were really yummy anyway. The only part I wasn't completely pleased with was the crumb topping. It tasted pretty floury and there wasn't a whole lot of it (though next time I could just set aside more!) and it wasn't as crumbly as some, but it was still nice and I think scooping out part of the mixture before adding the rest of the ingredients is part of the charm.
Oh, and sorry there isn't a picture of them out of the pan. For the love of muffins, use paper liners if you make this recipe! They didn't stick per se, it's just that they're so soft and fluffy that you end up tearing the tops off the muffins when you try to get them out. The original plan had been for me to send these to work with my husband, but I don't think his coworkers want to crowd around a muffin tin with spoons, so the muffins will be staying home with us.
Verdict: A repeat muffin for sure! Not an every day muffin what with all the shortening and sugar, but good for the occasional treat or to take along somewhere.
Now, to business. This was a pretty straight forward endeavor. I followed the recipe exactly and even mixed up the flour and brown sugar with my fingers like Marion in the video. Normally I don't like getting stuff on my hands but this was kind of fun! In the video, they get exactly 12 big muffins by filling the tins almost all the way to the top. I did the same and my batter loving husband ate what little batter remained, but really it would probably be just as well to make 16 or so muffins instead of 12.
This is what my muffins looked like- just like the video, huh?

Not the prettiest things, but know what? They sure were good! They taste very homey and old fashioned. The cinnamon and nutmeg are pretty mild and the brown sugar gives them a nice, full flavor. Perhaps not the most exciting muffins ever, but they were FAR from boring. They actually remind me quite a bit of the glorious Allspice Apple Crumb muffins, only without the apples, a slightly different flavor profile, a different type of crumb topping, and a lot less work. Admittedly, they are not on the same level as Allspice Apple Crumb muffins, but I can be a bit particular about muffins and I thought these guys were really yummy anyway. The only part I wasn't completely pleased with was the crumb topping. It tasted pretty floury and there wasn't a whole lot of it (though next time I could just set aside more!) and it wasn't as crumbly as some, but it was still nice and I think scooping out part of the mixture before adding the rest of the ingredients is part of the charm.
Oh, and sorry there isn't a picture of them out of the pan. For the love of muffins, use paper liners if you make this recipe! They didn't stick per se, it's just that they're so soft and fluffy that you end up tearing the tops off the muffins when you try to get them out. The original plan had been for me to send these to work with my husband, but I don't think his coworkers want to crowd around a muffin tin with spoons, so the muffins will be staying home with us.
Verdict: A repeat muffin for sure! Not an every day muffin what with all the shortening and sugar, but good for the occasional treat or to take along somewhere.
Saturday, November 3, 2012
Penne with Herbed Clam Sauce
This is a recipe I randomly came across last week in this thread. I've never cooked with clams and the one time I had clams with pasta, I didn't like it, but this recipe looked interesting and easy to make so I decided to give it a whirl! Happily, it turned out quite well and we both enjoyed how well the flavors of clam, shallot, white wine, thyme, and garlic melded together, especially for a sauce that doesn't cook long. My husband actually said it was one of his favorite things that I've made. It's also not too bad for you and ingredients that are easy to keep on hand. I think it will become a regular dinner here!
Quick Note: The original recipe calls for linguine, but I chose penne because when I serve a sauce that has small pieces in it with long pasta, the pieces inevitably all end up in the bottom of the bowl after the pasta is gone! Also, I didn't have fresh herbs, but I'm sure it would be yummier (and prettier!) with them.
Sorry this is so very ugly- I promise that it tastes good and the fresh herbs would brighten it up!

Penne with Herbed Clam Sauce
2 T butter
1 large shallot, chopped finely (about 1/2 C)
2 cloves garlic, minced
2 1/2 T flour
8 oz clam juice (1 bottle)
1/2 C white wine
10 oz can whole baby clams, undrained
2 t minced fresh thyme or 3/4 t dried thyme
1/4 C minced fresh parsley or 2 t dried parsley
3/4 t salt (or to taste)
1/2 t pepper
1/2 lb dried penne pasta
In a small pan, melt butter over medium heat. Add shallot and garlic and saute until softened and golden, about 5 minutes. Add flour and stir until incorporated. Stir in the clam juice, a small amount at a time, making sure the sauce is smooth between each addition. Add wine, clams, herbs, salt, and pepper. Simmer, stirring frequently, about 5 minutes. Toss with penne. Serve pasta with salad and fresh fruit.
Yield: 4 servings
Thursday, November 1, 2012
Graveyard Cake
Well, darn! So much for sharing several Halloween recipes. I attempted to make Candy Corn Pizza (less horrifying than it sounds, look here at Our Best Bites) but somehow or other after it baked, the mozzarella was the same color as the cheddar. Delicious, but unimpressive and not worth blogging about. Then I was going to make Spider Melt Sandwiches, but we ended up having pizza instead. Then on actual Halloween night, I wasn't feeling well so didn't make my standard Mummy Fingers. I have the ingredients for the spider sandwiches so will probably just make them anyway, and if they turn out well I will either post the recipe in a couple of days or wait until next year. The Mummy Fingers- which somehow escaped getting posted last year, too- will wait as well.
Hopefully this awesome cake will make up somewhat for the boring and unfestive spirit on the blog! Every Halloween, I want to make some kind of spooky dessert, and for some reason that dessert almost without fail ends up being Graveyard Cake or Graveyard Cupcakes. I figure it's pretty much tradition now, so decided to do it again this year! Usually I use a cake mix since it's the decorations that are the star, but this year I wanted to try something different and used the base for the Mississippi Mud Cake from the Cinnamon Spice and Everything Nice blog.
Poor Reeni will probably be horrified at what I did to her cake- left off the marshmallow/ganache/coconut/pecan/cherry topping and used just melted chocolate chips and food coloring tinted canned frosting (sorry, Reeni!), but I couldn't help myself! The cake looked so, so good and I wanted to make it immediately when I ran across the recipe a couple of weeks ago, but the only chocolate cake I was planning on making anytime soon was my traditional Halloween graveyard cake. Sadly, chocolate ganache and those other yummy toppings do not look like a graveyard, so I had to change things up a bit. Used just chocolate chips instead of the ganache because I wanted to safely store the cake at room temperature for a few days and ganache has cream in it, and purchased frosting simply because so far I have never, ever found a recipe for homemade vanilla frosting that I thought tasted okay (not a fan of the powdered sugar flavor). If you decide to make this cake, though, you are more than welcome to make both the ganache from the original recipe and homemade vanilla frosting, or you can jump over to the original recipe and make a Mississippi Mud Cake the way it was intended to be made!
Justifications aside, this is a really good cake. Reeni said her cake was dense and brownie-like, which is of course what I expected, but mine ended up being fluffy and soft and moist and perfect. The thin layer of chocolate on top really enhanced the chocolate flavor, and the frosting just made it even better. Next time I will definitely make the cake with the ganache and marshmallow fluff because I can only imagine it is amazing, too! And although I was quite happy with the amount of chocolate in the cake, real chocolate lovers could even use 3/4 C cocoa. My other favorite chocolate cake recipe (uh, the one on the box of Hershey's cocoa) uses 3/4 C cocoa for the same size cake so I don't see how it could be bad!
Update: Amazingly, this cake stayed yummy and moist for a solid week. Homemade cakes usually get stale really fast, but not this one! It will be my go to chocolate cake recipe now, no more boxed mix. The only reason I used the boxed mix anyway was because they stay good a lot longer.


Graveyard Cake
Cake:
1 C butter
1 C hot water
1/2 C cocoa
2 C sugar
2 C flour
1 t baking soda
1 t espresso powder (optional, I didn't have this and didn't want to buy it)
1/2 t salt
2 eggs
1/2 C sour cream
1 t vanilla extract
Topping:
about 1 C chocolate chips
1 jar vanilla frosting (or about 1 1/2- 2 C of your favorite vanilla frosting recipe)
green and black food coloring
Milano cookies
pumpkin shaped candy corn
about 5 Oreo cookies, pulverized in a blender
Preheat oven to 350 and grease a 9 by 13 baking dish. Place butter in a medium bowl and microwave until melted. Stir in hot water and cocoa powder. Set aside. In a mixing bowl, mix together sugar, flour, baking soda, optional espresso powder, and salt. Pour in cocoa mixture and mix just until combined. Add eggs, sour cream, and vanilla extract, and beat just until smooth. Don't over mix. Pour batter into prepared baking dish and bake until a toothpick inserted into the center comes out clean, about 30 minutes.
As soon as the cake is done, pour the chocolate chips on top. About a cup is good, you can just eyeball it and use more if you want, but keep in mind a thick layer will be harder to stick the tombstones through! Place cake back into oven and let the chocolate chips melt for a minute or two. Make sure not to walk away or you risk doing horrible things to the chocolate chips! When the chips have melted enough, they will look very shiny. Remove the cake from the oven and do one of my all time favorite kitchen activities: Evenly spread the melted chocolate over the surface, while imagining the opening credits of Willy Wonka and the Chocolate Factory and humming "The Candy Man Can" and wonder why you don't melt chocolate chips onto things more often just so you can spread it around. After you finish having fun, set the cake aside and let it cool completely before decorating.
To decorate, place a couple tablespoons of frosting into a small plastic bag and add a bit of black food coloring. Squish it around to mix, snip off the very tip of a corner of the bag, and pipe "RIP" (or whatever you want) onto the cookies. Alternatively, you could probably use more melted chocolate chips for this. Set the cookies aside and mix the frosting with green food coloring. Spread over cake, then use a spoon to make the frosting look like grass by touching a spoon against the surface of the frosting and pulling upwards. Do this all over the cake. Carefully press the tombstone cookies down through the layer of chocolate, then sprinkle Oreo crumbs in front to look like freshly turned soil. Place candy corn pumpkins around tombstones. Enjoy!
Yield: About 16 servings
Friday, October 26, 2012
Worms and Blood
It's that time of year again! The time when I make all kinds of weird, creepy looking food (with gross names) in the spirit of Halloween and my sweet husband happily eats it all anyway. I am definitely still a kid at heart and really enjoy making spooky food. Last year, I made such delights as chocolate oatmeal with ghosts for breakfast, deviled eyes as a snack, and for dinner vampire bat legs with maggots, serpentine stromboli, and baked mice. Dessert was honey caramel apples, which is not remotely creepy but still very festive.
Some of these I plan to make again this year because they were so good, but of course I had to find some new fun recipes for this year! To kick things off, I made the horrifying but yummy Worms and Blood. Found the idea last year on Our Best Bites (go check out their blog if you want even more great Halloween food ideas). Okay, so the worms are just sliced hot dogs and the blood is barbecue sauce. The effect is pretty spooky though and it tastes quite good. I used homemade barbecue sauce, but you can use whatever kind you want. Enjoy!

Worms and Blood
8 hot dogs
1/2 T butter
1/2 C barbecue sauce
Slice each hot dog lengthwise into 8 pieces so they're long and skinny like worms. Heat the butter in a skillet over medium-high and add the hot dogs. Saute, stirring frequently, until the hot dogs curl up and get a little browned. Reduce the heat and add the barbecue sauce, stirring until it's heated through. Serve on hot dog buns.
Yield: About 6 sandwiches, depending on how much you put on each bun. They reheat well, or you can very easily cook less hot dogs and just use less BBQ sauce.
Sunday, October 21, 2012
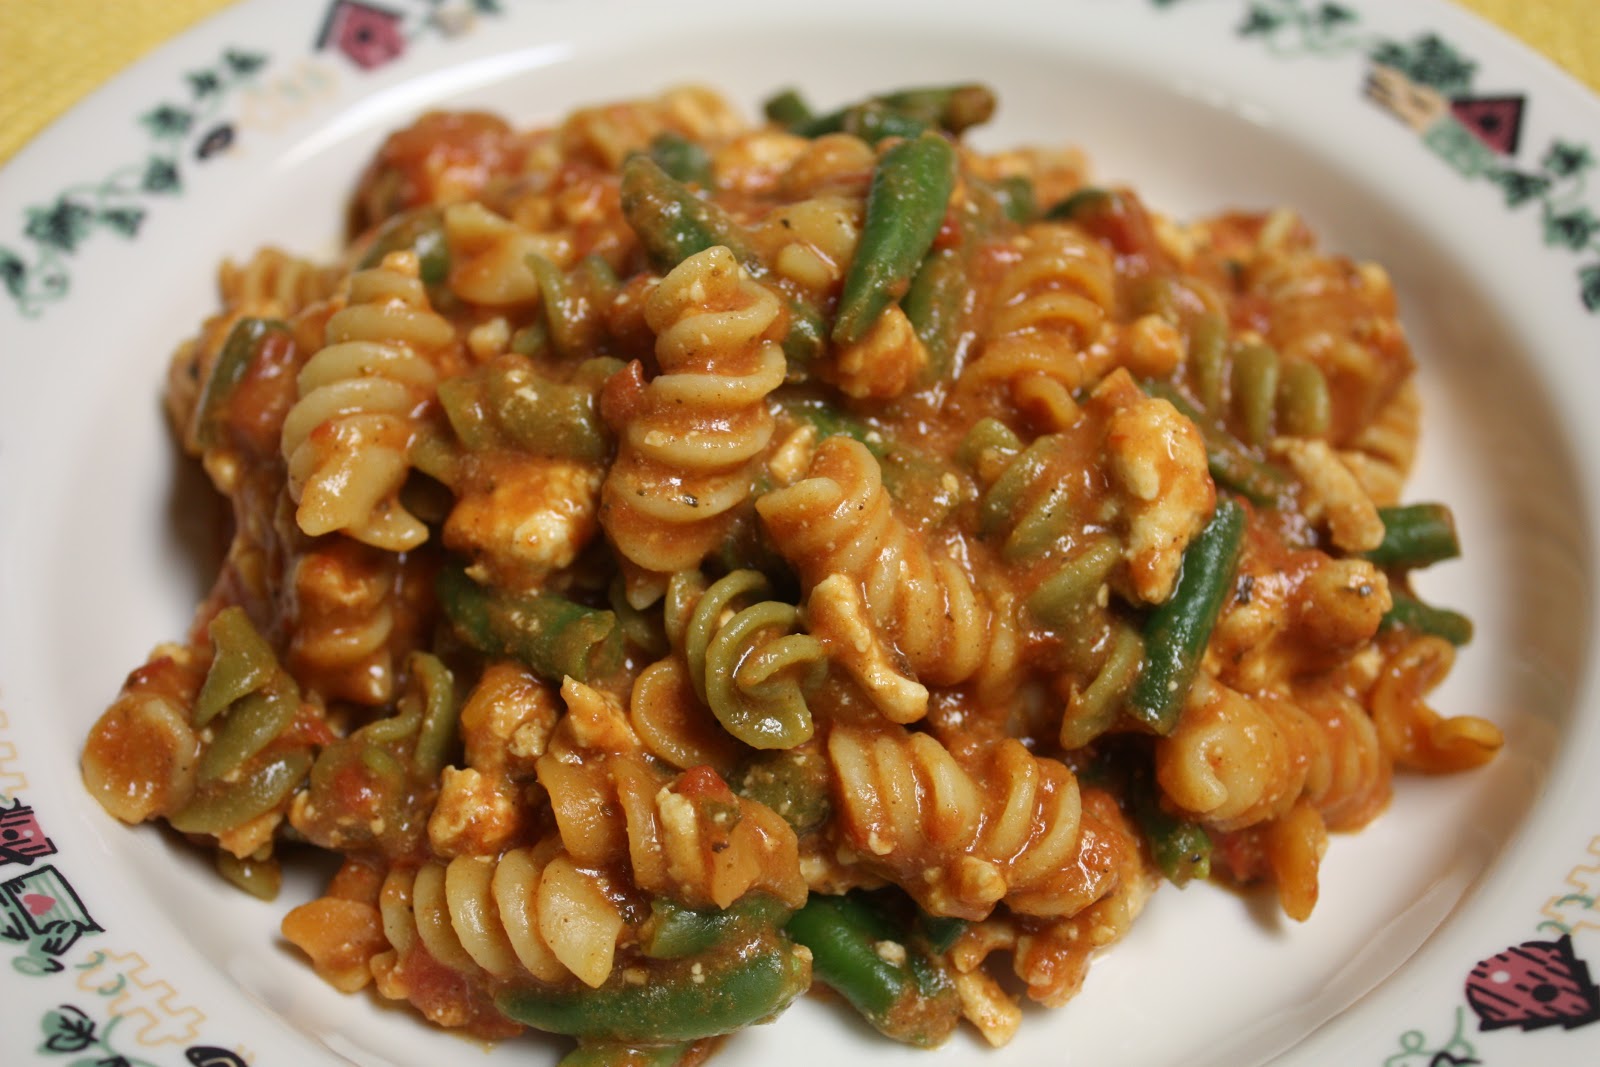
Greek Pasta Skillet
Okay, so this isn't really Greek- it's more Greek inspired and I'm willing to bet anyone from Greece would be horrified at how unauthentic it is- but it sure tastes good! The recipe is from McCormick and my mom's best friend printed out a copy for me to try about 10 years ago. I made it soon after and my mother and I both liked it a lot! Over the years I've made it for several people and they've all liked it, too. A friend of mine who never eats leftovers was even excited to have it again the next night. It looks like your standard quick 1 dish dinner recipe, but the addition of ground cinnamon and feta cheese really set it apart. If you're suspicious of the cinnamon or especially sensitive to spices, you can try halving it, but I do encourage you to at least use some cinnamon as it really does a lot for the flavor. This is a slightly tweaked double batch of the original recipe so it makes a lot (I make a big batch because we like it so much and it freezes well), but if you don't want lots of leftovers, just use the amounts in the original recipe to guide you.
Sorry about the rotini pasta in the photo. I've made this recipe many times and have always used penne, but ended up with tricolor rotini this one time! It was good, but penne holds up better against everything else going on in the dish.

Greek Pasta Skillet
1 T oil
1.25 lb package extra lean ground turkey
4 C chicken broth
28 oz can crushed tomatoes
6 oz can tomato paste
4 t oregano
2 t cinnamon
1 t onion powder
1 t garlic powder
12 oz by weight penne pasta (or whatever shape you want, I prefer penne)
1 lb frozen green beans
6 oz crumbled feta by weight
Heat oil in a large skillet over medium. Crumble in ground turkey and cook until browned, stirring frequently. Stir in tomato products and spices until well combined, then stir in pasta. Reduce heat and simmer over low, stirring occasionally, until pasta is almost done, about 10 minutes. Remove lid and stir in green beans and feta. Simmer, covered, until beans and pasta are tender.
Yield: 10 servings
Sorry about the rotini pasta in the photo. I've made this recipe many times and have always used penne, but ended up with tricolor rotini this one time! It was good, but penne holds up better against everything else going on in the dish.
Greek Pasta Skillet
1 T oil
1.25 lb package extra lean ground turkey
4 C chicken broth
28 oz can crushed tomatoes
6 oz can tomato paste
4 t oregano
2 t cinnamon
1 t onion powder
1 t garlic powder
12 oz by weight penne pasta (or whatever shape you want, I prefer penne)
1 lb frozen green beans
6 oz crumbled feta by weight
Heat oil in a large skillet over medium. Crumble in ground turkey and cook until browned, stirring frequently. Stir in tomato products and spices until well combined, then stir in pasta. Reduce heat and simmer over low, stirring occasionally, until pasta is almost done, about 10 minutes. Remove lid and stir in green beans and feta. Simmer, covered, until beans and pasta are tender.
Yield: 10 servings
Saturday, October 20, 2012
Chocolate Ice Cream
If you love ice cream and have never had homemade, I really suggest that you invest in your very own ice cream maker. I am honestly rather skeptical when people wax poetic about how much better homemade everything is because that often simply is not the case much for many things. Homemade salsa? Yum, definitely better than the jar! Homemade bagels? Good maybe, but difficult to make as well as a great bagel bakery, plus they take a ton of time and effort. I'd rather leave the bagel making to the professionals. However, ice cream is one of those things that really IS better when made at home. As much as I love Ben and Jerry's, it doesn't compare to fresh, homemade ice cream.
When I was growing up, we had a hand crank one and every once in a while made a batch, which was of course a ton of fun for a little kid. Then when I was in high school, Amazon.com was having a big sale on Cuisinart ice cream makers and I convinced my mom that it was time for an upgrade. Her favorite food is ice cream so not much convincing was necessary! I can't remember ever having a batch turn out poorly. I made regular flavors like chocolate, but also coconut cream ice cream and kiwi sorbet. You can even use an ice cream maker to make slushies using any liquid. 7Up with a bit of coconut extract added is my favorite! Sadly, I hadn't made any ice cream since I moved out of my mom's house 7 years ago as she was unwilling to part with it, but my husband's parents gave us a Cuisinart ice cream maker just like the one my mom has. Our ice cream maker is great and I highly recommend it, though there's a new model out that comes in all manner of beautiful colors.
For the first recipe in our ice cream maker, I decided to go with good ol' chocolate since my husband is a complete chocolate fiend. I slightly altered this recipe I found on AllRecipes- added more chocolate and strained the mixture to make completely sure the finished product wouldn't have lumps- and it is just perfect. Creamy, rich, deep flavor, and chocolaty but not overwhelmingly so. The vanilla adds a wonderful touch. It is quite easy to make, too, so a great recipe if you've never made ice cream before! You can either serve it fresh from the ice cream maker, in which case the texture will be more like soft serve (which is how I prefer it!):

Or you can scoop the ice cream into a container and freeze it for a few hours until it's firmer and scoop it up then (how my husband preferred it):

Either way, you can't go wrong with this recipe! We will definitely have it again and I am really looking forward to experimenting with new recipes. Up next will be either cake batter ice cream (again, for my husband), cherry ice cream, ginger ice cream, or mint cookies and cream ice cream. So many choices!
Chocolate Ice Cream
3 egg yolks
3/4 C sugar
2 T cocoa powder
1/4 t salt
1 C milk
3 oz (by weight) semisweet chocolate chips
2 C heavy cream
1 t vanilla extract
Beat egg yolks with a fork in a 1 C measuring cup, set aside. In a small saucepan, whisk together sugar, cocoa powder, and salt. Whisk in milk. Heat over medium, whisking constantly, until mixture comes to a simmer. Remove from heat and quickly whisk about a tablespoon of the mixture into the beaten egg yolks. Once incorporated, whisk in another tablespoon, then another, then start whisking in slightly large additions. Continue until you have 3/4 C of egg yolk mixture. Briskly whisk egg yolk mixture back into pan. Return to stove and heat over medium low, whisking constantly, until slightly thickened- about 2 minutes. Don't let the mixture boil. Remove pan from heat and set aside for a minute so it can cool slightly, then whisk in the chocolate chips. Pour mixture through a fine mesh sieve and refrigerate until completely cooled, about 2 hours. When you're ready to make the ice cream, whisk in the heavy cream and vanilla extract. Freeze mixture according to the directions for your ice cream machine.
Yield: 6 servings
Tuesday, October 16, 2012
Applesauce Drop Cookies with Browned Butter Icing
This is another recipe from the Betty Crocker Cooky Book, and just
perfect for autumn. I've been planning to make it for months and have
actually set out the ingredients on the counter a few days ago before
finally making them yesterday. We had our first snow yestday, about 2
inches of light fluff. Living in Alaska means you have to accept the
fact that you'll be surrounded by snow for 7 months of the year, and I
have to admit that I was a bit happy to see it again!
In any case, these soft, spicy cookies were the perfect treat to make in honor of the first snow of winter. They are very cakey-- to the point that you could probably make some fantastic cupcakes with no changes to the recipe-- and the dough is more like a thick batter. While the applesauce flavor is not really apparent, it does make them very moist. Another blogger described these cookies as being "senior citizen cookies", which I thought was so funny! Especially since they are extremely similar to Pumpkin Spice cookies, a lifelong favorite of mine that were incidentally the only cookies I would eat as a child. So much for being old! They are delicious and a great choice if you love spices like cinnamon and cloves as much as me, regardless of your age. Also, while the cookies are very good on their own, the addition of the creamy vanilla frosting with a hint of browned butter makes them even better. Last of all, this recipe is a good choice if you need spur of the moment cookies since you don't need to let any cold ingredients warm up and don't need to mess with rolling out cookie dough or forming balls.
As usual for me, I changed the recipe quite a bit. The original called for coffee and well drained applesauce, but I chose to leave out the coffee and use regular applesauce. It also called for chopped nuts (which you are free to add if you feel so inclined), 1/2 t less cinnamon, and 1/2 t more nutmeg. I do like nutmeg, but unlike cinnamon I think it's best in small amounts and the 1/2 t I used was just right. The recipe also said and to refrigerate the dough for 2 hours before baking. I wanted to see how they would turn out without being refrigerated so just went ahead and baked them and they turned out perfect, each cookie about half an inch thick. Wouldn't really want them any thicker! Also, don't know what this says about me, but the recipe made half as many recipes as it said it would and I needed twice as much of the icing. Come to my house if you want to get sugared up.
As a side note, I just realized that all of the recipes from the Cooky Book that I've shared on the blog so far have been drop cookies! Kind of odd since I really don't make drop cookies very often. Guess I need to pick another section of the book next time! In my defense, I've actually made 2 non-drop cookies from the Cooky Book so far and just haven't shared them on the blog yet. As tempting as Orange Drop Cookies and Pineapple Drop Cookies look to me, I think next I will try Oatmeal Coconut Crispies. Yum.

Applesauce Drop Cookies
1 C shortening
2 C packed brown sugar
2 eggs
2 C applesauce
3 1/2 C flour
1 C golden raisins
1 t salt
1 t baking soda
1 1/2 t cinnamon
1 t cloves
1/2 t nutmeg
Preheat oven to 400 and line cookie sheets with parchment paper. Mix together shortening, brown sugar, and eggs until smooth, then mix in applesauce. Add other ingredients and mix just until well combined. Drop dough by tablespoons onto cookie sheets, with 2 inches between cookies. Bake until set and lightly golden, about 9 to 12 minutes. Let cookies cool on sheets for 10 minutes, then cool completely on cooling racks. Whether or not you choose to add the icing, store the cookies between layers of wax paper in the refrigerator.
Yield: 4 dozen medium sized cookies (you will of course get more if you make small cookies, which I do not!)
Browned Butter Icing
5 T butter
3 T cream (could probably use milk)
1 1/2 t vanilla extract
about 2 1/2 C powdered sugar
Melt butter in a small sauce pan over medium-low heat, stirring constantly once it melts. You want to brown the butter slowly, over a low heat, and in a small pan stirring all the while so it doesn't burn. Cook until the butter becomes light brown. Immediately remove from heat and stir in the cream, then the vanilla extract. Stir in powdered sugar until you have icing that is thick enough to spread easily but is not drippy. Immediately spread icing on cooled cookies and let set completely before you put the cookies away.
Tuesday, October 9, 2012
Dirty Rice with Turkey Sausage
When I was a kid, I was a very picky eater. Not so much with veggies or grains, but with dairy and especially meat. This meant that I didn't like much of what my mom served for dinner and I was often happy to just eat rice and veggies while everyone else ate the meat. Without fail, I topped my rice with Messina's Cajun Creole Seasoning, which my dad brought home from a trip to New Orleans. I just loved Messina's! That was 17 years ago and while I'm now much less picky, I still love Messina's. Lucky for me, my dad now lives in Louisiana so I can pick up jars of Messina's whenever I visit.
Now that my little story is out of the way, on to the recipe! This is a thoroughly tweaked version of Christy Jordan's Dirty Rice over on Southern Plate. Don't get me wrong- the original version is really good (if not authentic, since it's supposed to be made with chicken gizzards), but I'm not a fan of sausage and it turned out SO GREASY! So the next time I decided to use ground turkey seasoned with spices you'd find in sausage. Then the next time I figured out that you can just cook the rice in the skillet with the turkey, cutting down on dishes. If you're in a hurry though, you can steam the rice in the chicken broth while you cook the peppers and turkey. It's up to you! Also, feel free to use fresh bell pepper and onion (one of each). I went with frozen because it was $1.50 for a 12 oz bag and whole bell peppers were $3 apiece.
For the Cajun seasoning, you can use whichever you like, but how much you enjoy the finished dish will of course depend on how much you like the seasoning. My husband likes Messina's, too, so we both really enjoy this dinner. It's very yummy, easy, and pretty healthy to boot. Perfect with a salad on the side!
 Dirty Rice with Turkey Sausage
1 T olive oil
12 oz frozen onion and bell pepper strips
1 stalk celery, diced (optional)
1 1/4 lb extra lean ground turkey
3 cloves garlic, minced
1/2 t salt
1/2 t pepper
1/2 t ground ginger
1/2 t dried sage
1/2 t dried thyme
1 t dried parsley
3 C chicken broth
1 1/2 C uncooked rice
Cajun seasoning to taste
Heat olive oil in a large nonstick skillet over medium high. Saute onions, peppers, and celery until browned. Remove to a bowl. Add ground turkey to skillet and immediately sprinkle on the garlic and spices. Use a spatula to break up the raw meat and to incorporate the spices. When turkey has cooked fully, add the chicken broth and bring to a boil. Add rice, stir well, cover, and reduce heat to low. Let cook completely undisturbed (don't lift the lid!) for 20 minutes so the rice can steam properly. When rice is cooked, add peppers back to the skillet and stir to combine, then add Cajun seasoning to taste (I use 1 1/2 t) and mix thoroughly before serving.
Yield: 6 servings
Now that my little story is out of the way, on to the recipe! This is a thoroughly tweaked version of Christy Jordan's Dirty Rice over on Southern Plate. Don't get me wrong- the original version is really good (if not authentic, since it's supposed to be made with chicken gizzards), but I'm not a fan of sausage and it turned out SO GREASY! So the next time I decided to use ground turkey seasoned with spices you'd find in sausage. Then the next time I figured out that you can just cook the rice in the skillet with the turkey, cutting down on dishes. If you're in a hurry though, you can steam the rice in the chicken broth while you cook the peppers and turkey. It's up to you! Also, feel free to use fresh bell pepper and onion (one of each). I went with frozen because it was $1.50 for a 12 oz bag and whole bell peppers were $3 apiece.
For the Cajun seasoning, you can use whichever you like, but how much you enjoy the finished dish will of course depend on how much you like the seasoning. My husband likes Messina's, too, so we both really enjoy this dinner. It's very yummy, easy, and pretty healthy to boot. Perfect with a salad on the side!

1 T olive oil
12 oz frozen onion and bell pepper strips
1 stalk celery, diced (optional)
1 1/4 lb extra lean ground turkey
3 cloves garlic, minced
1/2 t salt
1/2 t pepper
1/2 t ground ginger
1/2 t dried sage
1/2 t dried thyme
1 t dried parsley
3 C chicken broth
1 1/2 C uncooked rice
Cajun seasoning to taste
Heat olive oil in a large nonstick skillet over medium high. Saute onions, peppers, and celery until browned. Remove to a bowl. Add ground turkey to skillet and immediately sprinkle on the garlic and spices. Use a spatula to break up the raw meat and to incorporate the spices. When turkey has cooked fully, add the chicken broth and bring to a boil. Add rice, stir well, cover, and reduce heat to low. Let cook completely undisturbed (don't lift the lid!) for 20 minutes so the rice can steam properly. When rice is cooked, add peppers back to the skillet and stir to combine, then add Cajun seasoning to taste (I use 1 1/2 t) and mix thoroughly before serving.
Yield: 6 servings
Wednesday, October 3, 2012
Ham & Cheese Hedgie Bread
I've seen this type of bread around the internet under the names hedgehog bread, bread pulls, and blooming bread. Whatever you want to call it, one thing is certain: it is DELICIOUS! I mean really, really good; perfect for an occasional treat or a fun appetizer for a small group. The bread has interested me ever since I saw it over at The Girl Who Ate Everything, and this is my spin- I kind of combined her Bloomin' Onion Bread and her Ham and Cheese Sliders recipes. Even though I made this back in May and just hadn't posted it yet, looking at the picture makes me want some RIGHT NOW!

Ham & Cheese Hedgie Bread
8 oz mini sourdough bread boule (California Goldminer Sourdough is what I used)
4 oz shaved ham, cut into 1 inch squares (I used sundried tomato rosemary ham)
4 oz thinly sliced cheddar, cut into 1/2 inch strips
3 T thinly sliced green onions
4 T butter
1 1/2 t poppy seeds
2 t dijon mustard
1/4 t Worcestershire sauce
Preheat oven to 350 and place a large piece of aluminum foil on a baking sheet. Cut bread to look like a hedgehog, going first one direction, then the other, and being sure not to cut all the way through the bottom crust. A serrated knife works best for this. Place sliced loaf on the baking sheet. Stuff in cheese (you may need to break the pieces more), then ham, then sprinkle on green onions, then spoon on butter mixture. Wrap with the foil. Bake covered 10 minutes, then unwrap and bake 10 minutes more, or until cheese is melted and bread is light golden. Serve immediately with lots of napkins, but watch out for burned fingers!
Yield: about 6 servings
Fruit Pizza
It's recipe catch up time! This is a recipe I kind of made up this past summer. I say "kind of" because fruit pizza is hardly a unique concept, but I did use my own recipe for the crust and the cream cheese filling. In any case, this is a very yummy, easy, pretty, and summery dessert! A sugar cookie spread with lemony cream cheese and topped with fresh fruit. What's not to like?! You can use pretty much any fruit you want on top.

Fruit Pizza
Crust:
2/3 C shortening
3/4 C sugar
1 egg
1/2 t vanilla extract
1/2 t lemon extract
2 C flour
1 1/2 t baking powder
1/4 t salt
Filling:
8 oz cream cheese, softened
1/2 C sugar
1/2 t lemon extract
1/4 t vanilla extract
Topping:
sliced fruit of your choice (I used blueberries, kiwi, mango, papaya, and pineapple)
Preheat oven to 375 and lightly grease a 12 inch springform pan. Cream together shortening and sugar until fluffy, then beat in eggs and extracts until smooth, pausing to scrape down the sides of the bowl. Add flour, baking powder, and salt, and mix just until combined, being sure not to over mix. Evenly press the dough in the bottom of a springform pan, building up the edges a bit. Bake the crust until lightly golden, 10 to 15 minutes. Let cool completely. You can stick it in the refrigerator to speed things along.
When the crust has cooled, make the filling. Beat together the filling ingredients until smooth, then spread on top of the crust. If you're going to serve it immediately, top with the fruit and serve. If you're going to serve it later, just cover the pan with plastic wrap (leave the sides of the pan attached to the base!) and add the fruit soon before serving. You can add the fruit a few hours ahead of time and it will be okay, but the fruit releases some juice so it's ideal to wait if you can.
Yield: about 12 servings
Quadruple Peanut Butter Cookies
Ohhhh gosh. If you love peanut butter as much as I do, you MUST make these cookies as soon as humanly possible. This is my version of a recipe from Sally's Baking Addiction and produces soft, thick, super peanut buttery cookies filled with peanut butter cups AND peanut butter chips AND Reese's Pieces (my addition). The Reese's Pieces add even more peanut butter flavor, a little bit of crunch, and make them prettier.
These cookies are simply amazing. My husband has a strong preference for chocolate chip cookies and isn't wild about peanut butter cookies, but even he loves these. I consider myself to be a bit of a peanut butter cookie connoisseur and I think they're pretty perfect. The recipe also doubles very well, just go on and dump the whole 10 oz bag of PB chips in if you go that route.
Quick note: The original recipe says to refrigerate the cookie dough for half an hour. I have never done that with this recipe and they turn out very plump anyway, to the point that I flatten them ever so slightly before baking and they're still nice and thick.

Quadruple Peanut Butter Cookies
1/2 C butter
1/2 C brown sugar
1/4 C sugar
1 egg
3/4 C peanut butter
1 t vanilla extract
1/2 baking soda
1 1/4 C flour
3/4 C peanut butter chips (in the baking aisle)
3/4 C coarsely chopped peanut butter cups (about 6 regular sized PB cups)
1/4 C Reese's Pieces, plus another 3/4 C or so to put on top
Preheat oven to 350 and line cookie sheets with parchment paper. Cream together butter and sugars. Beat in egg, peanut butter, and vanilla extract until smooth. Mix in baking soda and flour, being careful not to over mix. Stir in peanut butter chips, peanut butter cups, and the 1/4 C Reese's Pieces.
Form dough into walnut sized balls and place 1 1/2 inches apart on cookie sheets. Press 5 Reese's Pieces into the top of each cookie dough ball and very gently flatten with your palm to help the candy stick. Bake until lightly golden and set, about 8 to 12 minutes, depending on your oven. Let cool on cookie sheets for 10 minutes, then finish cooling on a wire rack.
Yield: about 24
Tuesday, October 2, 2012
Tuesdays with Dorie: Cranberry Pumpkin Loaf
Okay, so this week's Tuesdays with Dorie recipe is for Cranberry WALNUT Pumpkin Loaf: a beautiful yeast bread with a hint of spice and full of pumpkin, cranberries and golden raisins. I left out the walnuts because there is only 1 kind of bread that I have ever enjoyed with nuts in it. The recipe also called for fresh cranberries but our store didn't have any, so I used dried cranberries. I also halved the amount of nutmeg because I'm not the biggest fan of it, and I used allspice to make up the difference.
Must admit this is not a recipe I would usually make, but that is the entire reason I joined this baking group: to broaden my baking horizons. While I like pumpkin bread okay, I already have a favorite recipe. Also, neither of us care for dried fruit in our baked goods, especially not yeast breads. However, the concept of a pumpkin yeast bread was intriguing, so I decided to go for it.
Anyway, to the actual recipe, which you can check out over at the blog This Bountiful Backyard. This was another easy bread recipe, but definitely time consuming. After you make the dough, it has to rise at room temperature for a couple of hours, then go into the fridge overnight, then sit out at room temperature for four more hours, then rise for another two hours after being shaped into loaves. A number of TWD participants just skipped the fridge time and next time I make it (there will be a next time!), I will skip it as well. I'd also like to try forming the dough into balls and baking them all in a 9 by 13 pan as rolls. They would be the perfect addition to the Thanksgiving or Christmas table!

The verdict: This bread is very nice. The bit of spice is great and surprisingly, we both really like the dried fruit. Good texture, too, and perfect when cut into thick slices. I was expecting a dense bread, but it really isn't very dense. The loaf in my picture looks like it didn't rise much, but it actually rose like a champ- the recipe calls for the bread to be baked in 3 tiny pans but I used 2 big pans so my bread is small. I love how it looks- the orange bread with the yellow and red fruit is just beautiful, and it smelled wonderful both while the dough was being made and while it baked. Just like autumn!
Oh and funny side story- we adopted a stray cat from the local animal shelter last week and named him Declan. He is a very friendly, laid back guy and spent 5 hours sleeping on the couch this evening, with us periodically nudging him and rolling him over to make space for ourselves. At one point when the cat was kind of awake, my husband tried to get him to stand by lifting his side up. As soon as he let go, Declan flopped back onto his side :D Anyway, the thing that finally woke up the cat was the smell of this bread when we sat down on the couch with our slices! And boy, was he awake FAST and trying to get his fair share!
Two minutes after we ate our bread, he was back to sleeping, but the next day he yoinked a discarded heel of Cranberry Pumpkin Loaf out of the trash can!

Friday, September 28, 2012
Pineapple Ginger Pork Chops
Sorry about the lack of recipes lately, I've been very busy and blogging kind of fell to the wayside. However, I have a bit of a backlog of recipes and am planning to post more consistently.
We had these Pineapple Ginger Pork Chops last night for dinner. I found the base recipe on AllRecipes, read the reviews, and made some changes for my version. Usually I taste as I go when I'm experimenting with a recipe, but this time I just tossed everything in and didn't taste it until we were seated at the table. The verdict? Both of us really liked it! The pineapple and ginger flavors are definitely there, but it's not too over the top sweet, and the soy sauce, garlic, onion, and pepper add to the savory flavor. It tastes vaguely Asian inspired. The recipe makes a lot of sauce, too, which is perfect over rice. Best of all, it's easy to make and reasonably healthy. Definitely a repeat at our house!

Pineapple Ginger Pork Chops
1 T olive oil
6 boneless pork loin chops (any thickness you want, I used thin ones)
2 1/2 C chicken broth
3 T soy sauce
1 1/2 T white vinegar
3/4 t dried ginger
1/2 t garlic powder
1/2 t onion powder
1/2 t salt (or to taste, you may want less)
1/4 t pepper
3 T cornstarch
1 C pineapple juice
3 T brown sugar
Add oil to large skillet, turn to coat, and heat over medium high. Add pork chops and brown on both sides. Remove pork chops to a plate and use a dry paper towel to wipe any pork chop goobers out of the skillet (be careful not to burn yourself!). Add chicken broth, soy sauce, vinegar, and seasonings to skillet and bring to a boil. Place pork chops back in skillet and simmer over medium low until they're cooked through (thermometer inserted into the center of one reaches 145 degrees F). The amount of time will depend on how thick they are. Thin pork chops only need to simmer about 5 minutes but thick ones will need at least 10 minutes.
Remove pork chops to a clean plate. Add cornstarch to pineapple juice, stir with a fork until smooth, then stir in brown sugar. Whisk mixture into simmering skillet and continue to whisk until sauce has thickened. Cook for another minute, then add pork chops back to skillet and turn to coat. Cook another minute or so or until pork chops are heated through. Serve over rice.
Yield: 6 servings
Tuesday, September 18, 2012
Tuesdays with Dorie: Whole Wheat Loaves
Time for another Tuesdays with Dorie recipe! Last month one of the recipes was popovers, which I made and promptly forgot to post about. Oops! There's going to be a Tuesdays with Dorie makeup day at the end of this month so I might post about the popovers then or else try another recipe.
In any case, this week's recipe is Whole Wheat Loaves. It's a basic wheat bread recipe that uses half white flour and half whole wheat flour. This recipe was a dream to make and would be great for a first time bread baker. I had to sub honey for maple syrup and molasses for malt syrup, AND I got sidetracked and let my dough grow too large during the first rise, but the finished bread turned out perfect anyway:

So far we've only put butter on it, but it would be great toasted with orange marmalade or made into grilled cheese sandwiches. It's just a nice, standard wheat bread with good texture and good flavor. Nothing fancy, but definitely good and I will make it again for sure!
If you want to see the recipe, you can check it out at Veggie Num Nums or The Family That Bakes Together. Enjoy!
Wednesday, August 8, 2012
Peach Pudding Cake
Whenever I visit my mom in Washington, we always have a Girls' Night and invite my aunt and cousins over to eat, have girly drinks, chat, and watch a movie. Usually my mom and I cook something. This time, she chose the recipes. Together we made a delicious roasted green chile and corn lasagna (still need to get the recipe from her!) and I made this hideous yet delicious cake. The recipe is from a restaurant called Hyde Park Bar & Grill and was featured in Bon Appetit a number of years ago. It's probably the ugliest dessert you will ever make- sorry there aren't any pictures, just trust me- but it's also one of the most amazing ones! Wonderful fresh peaches, a hint of cinnamon (which was entirely my doing, the recipe doesn't call for cinnamon sugar), and perfect, moist cake. It's heart breakingly old fashioned and absolutely a must try recipe. And if you really must, you can cover the ugliness with whipped cream or ice cream :oD
Quick note: A great way to peel peaches is to bring a big pot of water to a boil and submerge the peaches, one or two at a time, for about 30 seconds to a minute for ripe peaches or up to 3 minutes for less ripe peaches. Scoop the peaches out of the water with a slotted spoon, let them cool (you can speed this along by dunking them in cold water), and the skins will slip right off.
Peach Pudding Cake
1 3/4 C flour
2 1/4 t baking powder
3/4 t salt
1/2 t baking soda
3/4 C softened butter (1 1/2 sticks)
1 3/4 C sugar
2 T vanilla extract (yes, 2 tablespoons!)
2 eggs
3/4 C buttermilk
4 C peeled, sliced peaches (about 3 lbs- I just covered the entire surface of the cake with peaches)
3 T sugar
1/2 t cinnamon
Preheat oven to 350 and grease a 9 by 13 inch baking dish as well as a piece of aluminum foil large enough to cover the top.
Whisk together flour, baking powder, salt, and baking soda, and set aside. In a medium bowl, beat butter until creamy. Beat in sugar in 3 additions. Beat in vanilla extract, then eggs one at a time. Alternately mix in dry ingredients and buttermilk in 3 additions each. Batter should be smooth. Spread batter in prepared baking dish and cover with a layer of peaches. Don't worry too much about whether they're arranged prettily because they will sink to the bottom of the cake! Combine the sugar and cinnamon and sprinkle on top.
Cover the baking dish with the foil and bake for 45 minutes, then remove foil (don't worry if some of the cake sticks, like I said earlier it is an ugly cake!) and bake until a toothpick inserted into the center comes out clean, about 20 to 40 minutes longer. If your cake turns out anything like mine, the surface in the middle will look shiny and raw even when it's baked through, so start testing the cake after 20 minutes! Let cake set for about 15 minutes and then serve warm.
Yield: about 12 servings
Friday, August 3, 2012
Beer Mac and Cheese
Alright, time to play catch up with my backlog of recipes that need to be posted! This one is for Beer Mac and Cheese. One of our favorite restaurants has an amazing beer cheese soup on the menu, and we love the Welsh Rabbit I make for Easter every year, so my mac and cheese loving brain logically made the leap between those dishes and mac and cheese. I pretty much winged the recipe and the sauce was based on the one from Welsh Rabbit. Got the idea for the pretzel topping from this recipe on AllRecipes.
The resulting mac and cheese was divine. The amount of beer flavor was perfect, and it was nice and cheesy. And the pretzel topping? Also great! By only broiling individual servings with the pretzels, the mac and cheese stayed nice and saucy without getting gritty, and leftovers didn't suffer from mushy topping since. I just reheated it in the microwave, stirred in a little milk to keep it creamy, then sprinkled the individual bowls with a bit more cheddar and the pretzel topping before tossing the bowls under the broiler with the topping. What could be better?


Beer Mac and Cheese
12 oz macaroni
3 T butter
2 T flour
1 1/4 C milk
3/4 C wheat beer (I used Pyramid Hefeweizen)
2 t Worcestershire sauce
2 t dijon mustard
3/4 t salt
1/4 t pepper
1/4 t paprika
3 C grated sharp cheddar
Topping:
extra grated cheddar
1/2 C roughly crushed pretzels
2 T melted butter
1/4 C parmesan cheese
1/4 t dried parsley
Boil macaroni in a large pot of lightly salted water. Drain, return to the pot, cover the pot so the macaroni stays warm, and set it aside. While the macaroni cooks, make the sauce. Melt the butter in a medium saucepan and add flour. Whisk until golden, about 1 minute. Add the milk, about 1/4 C at a time, whisking until smooth after each addition. When all the milk has been added, pour in the beer all at once and whisk until smooth. Whisk in the Worcestershire sauce, dijon mustard, salt, pepper, and paprika. Bring sauce to a simmer and cook about 2 minutes until thickened, whisking the whole time. Remove sauce from heat (this is important!) and stir in the grated cheese until melted. Add the sauce to the pot with the drained pasta and stir to combine.
Preheat the broiler and move the oven rack to the highest position. To make the topping, just toss together everything but the extra grated cheddar in a small bowl. Spoon macaroni and cheese into either individual broiler safe dishes or into 1 larger dish. Sprinkle with a bit of cheddar, then the topping. Place under broiler and broil until golden brown, being sure not to walk away or it could burn! This should only take a couple of minutes.
Enjoy! This is great with Cucumber Dill Salad.
Yield: About 8 servings.
Cucumber Dill Salad
This recipe comes from an old cookbook of my grandmother's called The Magnolia Collection and is by Gene Westbrook (it's autographed, too!). Let me give a bit of backstory: My grandmother was born and raised in Kentucky and was a wonderful cook. For every big family gathering, she would cook food for 40 or 50 people as if it were nothing. Everything she made was delicious, too! I honestly don't know her history with this particular cookbook. Not even sure why I ended up with it after she died, but on one of my visits to my father in Louisiana, this book was waiting for my and my dad said one of his siblings had sent it to him to give to me. The book itself is quite beat up and there are a few notes from her in margins so I think she used it a lot! Although I've had the book for several years now, I'm sad to say I've only made 2 recipes from it even though so many of them look delicious. However, both recipes- this one and a chicken salad recipe- are incredible and I make them a lot!
In the book, this recipe is listed in the Appetizers section and is called "Eloise's Cocktail Cucumbers." Not sure who Eloise was or how exactly you're supposed to serve the cucumbers, but we just have them as a side dish. I have altered the recipe so it has much less sugar than the original and it works out just great for a sweet, vinegary, dilly cucumber salad. You can even make a big bowl of it and serve it 2 nights.

Cucumber Dill Salad
1/4 C sugar
1/2 C white vinegar
1/4 C water
1 t salt
1 t dried dill
2 cucumbers, sliced thinly
Place everything but cucumbers in a small saucepan and bring to a boil. Cook until sugar has dissolved, which should only take a minute or so. Pour over sliced cucumbers and toss to coat. Refrigerate for a couple of hours or overnight. The recipe says to make 1 day ahead but they're actually still good warm, too!
Yield: About 4 servings
Tuesday, July 31, 2012
Tuesdays with Dorie: Blueberry Nectarine Pie
Holy moly, how did I go a month and a half without posting?! Not to fear my dears, I am still alive and cookin'. We went on vacation and had some other stuff going on and my blog just fell by the wayside a bit. I have lots of recipes to post, though!
On to business: today's Tuesdays with Dorie recipe is the amazing Blueberry Nectarine Pie. As soon as I read the name I knew we would love it, and I was right! Good crust, delicious and rather unique filling. Yum. Followed the directions exactly and my only suggestions would be to 1) increase fhe flour by 1 T to help thicken the sauce, and 2) let the pie cool for at least an hour and a half before serving. The book said to wait 30 minutes and we managed to resist for 45, but it was still quite hot and the filling ended up pouring everywhere, Regardless, we loved the pie and I will definitely make again, maybe even the filling alone as a topping for pound cake. I recommend it to anyone who owns the Baking with Julia book. If you don't have the book, you can get the recipe over at That Skinny Chick Can Bake or Manchego's Kitchen.

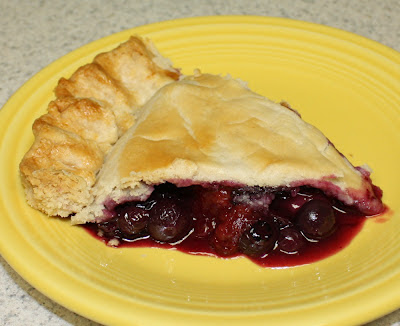
I actually made this for my second wedding anniversary. My husband loves cake, but loves pie even more and was heartbroken when we couldn't have pie at our wedding reception in addition to the cake. We wanted pie, but the venue would not allow any desserts from outside (except the wedding cake) and couldn't/wouldn't make pie. They did make lots of little lemon tarts-- which ended up costing about twice as much as the cake, I might add-- but they weren't very good. Bah. So I decided this pie would be the perfect dessert for our wedding anniversary and my husband agreed :)
Sunday, June 10, 2012
Quick Garlic Aioli
Yes, yes. I am aware that real aioli is made with raw egg yolks instead of mayonnaise. I would have made a more authentic recipe, too, if the idea of raw eggs didn't skeeve me out. Food poisoning is something I have happily avoided for the past 27 years (though my parents did get terrible food poisoning after eating celebratory soft serve ice cream when they found out my mom was pregnant with me) and I don't care to experience it any time soon. I also don't care to experience purchasing super expensive pasteurized eggs. So mayo it is. I honestly just threw the ingredients together (measured everything though!) and it isn't based on any recipe, but after I made it I looked on AllRecipes and this one is pretty similar. The garlic aioli was originally made to go along with my awesome portobello mushroom burgers, but I decided it deserved its own post because it's SO good and SO versatile! It was perfect on the burgers, but also great on the fries I baked to go along with the burgers, would be good on sandwiches, and odd as it sounds, it's really good on steamed broccoli. Just put a little bitty puddle of it on your plate, fork a broccoli floret, and dunk it (just a little bit!) in the aioli. A little goes a long way! I think it would also be great on artichokes or salmon cakes or pretty much anything else.

Quick Garlic Aioli
1/3 C mayonnaise
1 clove minced garlic
1 1/2 t lemon juice (can do more if you want it lemony, I held back for once in my life)
1/8 t pepper
1/8 t salt
Mix together all the ingredients in a little bitty bowl. It's fine if served immediately, but even better if you let it sit in the fridge for a couple of hours. It keeps for several days in the refrigerator.
Subscribe to:
Posts (Atom)