Showing posts with label breakfast. Show all posts

Tuesday, April 10, 2018

Ham & Cheese Biscuit Sandwiches

This recipe's name pretty much explains what it is.  It isn't anything fancy, but very tasty and could be made for any meal.  The recipe is from Budget Bytes and I thought it was genius to bake the biscuits with the ham and cheese inside instead of adding it later.  This way the cheese gets bubbly and perfectly melted, and the ham gets a little browned.  Yum!  You could add a little mustard if you wanted, but they're very good as is.
 
The toothpicks keep the top biscuits from falling off and the ham from sliding off.  Go on and leave the toothpicks in until you're ready to eat the sandwiches because you'll probably end up with major "drift" if you take them out too soon.
  
  
Ham & Cheese Biscuit Sandwiches
 
2 1/2 C flour
4 tsp baking powder
1/2 Tbsp sugar
1 tsp salt
about 1 1/3 C cream
6 slices cheddar cheese
1/2 lb of your favorite ham from the deli, I used Boar's Head Tavern Ham, sliced
  
Preheat oven to 400.
 
Stir together flour, baking powder, sugar, and salt.  Pour 1 C cream over top and mix together with a spoon.  Add additional cream as needed (only a tablespoon or so at a time) until you have a dough that holds together nicely and isn't too dry.  Form into a ball.
 
Dust a clean surface with flour and place the ball on top.  Squish with your hands to make a rectangle, then dust with more flour and roll out into a half inch thin rectangle approximately 8 by 11 inches.  Cut into 12 biscuit squares, in 3 rows of 4.
 
Line a baking sheet with parchment paper and put half of the biscuit squares on the sheet.  Top each with a slice of cheese (broken to fit as needed), then evenly divide the ham among them.  Top with the 6 leftover biscuit squares, then secure with a toothpick so the tops won't slide off.
 
Bake until the top biscuit is golden, about 15 to 20 minutes, depending on your oven.
 
Serve immediately, but remember not to eat the toothpicks!

Thursday, May 18, 2017

Default Green Smoothie

Charming name, no?  I picked it because that's what it is: the default smoothie I make several times a week with the Vitamix blender we received as a gift (thanks, Mom!).  You can get creative with the fruit and use all the same kind or a mix.  Also, if I put in apples, I sometimes leave out the carrots because even with a Vitamix blender, there's a little more texture in the finished smoothie than I prefer.  It's not bad by any means, though.  You could also try adding cucumbers or zucchini or another mild tasting vegetable instead of the carrots.  I'll do that here one of these days and update the post then.  My husband and I both love this smoothie, no matter how I make it!
  
I would also like to add that an inexpensive blender may not do a good job with the raw carrot.
  
Default Green Smoothie
  
1 C plain greek yogurt
1/2 C cold water
2 bananas
about 3 C somewhat packed down spinach or torn up kale
3/4 C baby carrots
1 1/2 to 2 C fresh or frozen fruit, like strawberries, blueberries, mango chunks, pineapple chunks, peach chunks, apple slices, or peeled oranges
optional: 2 or so Tbsp lemon or lime juice
  
Place everything in the blender in the order listed in the recipe.  Put on lid and blend according to your blender's directions until smooth.
  
Yield: 2 large smoothies or 4 small ones

Wednesday, March 15, 2017

Fantastical Food Fight: PBJ Smoothie

Wow, my first post of the year and it's already March!  I've cooked this year for sure, but haven't experimented with new recipes as often as usual or written new posts.  My husband and I both started new jobs in December and January and adjusting to that has been taking up a lot of... well, everything.  Little bloggie has not been forgotten, just taken a backseat for a little bit.
 
So, this is a Fantastical Food Fight post.  I tried to participate in January, which had the focus of slow cooker soup.  Picked a recipe, bought the ingredients, then didn't actually make the recipe until late February.  It's funny, really, I ended up using all the originally purchased ingredients for other things and had to repurchase them when I actually made the soup!  The good thing about FFF though is that there's no obligation to participate every month, so I wasn't letting anyone down when I didn't participate.
 
This month's Fantastical Food Fight subject is peanut butter and jelly!  Yum, we love PBJs at our house.  I immediately thought of Ina Garten's amazing PBJ bars, but I've already made those and posted about them on the blog.  As much as I'd love an excuse to make that recipe again, the Fantastic Food Fight posts are supposed to be about new recipes.  Looking online, I found a couple of recipes and ideas I was interested in trying, but settled on a smoothie because we've been on a real smoothie kick since we got a Vitamix blender.  
 
Okay so there isn't actually any jelly in this smoothie.  I try to make my smoothies as healthy as possible and although I like jelly, I a) did not want to add sugar to the smoothie, and b) I wanted to use fresh fruit.  But strawberry jam is frequently used in PBJs and peanut butter banana sandwiches are pretty common, too!
 
This is actually round two of my PBJ smoothie experiment.  The first time I tried it, I used milk instead of yogurt and water, real peanut butter, two bananas, and about half the strawberries.  Neither of us were crazy about the result.  I didn't like how rich (from the fat in the peanut butter) and milky it was, and the banana totally obliterated the strawberry flavor.  Usually I use two bananas in a smoothie for two people, but that wasn't a good choice for this one.  This version uses peanut butter powder so it's not as rich, yogurt and water, just one banana, and more strawberries.  The banana was actually added after I had already blended everything up.  My plan had been to leave out the banana entirely, but it was lacking a little something without the banana, so I chucked one in.
  

It's actually a lovely shade of pale pink- the glass is light green!
  
So, how did it turn out?  Pretty good!  My husband and I both agree that we like green smoothies better, but this was good and a nice alternative if you happen to be out of kale or spinach or are low on yogurt but want protein in the smoothie.  The flavors of the peanut butter, banana, and strawberries all come through nicely.  One thing I'd like to add is to make sure all your ingredients are cold.  The yogurt and strawberries came right out of the refrigerator, and I used cold water, but the banana was room temperature and the resulting smoothie was not very cold.  Usually I don't mind room temperature smoothies, but this one was definitely at its best when cold.
 
PBJ Smoothie
 
1/2 C plain greek yogurt
1/4 C cold water
1 frozen or cold banana
2 C frozen or cold strawberries
3 to 4 Tbsp peanut butter powder (I used 3 but 4 would have been good)
 
Place all ingredients in blender, put on lid, and blend until smooth.
 
Yield: 2 medium sized smoothies


Monday, October 24, 2016

Hard Boiled Egg Bake

Ooh, this is an ugly recipe, but it sure tastes good!  This could be breakfast, lunch, or dinner.  The recipe is from AllRecipes.
 
Hard Boiled Egg Bake
 
8 hard boiled eggs, peeled and sliced
3 Tbsp butter
3 Tbsp flour
1 C milk
1 C chicken broth
dash poultry seasoning
dash cayenne pepper
seasoned salt to taste
1/2 C grated cheddar
 
Preheat oven to 450 and grease an 8 by 8 baking dish.  Arrange eggs in dish.
 
Melt butter in a medium sauce pan over medium heat.  Add flour and stir constantly until golden, about two minutes.  Stir in milk about 1/4 cup at a time, stirring until smooth between additions.  Stir in chicken broth and seasonings.  Pour over eggs and top with grated cheddar.  Bake until hot and bubbly, about 20 minutes.  Serve over toast.
 
Yield: 6 servings

Saturday, September 17, 2016

Nectarine Banana Bread

This is just my regular banana bread with diced nectarines added, but it sure is good, and worthy of its own post!  Wow!  It's so moist, dense (in a good way), and sweet that it's practically cake.  One large loaf has 3 bananas and 3 nectarines in it, so it's full of fruit.  The nice thing is that you can taste both the nectarines and the bananas well.  Banana tends to cover up all other flavors, but because the nectarines are diced and not pureed, they come through great.  In the future, I'd like to try adding fresh raspberries instead of the nectarines and see how that turns out.
 
Nectarine Banana Bread
 
3/4 C softened butter
1 1/2 C sugar
2 eggs
3-4 mashed overripe bananas (you want about 1 1/2 C)
2 C flour
1 tsp baking soda
1/2 tsp salt
1/2 C buttermilk
3 nectarines, peeled and diced
  
Preheat oven to 350and grease a one large bread pan (I use this one) or two normal sized ones.
  
Mix butter and sugar until fluffy, then mix in eggs and bananas.  Add baking soda, salt, and half of the flour to the mixing bowl and beat to combine.  Stir in 1/2 of the buttermilk, then stir in the rest of the flour.  Stir in the last of the buttermilk until everything is well combined.  Stir in diced nectarines.  Spread batter in prepared bread pan and bake until a toothpick inserted into the center comes out clean, about 1 hour for a large loaf, or around 40-50 minutes for two normal loaves.  You can cover the pan with foil if the bread browns too much.  Let baked bread rest for about 20 minutes, then invert it onto a plate to finish cooling. 

Yield: About 12 servings

Thursday, September 1, 2016

Cheesy Bacon Ranch Breakfast Biscuits

On at least one weekend day every week, I make my husband and I a nice breakfast.  More often than not that means pancakes, but I also like making beggagels, waffles, french toast, muffins, omelets, or occasionally a breakfast casserole or something like this.  I found this recipe on a website called Spoon University earlier this week and thought it sounded perfect for a weekend treat.  They're really good and turned out pretty much how I expected them to: Soft, warm, nice smoky crunch from the bacon, cheesy, and just all around yummy.  We had them with fresh plums, and it was a very yummy breakfast that I'll make again.  Conveniently, I only had to buy the biscuit dough because I pretty much always have the other ingredients in my refrigerator already.
 
It occurred to me while we were eating these that there's no reason why they couldn't be served as a side to go with chicken or something at dinner.  I think I just saw bacon and thought of breakfast.  They'll probably stay mostly a breakfast thing for us because they're a bit more caloric and involved than I prefer side dishes to be, but that's just me.  I'll probably make them to go with dinner at some point.  The leftovers will be going with my husband to work for lunch and I'm going to try freezing a couple of them.
 
Pardon the lack of photo.  My camera went to heaven and I don't have a cell phone, so no easy way to take pictures when I made this recipe!
 
Quick Note:  You really have to use the flaky layer biscuits for this, not the plain kind, because the layers make it so you can separate them into halves cleanly.  Make sure the tube of biscuits says "flaky layers" on it.  Also, I just added a sprinkle of dried chives instead of fresh green onions because my green onions were looking floppy and unappealing.
 
Cheesy Bacon Ranch Breakfast Biscuits
 
tube of 8 refrigerated jumbo sized flaky layer biscuits (they must be the flaky layer variety!)
ranch dressing
8 slices of bacon, cooked and crumbled
about 1 C grated cheddar cheese
about 3 Tbsp sliced green onions or 1 1/2 Tbsp sliced fresh chives
 
Preheat oven to 350 (or temperature indicated on package of biscuits) and cover a baking sheet with parchment paper.  Place biscuits an inch or so apart on baking sheet.  Bake until the biscuits just begin to turn golden on top, about 8 minutes.
 
Remove baking sheet from oven and gently pull the top half off each one.  Spread a little ranch dressing on each bottom half, sprinkle with 1/8th of the bacon, a generous sprinkle of shredded cheese, and some green onions or chives.  Replace tops, and sprinkle with a little more cheese.  
 
Bake until nicely golden brown on top, about 5 minutes more.  Remove baking sheet from oven and let biscuits cool for a couple of minutes before serving.
 
Yield: 8 biscuits

Monday, July 18, 2016

Old Fashioned Sour Cream Donuts

My husband and I made these donuts a few months ago after I saw Tasty's short video showing how to make them.  It was the first time we'd made donuts, and they were a lot of fun.  These are cake style donuts, not the typical yeast dough based glazed donuts.  Someday I'd like to try yeast donuts, but this was a good recipe to start with and very yummy!  They're awesome either glazed or rolled in cinnamon sugar, I actually couldn't decide which I liked better.  Even nicer, they keep very well.  After the first day, they're softer, but pleasantly so and the flavors are very well melded together.  
   
For the glaze, feel free to use whatever type of extract you want.  I've mentioned it before on this blog, but I despise the flavor of powdered sugar.  I think it's the cornstarch.  Whatever it is, powdered sugar has a very overpowering, unpleasant flavor to me, so I had to use a lot of lemon extract to cover it.  One of these days, I'll buy a bag of powdered sugar that only has sugar as an ingredient, but it's so expensive!  If you don't want to use glaze, you can either leave them plain (not as sweet of course, but really tasty), or roll them in cinnamon sugar.  Or how about lemon sugar, or allspice sugar?  So many possibilities!
   
One last thing, you can fry the donut holes along with the donuts, they just won't need to cook as long.  If you don't want donut holes, just squish the holes together and roll them out to make more big donuts, but we think donut holes have their own charm.
   
Quick Note:  The original recipe says to score the donuts so they puff properly while frying, which you are free to do- just make 3 shallow cuts forming a large triangle.  I forgot to do that for the first half of the donuts and they didn't suffer any ill effects.  They puffed up and split around the outside, but I thought they looked cute that way.  
  
  
Old Fashioned Sour Cream Donuts
 
For the donuts:
2 1/4 cup (255 grams) cake flour
1 1/2 teaspoons baking powder
1 teaspoon salt
1/4 teaspoon ground nutmeg
1/2 cup sugar
3 tablespoons butter, at room temperature
2 large egg yolks
1/2 cup sour cream
about 2-3 Tbsp milk
Canola or vegetable oil, for frying (about 2 C)
 
For the glaze:

3 cups powdered sugar, sifted
1 1/2 teaspoons corn syrup
1/2 teaspoon vanilla extract
about 2 tsp lemon extract, or to taste (or use a different flavor extract)
1/3 cup hot water
  
Stir together dry ingredients (cake flour, baking powder, salt, and nutmeg) in a smaller bowl. Set aside.
 
In mixer bowl, combine butter and sugar on a low speed until light and fluffy. Add the egg yolks and mix together on medium speed. Add half the dry ingredients, blend. Add the sour cream, blend. Add in the rest of the dry ingredients and blend until the dough is well-combined, add enough milk for dough to come together. Place dough in greased bowl and cover with plastic wrap. Chill for an hour or overnight.
 
Place chilled dough on a floured surface. Roll out to about 1/3 inch thickness. Cut the donut shapes with round cookie cutters or use a larger glass and a shot glass.
 
Pour oil into a large skillet so it's about 1 inch deep.  Heat oil to 325°F.  Carefully place the donuts in the oil with heat safe tongs and cook until golden, then flip and cook until golden on the other side. Remove donuts to cookie cooling racks set over paper towels.
 
After all the donuts are done frying, make the glaze by combining the powdered sugar, extracts, corn syrup, and hot water until it becomes smooth.  Dip the top of each donut in the glaze and set on a drying rack to allow glaze to dry and any extra to drip off.  Double dip if necessary.  Alternatively, you can roll the hot donuts in cinnamon sugar.

Wednesday, July 13, 2016

Cream Scones Two Ways

I've developed a real love of scones.  I never ate them growing up, probably because my mother doesn't care for them and I took her word that they weren't very good.  Honestly, the first time I had a scone (other than one unimpressive grocery store bakery scone) was when I was about 27 and decided to try a recipe.  Since then, I've made several more recipes for scones and have really liked them all.
 
This recipe came about because I wanted to make two different types of scones- savory and sweet- but didn't want to end up with 24 scones for 2 people.  I found a rather neutral scone recipe on the King Arthur Flour website, made it as a base, then divided the dough and added mix ins to each bowl.  Both varieties turned out really nice, and complemented each other well: one with dried cherries, chocolate, and almond extract, and the other with cheddar and a generous amount of black pepper.  I served the scones with scrambled eggs, bacon, and grapes on a Sunday morning, and it was an awesome, rather extravagant seeming breakfast.
 
Quick Note:  The original recipe says to try freezing the scones for 15 minutes before baking because they'll rise even more, but I skipped this part.  Next time I'd like to try it, but the scones turned out really well anyway.  The recipe also said you can sprinkle coarse sugar over the sweet scones before baking.  I didn't have any, so just skipped it, but would like to try it at some point.
   
 
Cream Scones Two Ways
 
For base mixture:
3 C flour
2 Tbsp sugar
1 Tbsp baking powder
1 tsp salt
 
Preheat oven to 400 and line a large cookie sheet with parchment paper.  Mix together in a large bowl.  Scoop 1 1/2 cups plus 1 tablespoon of the mixture into a second mixing bowl.
 
For Cherry Chocolate Almond Scones:
 
3 Tbsp sugar
1/3 C dried cherries
1/3 C milk chocolate chips
about 1 C cream (may need more or less)
1 tsp almond extract
 
Into one of the bowls of base scone mixture, stir the 3 Tbsp extra sugar.  Stir in cherries and chocolate chips.  Measure out 3/4 C cream and stir the almond extract into it, drizzle over flour mixture.  Gently toss and stir dough together, adding a little more cream if needed so you have a soft, not too sticky dough.  You may need to use your hands.  Be sure to combine the dough just enough so it comes together, form into a ball.  Set dough aside.
 
For Peppery Cheddar Scones:
 
3/4 tsp black pepper
1/2 C sharp cheddar cheese, cut into small cubes
 
Into the other bowl of base scone mixture, stir pepper and cheddar.  Measure out 3/4 C cream and drizzle over flour mixture.  Gently toss and stir dough together, adding a little more cream if needed so you have a soft, not too sticky dough.  You may need to use your hands.  Be sure to combine the dough just enough so it comes together.
 
Make the dough into a ball and place it off to the side on the parchment paper lined cookie sheet.  Place the other dough ball on the other side of the pan, near the opposite corner.  Pat the dough balls out into 6 inch wide rounds.  Brush with cream, then cut each round into 6 wedges.  Pull the wedges slightly apart from one another.
 
Bake scones in preheated oven until golden on top and they look cooked through on the sides, about 18 minutes.  Let cool on the pans for a few minutes, then pull them gently apart and serve with butter.

Thursday, June 30, 2016

Tater Tot Breakfast Casserole

This is another recipe from Tasty, I've made a couple so far.  I can't help it, I like tater tot casserole, and for some reason had never thought of making a breakfast version before.  This one turned out really well, and I think it could be great for dinner, too.  The original called for 2 lbs of pork breakfast sausage and no veggies, but I hate pork sausage, so subbed ground turkey and sausage seasoning, and added mushrooms and a bell pepper.  My husband and I both thought the veggies added a lot and that it would be rather boring without them.  If I happen to have more bell peppers and mushrooms next time, I'll go ahead and toss them in!
 
Quick Note:  I used sausage seasoning I bought at a store, specifically the Prairie Sage variety from Hi Mountain.  I used 1 tablespoon.  If you don't have that, you can just use the garlic and spices from this recipe.  Also, I don't see why you couldn't prepare the recipe through putting the meat, veggies, soup, and cheese in the baking dish the night before, then covering it and refrigerating it.  In the morning,  you could add the tater tots and egg mixture, then bake.
 
Tater Tot Breakfast Casserole
 
1 Tbsp canola oil
1 lb ground turkey
sausage seasoning to taste
1 bell pepper, seeded and sliced
8 oz mushrooms, sliced
1 can condensed french onion soup
2 C grated cheddar
2 lbs tater tots
seasoned salt to taste
4 eggs
1 C milk
 
Preheat oven to 350 and grease a 9 by 13 inch baking dish.  Set aside.
 
Preheat large skillet over medium-high and add oil.  Crumble in ground turkey, and sprinkle with sausage seasoning.  Cook until cooked through.  Spoon into prepared baking dish and wipe out any remaining turkey bits.
 
Return skillet to stove and add bell peppers, cook for about 2 minutes, then add mushrooms and cook until both veggies are tender.  Add to baking dish with turkey sausage.
 
Pour soup over meat and veggies in baking dish and stir until well mixed.  Spread evenly in dish.  Top with grated cheddar, then tater tots.  
 
Beat together eggs and milk, then pour over tater tots.  Sprinkle lightly with seasoned salt.
 
Bake casserole until center is completely cooked through (temperature should reach 160 degrees so you know the eggs are cooked).  I covered mine with foil after 40 minutes so the tater tots wouldn't over cook, then baked it 20 minutes longer.
 
Remove casserole from oven and let it sit for 10 minutes so it can set up a little bit.  Serve with fresh fruit.
 
Yield: 8 servings

Friday, June 24, 2016

Dark Chocolate Banana Muffins

Ooh, these muffins are a treat!  Soft, cakey, sweet, very chocolaty (there's half as much cocoa powder as flour!), and even pretty to look at with their high crowns.  They're basically cupcakes without frosting, studded with chocolate chips instead.  The banana flavor isn't particularly strong, either, so they may be a good choice for someone who isn't a banana fan.  Someone like me!  I loved these, even with the banana. 
 
The recipe is from Our Best Bites.  I found it months ago, and was just waiting until I finally had 3 over ripe bananas.  My husband has one for breakfast most mornings, but he's done a great job lately of finishing the bunch before any of the bananas turn brown.  The original recipe called for applesauce and artificial sweetener, but I used oil and real sugar instead, plus a lot more mini chocolate chips.  I wasn't trying to make a low calorie muffin, so why not make them as tasty as possible?
  
 
Dark Chocolate Banana Muffins
 
3 very ripe bananas
1 egg
2/3 C sugar
1 1/2 tsp vanilla extract
1/3 C canola oil
1 C flour
1/2 C cocoa powder
1 tsp baking soda
1 tsp baking powder
1/2 tsp salt
1/2 C mini chocolate chips, plus more for on top
   
Preheat oven to 375 and line a 12 well muffin tin with muffin papers.  Set aside.
   
Place bananas and egg in stand mixer and mix until bananas have broken down.  Mix in sugar, vanilla extract, and oil until smooth.  Add flour, cocoa powder, baking soda, baking powder, and salt, and mix just until well combined, scraping down the bowl partway through.  Stir in the mini chocolate chips.
   
Divide batter evenly between muffin papers, and top each dollop of batter with a sprinkle of mini chocolate chips.  Bake until a toothpick inserted into the middle of one of the center muffins comes out clean, about 15 to 20 minutes.  Let cool for a few minutes before serving.
   
Yield: 12 muffins

Tuesday, June 7, 2016

Ultimate Chicken Strips

This is a recipe that my friend makes frequently and comes from Betty Crocker.  I'm so glad I finally got around to trying it myself, because these are the best chicken strips I've ever had.  Better than this one that's breaded in crushed crackers (though we still love that one and will continue to make it), better than the Honey Chicken Nuggets, better than a buffalo chicken strip recipe I haven't posted yet.  Better than any I've had in restaurants, too, but that's not too much of an accomplishment.  They're so good!  Lots of flavor, crunchy, very moist, and just great.  My husband dipped his in barbecue sauce, but I thought they were good enough to eat plain.  I served the nuggets with Cheesy Ranch potatoes and a fresh fruit salad, what a yummy dinner.
 
Quick Note:  I make my own Bisquick mix using this recipe.  It's very quick and easy and cheaper than the purchased kind, tastes better, too.
 
Ultimate Chicken Strips
 
2 large chicken breasts (about 1 1/2 lb)
2/3 C Bisquick
1/2 C grated parmesan
3/4 tsp salt
1/2 tsp paprika
1/4 tsp garlic powder
1 egg
3 Tbsp butter
 
Preheat oven to 450 and line a large baking sheet with parchment paper.  Lightly grease the parchment paper, and set aside.
 
In a gallon sized Ziploc bag, place Bisquick, parmesan, salt, paprika, and garlic powder, seal the bag, and shake to combine.  Beat the egg in a bowl.
 
Clean chicken breasts and cut into 1/2 inch thick strips.  Dunk half of the strips in the beaten egg, then place in the bag with the Bisquick mix.  Seal and shake well, until chicken is coated.  Arrange chicken on baking sheet, and repeat with the rest of the chicken strips.
 
Melt butter and spoon a little over every piece of chicken.
 
Bake until chicken is golden, crunchy, and cooked through, about 15-20 minutes.
 
Yield: 4 servings

Thursday, June 2, 2016

Perfect Pancakes


The base recipe is from the Cinnamon Roll Pancakes recipe, which is originally from the Recipe Girl blog.  I've only ever made those pancakes once because, in addition to being delicious, they're kind of a pain in the ass, but I've made the base recipe countless times.  I actually usually mix up the dry ingredients for 6 batches or so, store it in a bag in the pantry, then just scoop some out and add milk, egg, and oil when I want to make pancakes.  It has become the default pancake recipe I make, and we have pancakes most weekends.
 
These pancakes aren't just good, they're perfect.  We're both major pancake lovers and I've experimented with many recipes over the years, but this is The One.  They taste exactly like great pancakes you'd get at a restaurant: soft, fluffy, thick but not too thick, and are just pancakey perfection.  I enjoy making fancier pancakes, too, but this is our standard.  You can add mini chocolate chips or blueberries to the batter, or add a little molasses, cinnamon, ginger, allspice, and nutmeg to make gingerbread pancakes.  I've done all of these and they've been great!

   
Perfect Pancakes
 
1 C flour
2 T sugar
2 t baking powder
1/2 t salt
1 C milk
1 egg
1 T vegetable oil
butter to grease the skillet
  
In a medium bowl, whisk together flour, baking powder, and salt.  Add milk, egg, and vegetable oil, and whisk until smooth.
  
Tturn your oven to 200 degrees and place an oven safe plate in the oven.  You will put your pancakes in the oven as you make them so they stay warm.  Melt a small amount of butter in a nonstick (this is very important!) skillet or on a griddle set to medium-high.  Spoon on batter to make whatever size pancakes you want.  Cook the pancake until the edges are dry and there are bubbles on the surface.  Carefully flip the pancake using a wide spatula and cook for another 45 seconds or so until set.  Place the cooked pancake on the plate in the oven, and proceed in the same way with the rest of the batter.
  
Yield: 2 generous servings

Tuesday, May 31, 2016

Bacon & Egg Breakfast Bundles

I've made these many times before using different combinations of deli meat and cheese (favorites: roast beef with gruyere, and spicy turkey with colby jack), but decided to try making a breakfast version with bacon, egg, and cheese.  Actually, my husband is the one that made these.  Usually I do the cooking around here, but it was my birthday, so he made these while I advised from the couch.  It was delightful!  They're nothing fancy, but they are tasty and a nice little weekend treat served with fresh fruit and creamsicle dip.
 
As mentioned before, you can put pretty much anything in these.  You could try using ham instead of the bacon, if you prefer, and use whatever cheese you want.  We made half with colby jack and half with muenster.  The muenster melted beautifully and was very stretchy like mozzarella, if that appeals to you.  If you want something for lunch or dinner, how about pepperoni and sliced or cubed mozzarella, maybe a little sprinkle of parmesan, served with marinara sauce on the side?  Leftover fajita meat and veggies with cheddar, and salsa on the side?  Keep it simple with ham and cheese, maybe with honey mustard to dip?  I'm sure all of these would work great.
 
 
Bacon & Egg Breakfast Bundles

3 eggs
4 slices cooked bacon, broken in half
4 slices cheese of your choice, broken in half
8 oz tube of crescent roll dough (leave in the refrigerator until you're ready for them)
 
Preheat oven to 350 and line a baking sheet with parchment paper.
 
Grease a small nonstick skillet, heat it over medium, crack in the eggs, and scramble with a rubber spatula until cooked.  Add salt and pepper to taste, and set aside.
 
Take the crescent roll dough out of the refrigerator.  Separate the dough into 8 triangles.  Take a triangle of dough, top it with one of the bacon halves (break it up more to fit), one of the half slices of cheese (fold it into a square so it fits), and 1/8th of the scrambled eggs.  Form a little bundle by gently stretching the bits of dough around the filling and press it shut.  The filling should be completely encased.  Set the bundle on the baking sheet and repeat with the remaining ingredients.
 
Bake bundles until golden, about 10-12 minutes.
 
Yield: 8 bundles, how many this feeds depends on what else you're serving.

Tuesday, May 17, 2016

Cinnamon Apple Pancakes

These Cinnamon Apple Pancakes are a Secret Recipe Club recipe, but not one that I was assigned.  I was checking out recipes that other people made for SRC and came upon this one at the blog Daily Dish.  They looked so good, I had to make them!  My changes were to add salt (it doesn't make them taste salty, remember salt is a flavor enhancer) and to add more milk because the batter was very thick.  The pancakes turned out really nicely.  Lots of apple flavor and the pancakes were very moist and tender, in spite of not having any oil or butter in the batter.  We really liked them.  Next time I want to try experimenting with steaming the grated apples in a covered bowl in the microwave so they will soften up a bit.  The pancakes were definitely good as is, but the grated apple added a bit of texture, which may or may not appeal to some people.  I love tinkering with recipes!  When I try that method, I will update this post.
  
 
Cinnamon Apple Pancakes
 
2 large apples, peeled, cored, and grated
2 C flour
1 tsp salt
2 tsp baking powder
4 tsp cinnamon
1/4 C brown sugar
2 eggs
2 1/3 C milk
 
Preheat griddle.
 
Stir together flour, salt, baking powder, cinnamon, and brown sugar.  In a separate bowl, lightly beat eggs, then stir in milk and grated apples.  Stir apple mixture into flour mixture until well combined.
 
Butter griddle, then ladle on batter to make whatever size pancakes you desire.  Let them cook until bubbles form on the surface and the edges look dry, then carefully flip with a spatula.  Cook on the other side until golden.  Keep cooked pancakes warm on a platter in a 200 degree oven, and repeat process to make the rest of the pancake batter.  
 
Serve with butter and maple syrup.
 
Yield:  About 4-6 servings

Sunday, May 1, 2016

Secret Recipe Club: Rhubarb Bread

It's Secret Recipe Club time again!  This month, I was assigned the blog BCMom's Kitchen.  The blog is written by Anna.  Anna's approach to the recipes she makes seems pretty in line with my own.  She is a chronic recipe tweaker, loves trying out new recipes, only repeats a recipe if it turned out fabulously, and tends to gravitate towards easier recipes.  My kind of cook!
 
Tastiness abounds on Anna's blog.  She has a ton of recipes that appealed strongly to me, and I will probably make more of her recipes in the future.  I was particularly drawn to her varied selection of rhubarb recipes because to my undying joy, winter has finally left Interior Alaska (though last night I dreamed it snowed again) and my rhubarb plants are working overtime.  The stalks are still pretty small, but big enough to sacrifice a few for springtime tastiness!  Both of her rhubarb muffin recipes look great, as does the rhubarb focaccia (so unique, I'll definitely make this one!), rhubarb pudding cake, and blackberry rhubarb crumble.  Yum!  It was a very close tie between the two, but I decided to make rhubarb bread instead of rhubarb muffins.
 
The rhubarb bread turned out great.  I was drawn to it because I'd never actually seen a rhubarb bread recipe, and I liked that rhubarb was the star of the show instead of having to share the title with another fruit.  The soft, tart little bits of rhubarb were really nice and contrasted well with the sweet, cinnamony goodness of the bread.  One of the loaves went to our neighbors who kindly took care of our pets when we went out of town recently (first time leaving my dogs, it was so hard!), but my husband and I got to devour the other loaf ourselves.  Anna has a very intriguing recipe on the bread page for honey rhubarb butter, which I will try another time.  I just purchased a tub of honey brown sugar cinnamon butter at Sam's Club so wanted to use that on the bread.  Great combo!  I also really liked the taste and crunch of the topping, plus how quick and easy it is to make, so plan to use it in other recipes.  How good does pumpkin bread with crumb topping sound?  Yes, please!
   
  
Rhubarb Bread
 
1 egg
1 C brown sugar
1/2 C canola oil
1 tsp vanilla extract
1 C buttermilk
2 1/2 C flour
1 tsp salt
1 tsp baking soda
1 tsp cinnamon
2 C chopped rhubarb
 
for topping:
3 T butter, melted
1/2 C sugar
1/2 C oats
1 tsp cinnamon
  
Preheat oven to 325 and grease two 9 by 5 inch loaf pans.
  
Mix together egg, brown sugar, and oil, then stir in the vanilla extract and buttermilk.  In another bowl, combine flour, salt, baking soda, and cinnamon.  Stir into wet ingredients, then stir in rhubarb.  Divide batter evenly among the two loaf pans.
  
To make the topping, stir brown sugar, oats, and cinnamon into the melted butter, then sprinkle evenly over the loaves.
  
Bake in the preheated oven about 45 minutes, or until a toothpick inserted into the center comes out clean.  Let loaves cool in the pans for 10 minutes, then turn them out onto a cooling rack to finish cooling.
  
Yield: 2 loaves, about 16 servings
  

Friday, April 22, 2016

Cottage Cheese Pancakes

This recipe is from the blog A Taste of Madness, but slightly tweaked.  It's a great to make if you have cottage cheese that needs to be used up, and is easily doubled.  Leftovers freeze nicely.  Convenience aside, these are good pancakes.  They aren't my default favorite (that honor goes to the basic pancake recipe from Cinnamon Roll Pancakes), but they are definitely tasty.  They're very light and creamy, which may sound odd for a pancake, but it definitely works. 
 
 
Cottage Cheese Pancakes
 
1 C cottage cheese
1/3 C flour
2 Tbsp canola oil
3 eggs
1/4 tsp salt
1/2 tsp vanilla extract
 
Place all ingredients in a medium bowl and mix with immersion blender until cottage cheese is pureed and everything is well combined.  Ladle batter onto a greased pan or griddle over medium heat and cook until bubbles form and the surface looks a little dry, then carefully flip and cook on the other side until golden.  Keep cooked pancakes warm on a plate in an oven set to 200.  Serve with syrup, fruit, or other toppings of your choice.
 
Yield: 2 servings

Tuesday, January 19, 2016

Jamboree Muffins

This is the most recent recipe I've made from Joanne Fluke's murder-mystery series about Hannah Swensen that also focuses a lot on baking.  This recipe is from The Red Velvet Cupcake Murder.  I was lying in bed Saturday night and had decided to make muffins, but didn't have a particular recipe in mind.  10 minutes later, I was reading the book and came upon the recipe for Jamboree Muffins.  I had all the ingredients and they sounded good, so why not?
  
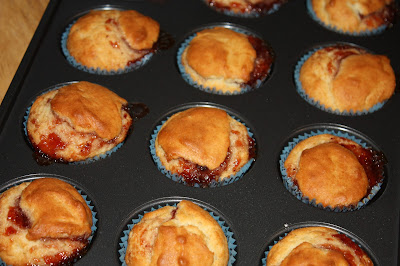
These muffins are GREAT.  Definitely among the best I've ever had.  They're very interesting, too.  The finished muffin is like a cross between a muffin and a biscuit, both in texture and flavor.  When I looked the recipe over the first time, I had my suspicions they'd be rather biscuit-like because the ingredients look more like a biscuit dough than muffin batter, and I was right!  They aren't very sweet and have a texture reminiscent of a buttermilk biscuit, but are rather airy, like a muffin.  The jam in the middle is an awesome addition.  I used strawberry, but pretty much any flavor would be really good.  I've tried making jam filled muffins in the past and they haven't been particularly good to start with, but the leftovers were awful because the jam made them very soggy.  The texture of these muffins is dense enough that they don't get soggy and were still tasty the next day.
  
In the future, I'd like to experiment with making these muffins with other ingredients added instead of jam.  They'd make great dinner biscuit/muffins with green chiles and cheddar added, or any number of other ingredients.  I'll bet they'd even be great left completely plain.  It's such an easy, one bowl recipe, that I'm sure I'll try several variations.
   
   
Jamboree Muffins
    
1 egg
3/4 C milk
1/2 C vegetable oil
1/3 C sugar
1 Tbsp baking powder
1 tsp salt
2 C flour
about 1/3 C jam
   
Preheat oven to 400 and grease a 12 cup muffin pan with oil, or use muffin papers.
   
In a large bowl, beat egg with a fork.  Mix in milk, vegetable oil, and sugar with a spoon until smooth, then stir in baking powder and salt.  Stir in flour and mix thoroughly, but don't worry about lumps.  This is basically a wet biscuit dough, so you don't want to over mix it!
Fill each muffin cup 1/3 full with batter, then top each with a small spoonful of jam.  Divide the remaining batter among the muffin cups.
  
Bake until golden and a toothpick inserted into the middle comes out clean, about 15-20 minutes (mine took 17).
  
Yield: 12 muffins

Wednesday, November 18, 2015

Cheddar Bacon Potato Waffles

I came upon this recipe on Serious Eats and decided to make it the next day because by some coincidence, I had all of the ingredients in my refrigerator (even cooked bacon) except for the mashed potatoes.  After buying 3 of the biggest potatoes I've ever seen and making them into mashed potatoes, we were ready to go. 

The batter was easy to make, but the cooking process required some tinkering.  I started out cooking the batter in my panini press because I was worried it would gunk up my waffle iron (my waffle iron is well seasoned and I didn't want to ruin it by having to wash it to remove stuck on bits), but that didn't work so well.  The waffles ended up very thin and fragile.  However, I could see the batter didn't stick to the grill plates, so decided to chance it with my waffle iron after all.  It worked great!  No sticking at all.  

You do need to cook them just right, though.  The temperature should be low enough that the waffle can cook through nicely inside without getting overdone on the outside.  If you cook the waffles at too high of a temperature, they will turn golden on the outside, but will be very difficult to remove from the iron because the inside will be too soft.  You will need to experiment some with your waffle iron and use a timer, but in my Black & Decker waffle iron, 6 minutes with the temperature at to the lowest waffle setting was perfect.  Additionally, if you open the iron too early, the waffle will tear in half with half stuck to the bottom grate and half to the top, so leave it alone for 3 minutes or so before checking!  I also decided to make big waffles instead of smaller ones because the batter tended to join together in the waffle iron, anyway.  You can just cut them apart along the indentations if you want smaller ones.
All the fiddling paid off, though, because these waffles were awesome!  When I asked my husband how many stars they get, he said, "a million!"- high praise!  I really enjoyed them, too.  Very yummy.  Crispy on the outside, soft on the inside, and tons of flavor from the cheese, bacon, and green onions.  I also didn't mash my potatoes very finely, so the waffles had delightful little chunks of potato in them.  The waffles are great plain, but a little sour cream makes them extra special.  For some reason salad with waffles seemed kind of odd, so we had them with applesauce on the side.
Below is my slightly tweaked version of the recipe.  I doubled also doubled it.  To make the mashed potatoes, I just added about 4 Tbsp butter, enough milk to make them the right consistency, and salt and pepper to taste.  This would be a great use for leftover mashed potatoes, though!
Quick Note:  Leftover waffles can be reheated on a parchment paper lined baking sheet in an oven set to 350 until hot and crispy, about 15 minutes.
 
Cheddar Bacon Potato Waffles
about 5 C of your favorite mashed potato recipe (leftover or freshly made, mine were warm)
1/2 C buttermilk
1/4 C vegetable oil
4 eggs
2 C grated cheddar
3/4 C cooked, crumbled bacon
1/3 C sliced green onions
1 C flour
1 tsp baking powder
1/2 tsp baking soda
1/4 tsp salt
1/4 tsp pepper
Brush the plates of a waffle iron with canola oil, and preheat the waffle iron to medium.
Place the mashed potatoes into a large mixing bowl.  Add buttermilk, oil, eggs, cheddar, bacon, and green onions, and stir until combined.  In another bowl, stir together flour, baking powder, baking soda, salt, and pepper, then stir it into the wet ingredients until well mixed.
To make waffles, spoon about 1 C batter (amount depends on how much your iron holds!) into the center of the greased, preheated waffle iron, and cook until the outside is dark golden.  Don't check on the waffle for at least 3 minutes or you could accidentally tear the waffle in half.  Use a timer so you can get the number of minutes right for the other waffles.  If you can't easily remove the waffle when the outside is dark golden, lower the heat on your waffle iron and cook for another minute or two.
Keep already cooked waffles hot on a platter in the oven set to warm.
Serve waffles with sour cream if desired and fresh fruit or applesauce on the side.
Yield:  About 8 servings as a main dish

Sunday, November 1, 2015

Secret Recipe Club: Orange Poppy Seed Waffles with Cranberry Syrup

This month's Secret Recipe Club recipe comes from the blog Adventures in All Things Food!  This blog is written by a lady named Andrea who has a very busy life with her husband, 3 truly adorable children, and a farm.  She is very talented and covers all kinds of topics on her blog, including, of course, food.  There are lots of great looking recipes on her blog, and I chose Orange Poppy Seed Waffles with Cranberry Syrup.  They seemed like the perfect breakfast for a lazy autumn day!  Other awesome looking recipes include Roasted Red Pepper and Tortellini Soup, and Chocolate Chip Malt Cookies.

The waffles and syrup both turned out great.  My only change was to add the juice of half a navel orange to the waffle batter instead of just 1 tablespoon.  This is the only time I can remember making waffles good and flavorful enough to eat without syrup or toppings of any sort!  They're delicious and the orange flavor comes through nicely.  I love poppy seeds so would probably double the amount next time.  In the future I will also experiment with making the batter into pancakes because the waffles turned out very fluffy and I think would do nicely as pancakes.

We loved the syrup, too, and it was perfect exactly as written.  Mine didn't have the beautiful jewel tone of Andrea's- you should have seen the color of the cranberries after cooking for 10 hours!- but it tasted great.  The orange flavor in the syrup is subtle and easy to miss, but it's still wonderful.  Usually I have a strong preference for regular maple syrup on waffles and pancakes, but I really enjoyed this cranberry syrup and didn't put normal syrup on mine at all.  A first!  In the future, I will experiment with cooking the syrup entirely on the stove so it will have a prettier color, but that's minor.  The recipe also made a lot more syrup than needed for the single batch of waffles, so I'm going to try it with plain pancakes as well.

All in all, a great breakfast treat that really tasted (and smelled!) like autumn/winter!  This would make a great Thanksgiving or Christmas breakfast.  Thank you for the great recipes, Andrea!  These waffles will definitely be on my table again!


Cranberry Syrup

1 1/2 C fresh cranberries, rinsed
1 C sugar
2 C water
zest of one large orange
2 Tbsp cornstarch

In a slow cooker, stir together all ingredients except cornstarch.  Cook overnight, 8-10 hours.  Strain liquid through a fine meshed sieve into a medium pan and press the berries against the sieve with a spoon to extract as much juice as possible.  Discard cranberries.

Bring the liquid to a boil.  While you wait for it to boil, stir together 1/4 C cold water and the 2 Tbsp cornstarch.  Use one hand to stir boiling liquid while you pour the cornstarch slurry in a small stream.  Continue to simmer until syrup thickens, then cook for another minute or two.  Remove pan from heat, pour into a small pitcher (you can let it cool a bit in the pan first if you're worried the pitcher will shatter), and set aside while you prepare the waffles.

Yield: About 3 cups

Orange Poppy Seed Waffles

1 3/4 C flour
3 Tbsp sugar
2 tsp baking powder
1/4 tsp baking soda
1/4 tsp salt
1 Tbsp poppy seeds (do 2 if you love poppy seeds like I do)
3 large eggs
1 1/2 C buttermilk
zest of one large orange
juice of 1/2 of a large orange
1 stick salted butter, melted

Whisk together dry ingredients in a large bowl.  In a medium bowl, whisk eggs until smooth.  Whisk in buttermilk, zest, and orange juice.  Pour into the dry ingredients and stir until well combined.  Stir in melted butter.  Let batter rest for 20 minutes.

While the batter rests, preheat and grease your waffle iron.  Cook waffles according to manufacturer's instructions.  Place an oven safe plate in your oven set to warm and add the finished waffles as they cook.  Serve waffles with butter and the cranberry orange syrup.

Yield:  This recipe made 4 large waffles on my Black & Decker iron, which makes for 4 servings.  How many waffles it makes will depend on your waffle iron.


Saturday, October 31, 2015

Chocolate Chip Pumpkin Muffins and Donuts

Earlier this week, I stumbled upon my blog's soulmate: Macaroni and Cheesecake!  In addition to loving the name of the blog, I found tons of fantastic looking recipes that I want to make really soon.  This is the first recipe I've made from the blog, but we're having another of the recipes for dinner tonight.
  
This recipe for Chocolate Chip Pumpkin Muffins was supposed to make 30 muffins.  I have exactly enough muffin tins for 30 muffins, and even had exactly 30 orange muffin papers.  Perfect!  Unfortunately, as I was prepping the tins for the (already made) batter, I couldn't find one of my 12 hole muffin tins.  This seemed like the perfect time to finally use the donut pans my mom gave me, so in addition to 18 muffins, I got 6 normal sized donuts, 12 mini donuts, and the rest of the batter I baked in 3 Fiesta bouillon bowls.  I'm honestly a little skeptical that the batter would have only made 30 muffins!  
  
Regardless, everything turned out great.  I brushed the donuts with melted butter and rolled them in cinnamon sugar.  My husband loved them.  I liked them, too, but preferred the plain muffins.  They're very moist and light, with a delicate pumpkin flavor, barely a hint of cinnamon, and of course, the melty little chocolate chips.  I chose to use mini chocolate chips (personal preference in muffins), and that was definitely a good call since I ended up making mini donuts with some of the batter and full sized chips would have been huge.  For some reason, in my opinion, when they were freshly baked, a bit of the flavor of the muffins was lost with the addition (and added texture) of the cinnamon sugar.  By the next day, the flavors of the donuts had melded nicely and I actually liked them better then.
   
I froze most of the muffins so I could put them in my husband's work lunches.  I'm pretty sure I'll be making this recipe again because we both really enjoyed them!

 
 Chocolate Chip Pumpkin Muffins
  
15 oz can pumpkin puree
2 C sugar
1 1/2 C canola oil
4 eggs
2 tsp baking soda
2 tsp baking powder
1 tsp salt
1 tsp cinnamon
3 C flour
10 oz bag mini chocolate chips
  
Preheat oven to 400 and either line approximately 30 muffin holes with paper liners, or grease the wells of donut pans.
  
Stir together pumpkin, sugar, oil, and eggs until smooth, then stir in baking soda, baking powder, salt, and cinnamon.  Stir in flour until batter is smooth, then stir in the chocolate chips.
  
If you're making muffins, you can just spoon batter into the muffin liners 2/3 full.  If you're making donuts, I suggest placing the batter into a gallon sized Ziploc bag, cutting off one of the corners of the bag, and piping the batter into the pans.  You want the pans to be about 2/3 full.
  
Bake pans of muffins/donuts until a toothpick inserted into the center comes out clean, about 20 minutes for muffins for about 10 minutes for donuts.
  
If you're making donuts, as soon as they come out of the oven, melt butter (probably about 4 Tbsp, maybe more) in a bowl.  Stir together about 1/2 C white sugar and 2 tsp ground cinnamon.  Run a plastic knife around the edges of the warm donuts to loosen them from the pan, then place them on a wire cooling rack.  Brush both sides with the melted butter, then roll them in the cinnamon sugar.  Place them back on the cooling rack to cool off.
  
If you want to freeze the muffins, let them cool completely, then place them in the refrigerator for a couple of hours.  Transfer them to the freezer until they're completely frozen, then place them together in a gallon Ziploc bag and store them in the freezer.  You can either let them thaw at room temperature, or warm them in the microwave.
  
The leftover donuts can be stored in a container at room temperature.
  
Yield: Approximately 36 muffins (my guess) or a lot more donuts!