Showing posts with label perfect 10. Show all posts

Wednesday, May 9, 2018

Pumpkin Fettuccine Alfredo

Oh, this recipe is so good!  I'm a lifelong fettuccine alfredo lover and this is among the best.  It's thick, rich, creamy, amazingly delicious, and is less bad for you than traditional fettuccine alfredo.  It's so good that I would serve it to guests with a nice side salad and garlic bread.  This is seems like it would be geared solely towards autumn or winter, but we make it year round.  It's always a good choice for my husband to make because it's so straight forward.  If you're skeptical about the pumpkin flavor, do know that it's pretty mild.  Mostly it adds bulk to the sauce and offers just a little bit of pumpkin deliciousness.  You could add more pumpkin if you felt so inclined, and a little grating of fresh nutmeg.
 
If you have leftovers, unlike regular fettuccine that turns into a horrifying greasy mess, this pumpkin version reheats very well.  Just reheat it in the microwave and stir in a little milk so it isn't dry.  

Pumpkin Fettuccine Alfredo

4 Tbsp butter
4 cloves minced garlic
15 oz can pumpkin
8 oz cream cheese
2 C milk
1 C freshly grated parmesan, plus more to sprinkle on top
salt to taste
1 lb dry fettuccine noodles
Cook the fettuccine in salted water while you make the sauce.

Saute garlic in butter over low-medium until it barely gets golden, this will take 3 minutes or so.  Garlic burns quickly, so watch it carefully and have the pumpkin ready to add in right when you need it.

Add pumpkin and cream cheese, whisk until smooth.  Whisk in milk and salt.  Heat over low until well combined.  

Add to drained fettuccine, and serve!

Yield: 6 servings


Thursday, August 11, 2016

Peanut Butter Pie

This is probably the recipe on my blog that I feel the most sentimental about.  My husband and I found it in a free booklet of Smucker's recipes at the grocery store in the summer of 2006, when we'd just been dating for a couple of months.  Seeing as we're both peanut butter lovers and had basically been eating our way through all of the peanut butter pies offered as dessert at the restaurants around town, we scurried home from the store with the ingredients for the pie and made it that night.  A favorite was born.  We started a little tradition of making peanut butter pie together every year on our dating anniversary, in addition to once or twice randomly throughout the rest of the year.  My husband even proposed to me on our dating anniversary in 2009 while we were eating this pie.  It's definitely a special recipe to us, and I don't really have an explanation for why I haven't posted it until now!
 
As much as I enjoy trying different versions of the same recipe (I have multiple favorite recipes for mac and cheese, spaghetti sauce, baked ziti, chocolate cake, etc), this is the one and only peanut butter pie recipe I've ever made.  The reason isn't actually really sentimentality (not entirely, at least), it's just that this pie is incredible and can't really be improved upon, so I haven't tried!  I found the recipe in a Smucker's booklet, but it online it can be found here on the Jif website, where it's called Decadent Peanut Butter Pie.  I have changed a couple of small things, namely that we like to divide the fudge into two layers and I use less Cool Whip because I've never seen a 12 oz tub of it at the store.  I also streamline the process a bit (no waiting for it to chill in the refrigerator between layers) and make my own cookie crust.
 
Quick Note:  If you don't have a food processor, you can crush the cookies in a gallon Ziploc bag with a rolling pin and just mix up the filling in a mixing bowl with a spoon.
 
Peanut Butter Pie
 
25 Oreo cookies
5 Tbsp butter, melted
8 oz brick cream cheese, softened
1/2 C sugar
1 C peanut butter, plus 2 Tbsp more for garnish
11 oz jar hot fudge topping for ice cream
8 oz tub Cool Whip, thawed
 
Place Oreo cookies in the bowl of a food processor and process until they turn into crumbs.  Pour in melted butter and pulse until well combined.  Dump cookie crumbs into a pie plate and press evenly along the bottom and up the sides.  Set aside.
 
Wipe out food processor.  Add cream cheese, sugar, and peanut butter, and pulse until combined.  Scrape down sides with a spatula, and pulse again until mixture is smooth.  Remove cutting blade.  Add 2/3 of the container of Cool Whip to the food processor and fold into the peanut butter mixture with a spatula until well combined.  Set aside.
 
Heat jar of hot fudge in jar according to directions on the label, then pour half of the jar into the pie crust.  Spread over the bottom of the pie crust with a spoon.  Set the rest of the hot fudge aside.  Spread pie filling evenly into the crust.  Top with the remaining hot fudge, reserving 2 tablespoons.  Spread to cover the filling evenly.  Spread remaining Cool Whip over the hot fudge.
 
To make the garnish, spoon the remaining 2 tablespoons hot fudge into a small Ziploc bag and the remaining 2 tablespoons peanut butter into another small Ziploc bag.  Cut the tip off one of the corners of the bag with the fudge and pipe it randomly over the pie.  Microwave the bag with the peanut butter for about 10 seconds (just so the peanut butter melts), then do the same as with the bag of hot fudge.
 
Place pie in refrigerator and chill until filling is set, about 4 hours.  Enjoy!
 
Yield:  About 8 servings.

Thursday, June 2, 2016

Perfect Pancakes


The base recipe is from the Cinnamon Roll Pancakes recipe, which is originally from the Recipe Girl blog.  I've only ever made those pancakes once because, in addition to being delicious, they're kind of a pain in the ass, but I've made the base recipe countless times.  I actually usually mix up the dry ingredients for 6 batches or so, store it in a bag in the pantry, then just scoop some out and add milk, egg, and oil when I want to make pancakes.  It has become the default pancake recipe I make, and we have pancakes most weekends.
 
These pancakes aren't just good, they're perfect.  We're both major pancake lovers and I've experimented with many recipes over the years, but this is The One.  They taste exactly like great pancakes you'd get at a restaurant: soft, fluffy, thick but not too thick, and are just pancakey perfection.  I enjoy making fancier pancakes, too, but this is our standard.  You can add mini chocolate chips or blueberries to the batter, or add a little molasses, cinnamon, ginger, allspice, and nutmeg to make gingerbread pancakes.  I've done all of these and they've been great!

   
Perfect Pancakes
 
1 C flour
2 T sugar
2 t baking powder
1/2 t salt
1 C milk
1 egg
1 T vegetable oil
butter to grease the skillet
  
In a medium bowl, whisk together flour, baking powder, and salt.  Add milk, egg, and vegetable oil, and whisk until smooth.
  
Tturn your oven to 200 degrees and place an oven safe plate in the oven.  You will put your pancakes in the oven as you make them so they stay warm.  Melt a small amount of butter in a nonstick (this is very important!) skillet or on a griddle set to medium-high.  Spoon on batter to make whatever size pancakes you want.  Cook the pancake until the edges are dry and there are bubbles on the surface.  Carefully flip the pancake using a wide spatula and cook for another 45 seconds or so until set.  Place the cooked pancake on the plate in the oven, and proceed in the same way with the rest of the batter.
  
Yield: 2 generous servings

Thursday, April 28, 2016

Cream Cheese Chicken Enchiladas

My friend recently made these enchiladas and told me how good they were.  She found the recipe here, on Cookpad.  My husband loves creamy enchiladas and I decided to make them right away (with a couple of changes) because I happened to have all of the ingredients on hand except for the chicken and red enchilada sauce.  For the chicken, I just used a rotisserie chicken from the store.  They only cost $4 at Sam's Club and have quite a bit of meat on them.  About 1/3 of the meat went into the enchiladas and the rest will go into chicken soup I made from cooking the bones with water, garlic, and bay leaves in my Instant Pot.
 
As predicted, my husband loved these.  He adores anything sorta Mexican food-ish, and cream cheese, so I knew they'd be right up his alley.  He liked them so much that he requested that I make a new tag on my blog for 10/10 rated recipes.
 
Cream Cheese Chicken Enchiladas
 
4 C cooked, shredded chicken
8 oz cream cheese, softened (I do this in the microwave)
5 oz plain greek yogurt (not vanilla flavored!)
2 1/2 C grated cheddar cheese, divided
28 oz can red enchilada sauce, divided
10 oz can green enchilada sauce (I used 10 oz salsa verde)
1 tsp onion powder
1/2 Tbsp chili powder
salt and pepper to taste
12 large tortillas
 
Preheat oven to 350 and grease a 9 by 13 inch baking dish and an 8 by 8 dish.  Spread 1 C of the red enchilada sauce in the bottom of the larger pan, and 1/2 C in the bottom of the smaller pan, then set them aside.
 
Stir together all ingredients except 1 1/2 C of the cheddar cheese, 1 1/2 C of the red enchilada sauce, and the tortillas.  Add salt and pepper to taste.  Spread filling evenly down the middle of tortillas, roll them up, and arrange in the prepared baking dishes, with 8 in the larger pan and 4 in the smaller.  Spread reserved red enchilada sauce on top, with 1 C on the larger pan and 1/2 C on the smaller pan.  Bake for 30 minutes, sprinkle the larger pan with 1 C of the reserved cheddar and the smaller pan with 1/2 C of the reserved cheddar, then return to oven for 10 more minutes.  The smaller pan may not need to bake as long as the larger one, just pull it out when it's bubbling.
 
Yield: 12 servings

Monday, April 18, 2016

Creamy Graham Cracker Refrigerator Cake

This is one of those embarrassing recipes.  Embarrassing both because of the ingredients, and because of how easy it is to make!  Regardless, my husband really likes it, and so do I.  It's nice and light and the graham crackers become cakey after sitting, but not in a gross soggy graham cracker way.  Admittedly, if you don't like pudding and Cool Whip, you probably won't like it, but it's definitely worth a try if you aren't above enjoying instant pudding mix!  
 
I always make this with cheesecake pudding mix and dark chocolate frosting, but there's no reason you couldn't get a bit creative.  Chocolate pudding, chocolate graham crackers, and chocolate frosting?  Banana cream pudding, cinnamon graham crackers, and caramel frosting?  Why not!
Creamy Graham Cracker Refrigerator Cake
 
2 3.4 oz boxes instant pudding mix (I use Jell-o brand cheesecake pudding mix)
3 C milk
8 oz tub Cool Whip, thawed
1 box graham crackers (you will need about 3 sleeves of crackers)
1 can dark chocolate frosting
Whisk together pudding mix and milk until it begins to set, then fold in the Cool Whip.  
Line the bottom of a 9 by 13 baking dish with graham crackers, breaking them to fit if necessary.  Spread 1/2 of the pudding mixture on top.  Cover that with another layer of graham crackers, then the rest of the pudding mixture.  Cover with a third and final layer of graham crackers.
Remove lid and foil seal from frosting can and microwave until partly melted, about 45 seconds.  Stir until smooth.  Pour over dessert and spread to cover with a spatula.
Place dessert in refrigerator and let sit at least 8 hours so the graham crackers can soften.
 
Yield: 12 servings

Sunday, February 21, 2016

Grandmother's Corn Pudding

Here's another family recipe, and definitely among my most treasured.  I have no explanation for why it's taken so long for me to share it.  This is from my paternal grandmother, a remarkable woman who was born in Kentucky in the 1920s and lived there her entire life.  She was a fantastic cook, and my personal favorite thing that she would make was corn pudding.  My parents got divorced (amicably, thankfully) when I was a teenager, and my mom likes to joke that the three most treasured things she got from her marriage were her two children and my grandmother's recipe for corn pudding.  My parents aren't married anymore and the four members of our nuclear family are spread in 3 states thousands of miles apart, but we all make corn pudding for Thanksgiving and/or Christmas.  You can see from all the cream that it is very far from being a healthy veggie dish, but some things are just special and worth it and this is one of them! 

Quick Note:  You can very easily halve this recipe, just use an 8 by 8 baking dish and reduce the baking time some.  For Christmas I made a full recipe, but baked part in a 7 by 11 dish and part in a loaf pan, which is what you see in the photo.
 

Grandmother's Corn Pudding

4 C corn (frozen or freshly cut from cobs)
8 eggs
4 C cream
2/3 C sugar
1 1/2 tsp salt
1 1/2 tsp flour
1 tsp baking powder

Preheat oven to 350 and grease a 9 by 13 baking dish.  Evenly spread corn in bottom of dish.  In a large bowl, whisk eggs until smooth.  Whisk in remaining ingredients until evenly mixed.  Pour carefully into the baking dish with the corn.  Bake until golden on top and a toothpick inserted into the center comes out clean, about 1 hour.

Yield:  About 12 servings

Friday, February 5, 2016

Brown Sugar & Cloves Baked Ham

This is the ham recipe I've used for Christmas the past two years, and I plan to stick with it indefinitely.  It's not as pretty as the pineapple and cherry studded hams, but it tastes amazing, so I'm sticking with it!  The recipe comes from Our Best Bites, which is a blog just bursting with great recipes.  Usually I'm not a huge meat eater, but I really love this ham, and so does my husband, who suggested we make it at Thanksgiving instead of turkey.  The glaze and the sauce it's served with are just great.  I've used a 9 lb Private Selection (Kroger brand) spiral cut ham wrapped in foil both years, and it's turned out great each time.  The leftover ham is perfect reheated or made into sandwiches, and the serving sauce goes well on sandwiches, too.  I put the ham bone in the freezer to make into pinto beans or hoppin' john.
  
 
Brown Sugar & Cloves Baked Ham
 
for serving sauce:
1/2 C mayo
1/4 C dijon mustard
2 tsp apple cider vinegar
 
for glaze:
2 Tbsp melted bacon grease
1 1/2 Tbsp apple cider vinegar
1 1/2 Tbsp dijon mustard
3 Tbsp thawed, frozen orange juice concentrate
3/4 C dark brown sugar
3/4 tsp ground cloves
 
If possible, make the serving sauce the night before so the flavors have time to meld.  Just stir the ingredients together in a small bowl and stash it in the fridge.
 
When you're ready to bake your ham, preheat oven to 325, lower the oven rack to the second lowest position, and line an approximately 8 by 12 inch baking dish with foil.  Place the ham in the dish fat side up.  Insert an oven safe thermometer probe into the thickest part of the ham (in the non-sliced region).  Cover the ham with foil.  Bake until temperature of ham reaches 110 degrees.
 
While the ham bakes, make the glaze by stirring together all of the glaze ingredients.  Remove ham from oven and generously brush the glaze all over, on the outside as well as between the slices.  It can be a little tricky to get the glaze between the slices, but it's worth it, just try not to tear the slices off the bone.
 
Return ham to oven and continue to bake to the temperature recommended on the package, or 145 degrees.  It will probably take about 3-3 1/2 hours for the ham to get up to temperature.  Check on it occasionally and cover again with foil if it starts getting over browned.  Remove ham from oven, tent with foil, and let rest for at least 10 minutes before serving with the sauce on the side.

Tuesday, January 19, 2016

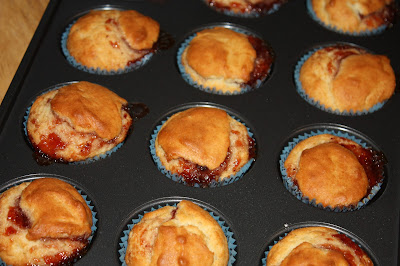
Jamboree Muffins

This is the most recent recipe I've made from Joanne Fluke's murder-mystery series about Hannah Swensen that also focuses a lot on baking.  This recipe is from The Red Velvet Cupcake Murder.  I was lying in bed Saturday night and had decided to make muffins, but didn't have a particular recipe in mind.  10 minutes later, I was reading the book and came upon the recipe for Jamboree Muffins.  I had all the ingredients and they sounded good, so why not?
  
These muffins are GREAT.  Definitely among the best I've ever had.  They're very interesting, too.  The finished muffin is like a cross between a muffin and a biscuit, both in texture and flavor.  When I looked the recipe over the first time, I had my suspicions they'd be rather biscuit-like because the ingredients look more like a biscuit dough than muffin batter, and I was right!  They aren't very sweet and have a texture reminiscent of a buttermilk biscuit, but are rather airy, like a muffin.  The jam in the middle is an awesome addition.  I used strawberry, but pretty much any flavor would be really good.  I've tried making jam filled muffins in the past and they haven't been particularly good to start with, but the leftovers were awful because the jam made them very soggy.  The texture of these muffins is dense enough that they don't get soggy and were still tasty the next day.
  
In the future, I'd like to experiment with making these muffins with other ingredients added instead of jam.  They'd make great dinner biscuit/muffins with green chiles and cheddar added, or any number of other ingredients.  I'll bet they'd even be great left completely plain.  It's such an easy, one bowl recipe, that I'm sure I'll try several variations.
   
   
Jamboree Muffins
    
1 egg
3/4 C milk
1/2 C vegetable oil
1/3 C sugar
1 Tbsp baking powder
1 tsp salt
2 C flour
about 1/3 C jam
   
Preheat oven to 400 and grease a 12 cup muffin pan with oil, or use muffin papers.
   
In a large bowl, beat egg with a fork.  Mix in milk, vegetable oil, and sugar with a spoon until smooth, then stir in baking powder and salt.  Stir in flour and mix thoroughly, but don't worry about lumps.  This is basically a wet biscuit dough, so you don't want to over mix it!
Fill each muffin cup 1/3 full with batter, then top each with a small spoonful of jam.  Divide the remaining batter among the muffin cups.
  
Bake until golden and a toothpick inserted into the middle comes out clean, about 15-20 minutes (mine took 17).
  
Yield: 12 muffins

Thursday, December 3, 2015

Spaghetti and Meatballs

This recipe for meatballs and sauce comes from Serious Eats.  It was actually the first recipe I made from Serious Eats, the description about the author's Friday Night Meatball tradition intrigued me.  I first made it a year ago and absolutely loved it.  The sauce is perfectly savory and flavorful, even though it doesn't have many ingredients, and the meatballs are among the best I've ever had.  I'm particular about tomato sauce and meatballs, so you know these are good!  The meatballs are great served over raw spinach, roasted veggies, or as meatball subs, too.  This recipe is simple, but takes at least two hours to get on the table, so plan accordingly!
  
Quick Note:  I've changed this recipe a little.  The biggest thing is that I use a lot less salt.  I also put the entire 1/2 C parsley into the meatballs.  Didn't realize until I'd made it a couple times that half the parsley was supposed to go in the sauce, but it doesn't hurt the meatballs at all!  Also, this most recent time I served the sauce and meatballs over whole wheat penne.  The plan had been to use spaghetti, but the box I thought was in the pantry had been used up!  Turns out the sturdiness of the penne really held up well to the sauce, I may do it this way in the future occasionally.
  
  
Sauce:
  
2 Tbsp butter
7 cloves garlic, freshly minced
6 oz can tomato paste
2 28 oz cans whole tomatoes, crushed with hands
1/2 tsp salt
1/2 tsp pepper
  
Meatballs:
4 slices bread in crumbs
1/2 C minced parsley
1 1/2 Tbsp Goya seasoning
2 T dried minced onion
3/4 tsp black pepper
2 eggs
2 lb ground beef
2 Tbsp olive oil
grated parmesan to serve
cooked pasta
  
Heat butter/oil in a large pot over medium.  Add garlic and cook 1 minute, stirring constantly.  Add tomato paste and stir constantly for 1 more minute.  Add crushed tomatoes, salt, and pepper.  Bring to a simmer, cover pot, and reduce heat to low while you make the meatballs.
  
Stir together bread crumbs, parsley, Goya seasoning, onion, pepper, and eggs.  Add ground beef and mix gently just until well combined (don't over mix).  Form meat into 1 1/2-2 inch balls and place on a foil lined baking sheet.
 
Heat oil in a large nonstick skillet over medium and add a single layer of meatballs.  Brown meatballs on all sides, turning gently with tongs.  Place meatballs into simmering sauce and brown the rest of the meatballs.
 
When all the meatballs are browned, stir them gently in the sauce making sure not to break them up, and simmer over low heat, uncovered (but use a spatter screen!), for 1 hour 15 minutes (you can go as long as 2 hours), stirring occasionally.  You'll have to stir more frequently as the sauce cooks down.  Serve sauce and meatballs over cooked pasta, sprinkled with parmesan.
  
Yield:  About 8 servings

Wednesday, November 18, 2015

Cheddar Bacon Potato Waffles

I came upon this recipe on Serious Eats and decided to make it the next day because by some coincidence, I had all of the ingredients in my refrigerator (even cooked bacon) except for the mashed potatoes.  After buying 3 of the biggest potatoes I've ever seen and making them into mashed potatoes, we were ready to go. 

The batter was easy to make, but the cooking process required some tinkering.  I started out cooking the batter in my panini press because I was worried it would gunk up my waffle iron (my waffle iron is well seasoned and I didn't want to ruin it by having to wash it to remove stuck on bits), but that didn't work so well.  The waffles ended up very thin and fragile.  However, I could see the batter didn't stick to the grill plates, so decided to chance it with my waffle iron after all.  It worked great!  No sticking at all.  

You do need to cook them just right, though.  The temperature should be low enough that the waffle can cook through nicely inside without getting overdone on the outside.  If you cook the waffles at too high of a temperature, they will turn golden on the outside, but will be very difficult to remove from the iron because the inside will be too soft.  You will need to experiment some with your waffle iron and use a timer, but in my Black & Decker waffle iron, 6 minutes with the temperature at to the lowest waffle setting was perfect.  Additionally, if you open the iron too early, the waffle will tear in half with half stuck to the bottom grate and half to the top, so leave it alone for 3 minutes or so before checking!  I also decided to make big waffles instead of smaller ones because the batter tended to join together in the waffle iron, anyway.  You can just cut them apart along the indentations if you want smaller ones.
All the fiddling paid off, though, because these waffles were awesome!  When I asked my husband how many stars they get, he said, "a million!"- high praise!  I really enjoyed them, too.  Very yummy.  Crispy on the outside, soft on the inside, and tons of flavor from the cheese, bacon, and green onions.  I also didn't mash my potatoes very finely, so the waffles had delightful little chunks of potato in them.  The waffles are great plain, but a little sour cream makes them extra special.  For some reason salad with waffles seemed kind of odd, so we had them with applesauce on the side.
Below is my slightly tweaked version of the recipe.  I doubled also doubled it.  To make the mashed potatoes, I just added about 4 Tbsp butter, enough milk to make them the right consistency, and salt and pepper to taste.  This would be a great use for leftover mashed potatoes, though!
Quick Note:  Leftover waffles can be reheated on a parchment paper lined baking sheet in an oven set to 350 until hot and crispy, about 15 minutes.
 
Cheddar Bacon Potato Waffles
about 5 C of your favorite mashed potato recipe (leftover or freshly made, mine were warm)
1/2 C buttermilk
1/4 C vegetable oil
4 eggs
2 C grated cheddar
3/4 C cooked, crumbled bacon
1/3 C sliced green onions
1 C flour
1 tsp baking powder
1/2 tsp baking soda
1/4 tsp salt
1/4 tsp pepper
Brush the plates of a waffle iron with canola oil, and preheat the waffle iron to medium.
Place the mashed potatoes into a large mixing bowl.  Add buttermilk, oil, eggs, cheddar, bacon, and green onions, and stir until combined.  In another bowl, stir together flour, baking powder, baking soda, salt, and pepper, then stir it into the wet ingredients until well mixed.
To make waffles, spoon about 1 C batter (amount depends on how much your iron holds!) into the center of the greased, preheated waffle iron, and cook until the outside is dark golden.  Don't check on the waffle for at least 3 minutes or you could accidentally tear the waffle in half.  Use a timer so you can get the number of minutes right for the other waffles.  If you can't easily remove the waffle when the outside is dark golden, lower the heat on your waffle iron and cook for another minute or two.
Keep already cooked waffles hot on a platter in the oven set to warm.
Serve waffles with sour cream if desired and fresh fruit or applesauce on the side.
Yield:  About 8 servings as a main dish

Sunday, November 1, 2015

Secret Recipe Club: Orange Poppy Seed Waffles with Cranberry Syrup

This month's Secret Recipe Club recipe comes from the blog Adventures in All Things Food!  This blog is written by a lady named Andrea who has a very busy life with her husband, 3 truly adorable children, and a farm.  She is very talented and covers all kinds of topics on her blog, including, of course, food.  There are lots of great looking recipes on her blog, and I chose Orange Poppy Seed Waffles with Cranberry Syrup.  They seemed like the perfect breakfast for a lazy autumn day!  Other awesome looking recipes include Roasted Red Pepper and Tortellini Soup, and Chocolate Chip Malt Cookies.

The waffles and syrup both turned out great.  My only change was to add the juice of half a navel orange to the waffle batter instead of just 1 tablespoon.  This is the only time I can remember making waffles good and flavorful enough to eat without syrup or toppings of any sort!  They're delicious and the orange flavor comes through nicely.  I love poppy seeds so would probably double the amount next time.  In the future I will also experiment with making the batter into pancakes because the waffles turned out very fluffy and I think would do nicely as pancakes.

We loved the syrup, too, and it was perfect exactly as written.  Mine didn't have the beautiful jewel tone of Andrea's- you should have seen the color of the cranberries after cooking for 10 hours!- but it tasted great.  The orange flavor in the syrup is subtle and easy to miss, but it's still wonderful.  Usually I have a strong preference for regular maple syrup on waffles and pancakes, but I really enjoyed this cranberry syrup and didn't put normal syrup on mine at all.  A first!  In the future, I will experiment with cooking the syrup entirely on the stove so it will have a prettier color, but that's minor.  The recipe also made a lot more syrup than needed for the single batch of waffles, so I'm going to try it with plain pancakes as well.

All in all, a great breakfast treat that really tasted (and smelled!) like autumn/winter!  This would make a great Thanksgiving or Christmas breakfast.  Thank you for the great recipes, Andrea!  These waffles will definitely be on my table again!


Cranberry Syrup

1 1/2 C fresh cranberries, rinsed
1 C sugar
2 C water
zest of one large orange
2 Tbsp cornstarch

In a slow cooker, stir together all ingredients except cornstarch.  Cook overnight, 8-10 hours.  Strain liquid through a fine meshed sieve into a medium pan and press the berries against the sieve with a spoon to extract as much juice as possible.  Discard cranberries.

Bring the liquid to a boil.  While you wait for it to boil, stir together 1/4 C cold water and the 2 Tbsp cornstarch.  Use one hand to stir boiling liquid while you pour the cornstarch slurry in a small stream.  Continue to simmer until syrup thickens, then cook for another minute or two.  Remove pan from heat, pour into a small pitcher (you can let it cool a bit in the pan first if you're worried the pitcher will shatter), and set aside while you prepare the waffles.

Yield: About 3 cups

Orange Poppy Seed Waffles

1 3/4 C flour
3 Tbsp sugar
2 tsp baking powder
1/4 tsp baking soda
1/4 tsp salt
1 Tbsp poppy seeds (do 2 if you love poppy seeds like I do)
3 large eggs
1 1/2 C buttermilk
zest of one large orange
juice of 1/2 of a large orange
1 stick salted butter, melted

Whisk together dry ingredients in a large bowl.  In a medium bowl, whisk eggs until smooth.  Whisk in buttermilk, zest, and orange juice.  Pour into the dry ingredients and stir until well combined.  Stir in melted butter.  Let batter rest for 20 minutes.

While the batter rests, preheat and grease your waffle iron.  Cook waffles according to manufacturer's instructions.  Place an oven safe plate in your oven set to warm and add the finished waffles as they cook.  Serve waffles with butter and the cranberry orange syrup.

Yield:  This recipe made 4 large waffles on my Black & Decker iron, which makes for 4 servings.  How many waffles it makes will depend on your waffle iron.


Friday, October 9, 2015

Colombian Chicken Stew

This is my adaptation of the Kenji Lopez-Alt's Colombian Chicken Stew recipe from the Serious Eats blog.  It's a very simple stew, with only a few ingredients and no liquid added.  It's made in a pressure cooker (I used my Instant Pot) and the tomatoes, onion, and chicken make a good amount of very flavorful broth, without needing to add any liquid.  It's pretty cool and very, very yummy with simple, but really good flavors.  I should note that while this is called a stew, it's almost more like a soup because the broth is not thick at all.  You can get a slightly thicker stew if you cut your potatoes smaller because they will break up and thicken the liquid a bit when you stir it up at the end.

I made the stew once according to the original directions (except wasn't able to fit all the vegetables into my Instant Pot), then made it this way.  The original method is very tasty, but the broth is quite greasy and it requires a lot of careful sifting and straining to get all the bits of bone and skin out of the stew.  This time, I used boneless, skinless chicken breasts and put them in a soup sock.  Everything turned out just as delicious, but it was even easier to make.  I'm sick with a pretty bad cold at the moment and was craving this stew, so it being easy to make was a definite perk!
Colombian Chicken Stew
 
2 1/2 lbs boneless, skinless chicken breasts
3 cloves garlic, minced
4 large tomatoes, diced large
1 large onion, diced
1 large russet potato, peeled and diced large
2 bay leaves
salt and pepper to taste
Place chicken breasts in the bottom of an Instant Pot and top with all vegetables.  Add the bay leaves and sprinkle on a bit of salt and pepper.  Plug in Instant Pot, put on and close the lid, make sure it's set to sealing, and cook on manual for 30 minutes.  It will take a while for enough pressure to build up to seal the pot, so don't worry!
After the 30 minutes are up, release the pressure by pushing the little lever on top with the end of a long handled spoon.  Let the pressure completely release, then remove the lid.  Discard the bay leaves.  Pull out the chicken breasts, chop/shred them however you like, and add them back to the pot.  Add salt and pepper to taste, then serve.
Alternate Prep:  I haven't actually tried it this way, but you could probably put all the ingredients in a greased slow cooker and cook on low until the chicken is cooked through, then proceed with the recipe.  How long it will take completely depends on the slow cooker.
Yield:  About 6 servings

Sunday, September 27, 2015

Crazy Cake

This cake is so good that I made it twice in less than a month!  First to bring it to a dinner with friends, then for a potluck that actually featured most of the same people, but I didn't hear any complaints.  The recipe is from the Ben and Birdy blog, and it's one I've been intrigued with for years and am so glad I finally made it.  You know it's good if I make it twice in such a short time period!  The first time I topped it with sweetened whipped cream and sprinkles like in the pictures over on that blog.  It was really, really good that way, but I decided to try a double batch of this frosting this time.  Either way is delightful.

This recipe apparently has its roots in the Great Depression because it was a reliable way to get a fantastic cake without eggs or butter.  It's often called Crazy Cake or Wacky Cake.  Whatever you call it, it's awesome!  The first time I used all whole wheat flour (just wanted to try it out) and Hershey's Special Dark cocoa.  The cake was basically black from the cocoa and everyone loved it.  The second time, I tried white flour and normal cocoa.  Also fantastic!

Note that this cake is vegan if you serve it with a vegan icing, vegan iced cream, sprinkle it with powdered sugar, or just serve it plain.


Crazy Cake

2 1/4 C flour (white, whole wheat, or a mixture)
2 C white sugar
1 C cocoa powder (regular or dark)
2 tsp baking soda
1/2 tsp salt
1 Tbsp vanilla extract
2 tsp vinegar
2/3 C canola oil
2 C cold water

Preheat an oven to 350 and grease a 9 by 13 baking dish.  Set aside.

In a large mixing bowl, whisk together dry ingredients.  Make 3 wells in the dry ingredients and pour the vanilla extract into one well, vinegar into another, and oil into the third.  Pour the cold water over top and whisk thoroughly until the batter is smooth.  Pour batter into prepared pan and bake until a toothpick inserted into the center comes out clean, about 30-35 minutes.  Let cake cool completely before frosting, or you can just let it cool for half an hour or so and serve warm cake topped with ice cream or sweetened whipped cream and sprinkles.

To make sweetened whipped cream, just beat 2 C cream until soft peaks form, then beat in vanilla extract and powdered sugar to taste.  Continue beating it until stiff peaks form, then stop immediately because you don't want to accidentally start turning your whipped cream into butter!

Thursday, August 27, 2015

Ravioli Lasagna

I came up on this recipe at the blog Peaceful Parents, Confident Kids and made it that night, it just looked so good and easy!  You don't even have to cook the ravioli first.  Best of all, it turned out REALLY well.  My lasagna loving husband said he liked it better than regular lasagna, which is saying a lot.  I was worried it may end up a little watery from all the raw spinach, but the ravioli absorbs all the excess liquid very nicely and the entire thing is just divine.
 
 
 Ravioli Lasagna
 
1 lb ground beef
1 26 oz jar/can prepared spaghetti sauce (it doesn't have to be fancy, I used Hunt's Four Cheese)
about 20 oz uncooked, refrigerated cheese ravioli
3 C grated mozzarella
1/3 C grated parmesan
4 oz raw baby spinach
Grease 9 by 13 dish and preheat oven to 350.
 
Cook ground beef in a large skillet over medium high, and then stir in spaghetti sauce.
 
To assemble the lasagna, spread a small amount of the meat sauce in the baking dish, then make a single layer of ravioli, half of the spinach, 2 Tbsp of the parmesan, 1 C of the mozzarella, half of the remaining sauce, the rest of the ravioli, the rest of the spinach, 2 Tbsp of the parmesan, and the rest of the sauce.  Cover with foil and bake 40 minutes.  Remove the foil, top with the remaining 2 C mozzarella and the remaining parmesan.  Bake 20 minutes longer or until it's bubbly throughout and the cheese is browned.  Let the lasagna cool for 10 minutes before serving.
 
Yield: 6-8 servings

Sunday, August 2, 2015

Secret Recipe Club: Basic Granola & Raw Raspberry Jam

This month, I was assigned a beautiful blog called The Smoothie Lover.  It's written by a young Danish girl named Josefine.  In addition to making very creative and mostly very nutritious recipes, Josefine takes absolutely gorgeous photos.  This is her first month doing Secret Recipe Club and I hope she had fun!

In the course of choosing a recipe to make from Josefine's blog, I actually looked at all the recipes she posted and settled on two: Basic Granola and Raw Raspberry Jam.  I made both to go with homemade Greek yogurt.  Both turned out really well.  My husband is the granola eater around here (he eats fruit and granola with lunch every day), and I am happy to have a recipe that contains much less sugar than most.  The jam is perfect in yogurt, I just stirred it into the plain yogurt and didn't need to add any other sweetener.  It's also great on toasted English muffins!  Raspberries are probably my favorite fruit, but I'd like to experiment with peaches or strawberries, too. (Update: In the month since I first made the raw jam, I have also made raw peach, grape, and strawberry jam, with great results each time!)


Basic Granola

1 1/2 C oats
2 Tbsp applesauce
1/2 C chopped raw nuts (I used cashews)
1/2 C seeds (I used sunflower and sesame)
1 Tbsp melted coconut oil (you can do this in a measuring cup in the microwave)
1/4 C water
3 Tbsp honey or maple syrup (I used honey)
1/2 C dried fruit (I used dried cherries, blueberries, and cranberries)

Preheat oven to 350 and line a large baking sheet with parchment paper; set aside.

In a large mixing bowl, stir together oats and applesauce until evenly coated.  Stir in nuts and seeds.  In a small bowl, stir together melted coconut oil, water, and honey or maple syrup.  Pour evenly over granola mixture and stir to coat.

Evenly spread granola on parchment paper and bake, stirring every 15 minutes, until granola is golden and dry.  If you're not sure whether it's dried yet, you can remove a little from the oven and let it sit at room temperature for a few minutes, it will quickly harden if it's ready.

Let granola cool completely, then pour into a container, add dried fruit, and shake to combine.

Yield:  About 8 servings


Raw Raspberry Jam

2 C raspberries (I used a 12 oz bag of thawed, frozen raspberries)
3 Tbsp honey
3 Tbsp chia seeds

Puree raspberries with a food processor or immersion blender, then stir in  honey and chia seeds.  Store covered in the refrigerator overnight so the chia seeds can expand and thicken the jam.

Yield:  About 2 cups

Sunday, July 12, 2015

Cheesy Ranch Potatoes

I stumbled upon this recipe on Natasha's Kitchen recently and have made it twice in the past month.  It's so simple and very, very tasty!  The first time, I used red potatoes with the skin on, bottled ranch dressing, and green onions, and this time I used peeled russet potatoes, homemade ranch dressing (actually homemade ranch dressing mix plus mayo and milk), and bacon.  Both were great!

This is very much a "do what you want" recipe.  You can make just a small amount of potatoes, or a whole lot, and pretty much any kind of potato will do.  You also don't have to measure anything, just use your own judgment!

Cheesy Ranch Potatoes

potatoes
ranch dressing
garlic salt
grated cheddar cheese
cooked, crumbled bacon (optional)
thinly sliced green onion or chives (optional)

Wash and peel the potatoes if desired, then cut them into 1 1/2 inch chunks.  Boil in salted water until they can be pierced with a fork, then drain thoroughly.  Carefully fold in desired amount of ranch dressing, you want them to be coated but not swimming in it.  Spoon evenly into a greased baking dish, season to taste with garlic salt, then bake at 400 until the potatoes start to turn golden in places on top, about 20-25 minutes.  Remove from oven and sprinkle with desired amount of grated cheese, plus the bacon if you're using it.  Return to oven for 5 minutes.  Remove and sprinkle with the green onions or chives if you're using them, then let the potatoes sit for a few minutes before serving.  Leftovers reheat really well!

Tuesday, June 23, 2015

Grilled Corn & Tomato Salad

I have made this salad 4 times in the past month or so.  We love grilled corn on the cob, and so far every time I have grilled this summer, I've grilled corn for us to eat immediately as well as corn to use the next day in this salad.  It's nothing fancy, but very good!

 
Grilled Corn & Tomato Salad
 
2 cobs fresh corn
olive oil
salt and pepper
10 oz (by weight) cherry tomatoes, halved
3 Tbsp sliced green onions
2 Tbsp apple cider vinegar, plus more to taste
1 tsp dried basil
1/8 tsp garlic powder
salt to taste
Remove the corn husks and corn silk from cobs.  Rinse corn and pat dry.  Brush all over with olive oil, then sprinkle with salt and pepper.  Grill on an outdoor grill over medium heat, rotating every couple of minutes and with grill cover shut in between, until there are grill marks all over the corn and it's cooked through, about 15 minutes.  Remove corn from grill and let it sit until cool enough to handle, or wrap it in foil and refrigerate over night.
When you're ready to make the salad, cut the corn off the cobs with a serrated knife.  Place in a medium mixing bowl with the halved tomatoes and green onions, then add the rest of the ingredients.  Toss until everything's well mixed, taste, and add a little more vinegar, salt, garlic powder, or basil if you think it's needed.
I always serve half of the salad immediately, then cover the rest and serve it the next day.  It's good both ways!

Sunday, May 31, 2015

Secret Recipe Club: 30 Minute Dinner Rolls

This month's SRC recipe comes from the blog Hun... What's for Dinner?, which is written by a very nice sounding young stay-at-home mom of two adorable children.  She is a very busy cook and makes all kinds of things!  I really want to try her Stuffed Savory Ham and Cheese French Toast and Old Fashioned Tomato Noodle Soup (I feel these two would be really good paired together), but ended up choosing her 30 Minute Dinner Rolls.  The idea of rolls in 30 minutes really intrigued me and the picture she posted looked really good, so I gave it a go.

Lucky I did, too, because the rolls are so good!  They're quick, yes, but believe me when I say the quality does not suffer.  They're soft, puffy, and very, very tasty.  I have no idea how they're so good when they take so little effort, but you won't hear me complaining!  The main advantage to these I think is that without all of the kneading and rising, the guesswork of how long it will take to make the rolls is completely gone.  You can't really rush rising dough and it doesn't always cooperate with the other things you're trying to get on the table, but that's not really a problem with this recipe since the times are so predictable.


30 Minute Dinner Rolls

1/4 C sugar
1/3 C vegetable oil
1 C plus 2 Tbsp warm water
2 Tbsp yeast
4 C flour, divided
1/2 tsp salt
1 egg

In the bowl of a stand mixer, stir together sugar, oil, water, and yeast until yeast dissolves.  Let sit for 15 minutes.  The yeast should look creamy and have grown some.

Add 2 C of the flour, the salt, and the egg, then stir it in.  Stir in additional flour in 1/2 C increments until it's too difficult, then attach the dough hook and knead until the dough comes together and looks uniform.  It's okay if it's sticky and don't worry about kneading it past when the dough comes together.

Grease a 9 by 13 baking dish, grease your hands, and then form the dough into 12 equal sized balls and arrange them evenly in the dish.  Place the dish in the oven and let the rolls rise for 10 minutes.  After 10 minutes have passed, turn the oven to 400.  Set your timer for 10 minutes once the oven finishes preheating.  The rolls are done baking when they're golden brown.

Yield: 12 large rolls


Thursday, May 21, 2015

Goulash

This recipe is from the Serious Eats website and was created by J. Kenji Lopez-Alt.  He calls it American Chop Suey, but I've always known it as goulash.  In all honesty, it's never been one of my favorite foods, though I do have fond memories of my grandmother making it.  My husband requested something with macaroni, tomatoes, and ground beef, though, and I immediately thought of this recipe that I had bookmarked months ago!
 
This recipe does not disappoint.  It is by far the best goulash I have ever had and I don't really see bothering with any other version of the recipe.  How could it not be good with all the pockets of melted mozzarella?  Cheese aside, it's just an awesome recipe with lots of well balanced flavor, especially for a recipe that takes less than an hour to make.  My husband and I both rated it 9 out of 10, which is of course very good!
I mostly stuck to the original recipe, but it calls for letting the macaroni soak in hot water before draining it and adding it to the skillet.  A lot of recipe reviewers said this made the macaroni very mushy, which I of course wanted to avoid.  I compensated by just adding the uncooked noodles right to the skillet and letting it cook for a bit longer.  Perfect!  I also used one can of whole tomatoes and one crushed, but that was an accident, apparently the crushed tomatoes were hiding behind the whole ones on the grocery store shelf.  This probably didn't make a huge difference in the outcome, but crushed tomatoes are definitely thicker/richer than pureed whole tomatoes.  Next time I'll try using all whole tomatoes, but I have zero complaints about how it turned out!
 
 
Goulash

2 T olive oil
2 T butter
1 large onion, finely diced
1 bell pepper, diced
4 cloves garlic, minced
1/4 C fresh parsley, minced
1 Tbsp dried oregano
1 tsp red pepper flakes
1 lb ground beef
2 28 oz cans whole tomatoes, blended until smooth (I used 1 whole, 1 crushed)
1 C chicken broth
2 T Worcestershire sauce
1 lb dry macaroni noodles
salt and pepper to taste (I used 1 tsp salt, and 1/2 tsp pepper)
1 lb mozzarella cheese, cut into 1/2 inch cubes
3 oz grated parmesan
Heat olive oil and butter in a very large skillet over medium-high until butter is melted.  Add onion and bell pepper and saute until onions are translucent, about 7 minutes.  Add garlic, 1/2 of the parsley, the oregano, and red pepper flakes, and saute 1 minute. 

Raise heat to high and crumble in ground beef.  Saute until meat is cooked through.  Add tomatoes, broth, and Worcestershire sauce, and bring to a boil.  Stir in macaroni, reduce heat to a simmer, cover, and let cook 7 minutes. 

Stir, add salt and pepper to paste, then quickly stir in half of the mozzarella cubes, just enough to evenly disperse the cheese.  Evenly top with the rest of the mozzarella and half of the parmesan.  Cover the skillet, reduce heat to the lowest setting, and cook 3 minutes without stirring.  Remove skillet from heat and let sit 5 minutes more. 

Remove lid, sprinkle with remaining parmesan and parsley, and serve with Worcestershire sauce.
Yield: About 10 servings

Saturday, April 18, 2015

Greek Pasta Salad

I planned to make this recipe for 6 months before I finally made it!  Our puppy requires a lot of attention and this is the first dinner I cooked that was more complicated than hot dogs and a can of pork and beans.  I made it while she was milling around my feet, and she didn't pee on the floor or anything :D

That success apart, this is a really good pasta salad.  I halved the recipe, but it still made a lot.  You know it's good if you still are looking forward to eating it 4 or 5 days later!  We liked it so much that I plan to make it again once the weather warms up a bit.
 
The recipe is from the blog Rocky Mountain Woman.  My only changes (other than halving the recipe) were to use roasted bell peppers instead of sundried tomatoes (I couldn't find any at the store), and I cut way back on the dried oregano.

As a side note, the dip pictured with the raw veggies in this photo is Dilly Dip.


Greek Pasta Salad

1 lb assorted dry pasta
15 oz can small whole olives, drained and rinsed
12 oz jar roasted bell peppers, diced
1/2 of a 12 oz jar sliced peperoncinis, drained
7 oz container crumbled feta cheese
 
for dressing:
3 Tbsp apple cider vinegar
1/3 C olive oil
1 tsp dried oregano
1/2 tsp dried basil
 1 tsp Worcestershire sauce
1 1/2 tsp dijon mustard

Cook pasta in salted water, drain, and rinse with cold water until pasta is chilled.  Drain thoroughly.  Stir in olives, roasted peppers, peperoncinis, and feta.

In a medium bowl, whisk together dressing ingredients until everything is incorporated.  Pour over pasta salad, stir, and refrigerate for a couple of hours before serving.

Yield:  Depends on whether you do this as a main dish or side, but about 8-16.