I know it may not sound like a good thing for frosting to be chewy, but trust me on this. It's not chewy like gummi bears, but chewy like a homemade caramel candy, with a solid helping of chocolate. It starts out the perfect glossy spreading consistency, then firms up into a thick, fudgy texture. How could that not be good? Let me note that I have no idea how well this would work with a layer cake where the frosting has to stick to the sides, but it works well on cupcakes or spread over a 9 by 13 inch cake left in the pan.
This frosting is also astonishingly easy to make and only has two ingredients: chocolate chips and sweetened condensed milk. It's the fudge frosting from Joanne Fluke's titular fudge cupcake recipe. I was excited about trying the cupcake recipe for months because I've had a lot of luck with her recipes and love all things raspberry (the "secret" ingredient in the cupcake batter is raspberry syrup), but didn't care for the cupcakes themselves. They weren't very chocolatey, but were both dense and dry. Sorry, Joanne. The frosting, on the other hand: divine! Make it!
Chewy Chocolate Fudge Caramel Frosting
14 oz can sweetened condensed milk (not evaporated milk)
12 oz bag semisweet chocolate chips (2 cups)
Pour sweetened condensed milk into a medium sauce pan and heat over medium, stirring frequently, just until it's hot and bubbly. Remove from heat and wait for the bubbles to subside a little (about 30 seconds), then dump in the chocolate chips. Stir mixture until chocolate chips are melted and the frosting is thick, glossy, and very smooth. Spread immediately over cake or brownies.

Showing posts with label joanne fluke. Show all posts
Showing posts with label joanne fluke. Show all posts
Sunday, September 25, 2016


Tuesday, January 19, 2016
Jamboree Muffins
This is the most recent recipe I've made from Joanne Fluke's
murder-mystery series about Hannah Swensen that also focuses a lot on
baking. This recipe is from The Red Velvet Cupcake Murder. I was lying
in bed Saturday night and had decided to make muffins, but didn't have a particular recipe in mind. 10 minutes later,
I was reading the book and came upon the recipe for Jamboree Muffins. I
had all the ingredients and they sounded good, so why not?
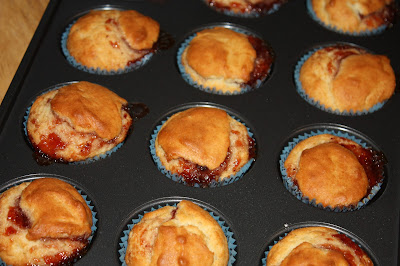
Jamboree Muffins
These
muffins are GREAT. Definitely among the best I've ever had. They're
very interesting, too. The finished muffin is like a cross between a
muffin and a biscuit, both in texture and flavor. When I looked the
recipe over the first time, I had my suspicions they'd be rather
biscuit-like because the ingredients look more like a biscuit dough than
muffin batter, and I was right! They aren't very sweet and have a
texture reminiscent of a buttermilk biscuit, but are rather airy, like a
muffin. The jam in the middle is an awesome addition. I used
strawberry, but pretty much any flavor would be really good. I've tried
making jam filled muffins in the past and they haven't been
particularly good to start with, but the leftovers were awful because
the jam made them very soggy. The texture of these muffins is dense
enough that they don't get soggy and were still tasty the next day.
In
the future, I'd like to experiment with making these muffins with other
ingredients added instead of jam. They'd make great dinner
biscuit/muffins with green chiles and cheddar added, or any number of
other ingredients. I'll bet they'd even be great left completely
plain. It's such an easy, one bowl recipe, that I'm sure I'll try
several variations.

Jamboree Muffins
1 egg
3/4 C milk
1/2 C vegetable oil
1/3 C sugar
1 Tbsp baking powder
1 tsp salt
2 C flour
about 1/3 C jam
Preheat oven to 400 and grease a 12 cup muffin pan with oil, or use muffin papers.
In
a large bowl, beat egg with a fork. Mix in milk, vegetable oil, and
sugar with a spoon until smooth, then stir in baking powder and salt.
Stir in flour and mix thoroughly, but don't worry about lumps. This is
basically a wet biscuit dough, so you don't want to over mix it!
Fill
each muffin cup 1/3 full with batter, then top each with a small
spoonful of jam. Divide the remaining batter among the muffin cups.
Bake until golden and a toothpick inserted into the middle comes out clean, about 15-20 minutes (mine took 17).
Yield: 12 muffins
Thursday, November 12, 2015
Candy Bar Brownies
Yet another recipe from
Joanne Fluke's Hannah Swensen mystery series, this time from The Cream
Puff Murder! This is more of an idea than a recipe, but it sure is a
good idea. We polished off the pan of brownies in a day and a half, even though they're very rich. My husband, the chocolate and brownie lover, said these brownies seemed more like a candy bar than a brownie!
They're good at room temperature, but best a couple of hours after they
come out of the oven and are still a little bit warm because the
chocolate in the middle isn't completely set up yet.
Quick
Note: The original recipe said to use a mix for a 9 by 13 pan, but to
bake it in an 8 by 8 pan. I used a mix for an 8 by 8 pan and have no
regrets, they were perfect. I fear the larger mix in the smaller pan
would have overflowed. Also, the recipe said to use a plain mix, but I
used one with a caramel swirl and we loved how it turned out! If you
can't find a mix with a caramel swirl, you can try swirling in 1/4 C
caramel ice cream topping, but no promises on how it will turn out. I tried doing this recently with Twix brownies and used Smuckers Salted Caramel sauce and the caramel kind of boiled off and disappeared into the batter.Update 8/15/16: I made these a different way, and they were even better. I used a regular brownie mix, put chopped peanut butter cups and Hershey bars in the middle according to the directions below. After the brownies were done baking, I made a caramel sauce by melting 5 oz (by weight) soft caramels with 1/4 C milk over medium-low heat. I poked some holes in the brownies with a meat fork, then poured the caramel sauce over top. They were awesome brownies! So gooey and chocolaty that they were best eaten with a fork. Good alternative if you have a little more time on your hands and want an over the top brownie or if you can't find a mix with caramel swirl.

Candy Bar Brownies
Prepare brownie mix according to box instructions, and spread half of the batter in the prepared baking dish.
Top with the chocolate bars, breaking them as necessary to fit. You want it to be one flat layer and will have some chocolate left over, but I don't see that as a problem!
Tuesday, October 20, 2015
Mini Cherry Cheesecakes
This is another recipe from Joanne Fluke's Hannah Swensen series. Book #8 is called The Cherry Cheesecake Murder, and the book contains recipes for both a large cherry cheesecake and miniatures. My husband loves both cherries and cheesecake, so I had to make him one of them! The mini cheesecakes are very easy to make, very cute, and very yummy. He brought them to work when he started a new job and said everyone liked them. In the future, I'd like to experiment with making a graham cracker based crumb crust for the cheesecakes instead of using whole Nilla wafers, but the wafers are nice, too. I think they've shrunk in recent years though because they don't cover the entire bottom of the cupcake papers.

Mini Cherry Cheesecakes
2 8 oz packages cream cheese, softened
3/4 C sugar
2 eggs
1 Tbsp lemon juice
1 tsp vanilla extract
24 Nilla Wafer cookies
can cherry pie filling (you won't need the whole thing)
Preheat oven to 350 and line muffin tins with cupcake papers. Place one Nilla Wafer in the bottom of each cupcake paper, flat side down. Set aside.
Mix together cream cheese and sugar until well combined, then beat in eggs. Beat in lemon juice and vanilla extract until mixture is completely smooth. Divide evenly among the cupcake tins. The papers won't be super full, but they will puff up some when baked. Bake cheesecakes until a toothpick inserted into the center comes out mostly clean, about 20 minutes. Let cool completely in the refrigerator, then before serving, top each mini cheesecake with 3 cherries from the can of cherry pie filling. The topped mini cheesecakes will stay good in the refrigerator for several days.

Mini Cherry Cheesecakes
2 8 oz packages cream cheese, softened
3/4 C sugar
2 eggs
1 Tbsp lemon juice
1 tsp vanilla extract
24 Nilla Wafer cookies
can cherry pie filling (you won't need the whole thing)
Preheat oven to 350 and line muffin tins with cupcake papers. Place one Nilla Wafer in the bottom of each cupcake paper, flat side down. Set aside.
Mix together cream cheese and sugar until well combined, then beat in eggs. Beat in lemon juice and vanilla extract until mixture is completely smooth. Divide evenly among the cupcake tins. The papers won't be super full, but they will puff up some when baked. Bake cheesecakes until a toothpick inserted into the center comes out mostly clean, about 20 minutes. Let cool completely in the refrigerator, then before serving, top each mini cheesecake with 3 cherries from the can of cherry pie filling. The topped mini cheesecakes will stay good in the refrigerator for several days.
Wednesday, September 23, 2015
Sally's Banana Bread
Imagine that, a banana bread recipe on my blog! I have only once in my life eaten a banana bread that I actually enjoyed, and that was about 12 years ago. Bananas and I are not friends in most instances, and for me, the flavor of baked bananas is even worse than raw. I decided to make this recipe, though, because I had some bananas to use and have had really good luck with all of the recipes I've made from Joanne Fluke's Hannah Swensen series. This recipe is called Sally's Banana Bread and is from the book The Sugar Cookie Murder. I've made at least 5 recipes from just that book so far and we have really liked all of them.
The banana bread ended up being really good, even though it didn't have any cinnamon. I had a couple of slices, as did my husband, and the rest of the loaf went to a new neighbor who said she liked it, as well. It's sweet, moist, and just my idea of the perfect banana bread. I'm happy to add a second banana recipe to my shelf, in addition to Brown Sugar Banana Cake!
This recipe escaped being photographed because it was eaten up so quickly! It didn't look different from any other banana bread, though, except that I baked it in this lovely pan. I love that pan, by the way. It's great for quick breads and bundt cakes, and so far everything I have baked has come out really easily.
Quick Note: I cut the salt down to 1/2 tsp from 1 tsp in the original recipe because I used salted butter and thought 1 tsp sounded like too much.
Sally's Banana Bread
3/4 C softened butter
1 1/2 C sugar
2 eggs
3-4 mashed overripe bananas (you want about 1 1/2 C)
2 C flour
1 tsp baking soda
1/2 tsp salt
1/2 C buttermilk
1/2 C chopped walnuts or pecans, optional (I did not add them!)
Preheat oven to 350and grease a bread pan.
Mix butter and sugar until fluffy, then mix in eggs and bananas. Add baking soda, salt, and half of the flour to the mixing bowl and beat to combine. Stir in 1/2 of the buttermilk, then stir in the rest of the flour. Stir in the last of the buttermilk and the nuts (if you're using them) until everything is well combined. Spread batter in prepared bread pan and bake until a toothpick inserted into the center comes out clean, about 1 hour. You can cover the pan with foil if the bread browns too much. Let baked bread rest for about 20 minutes, then invert it onto a plate to finish cooling.
The banana bread ended up being really good, even though it didn't have any cinnamon. I had a couple of slices, as did my husband, and the rest of the loaf went to a new neighbor who said she liked it, as well. It's sweet, moist, and just my idea of the perfect banana bread. I'm happy to add a second banana recipe to my shelf, in addition to Brown Sugar Banana Cake!
This recipe escaped being photographed because it was eaten up so quickly! It didn't look different from any other banana bread, though, except that I baked it in this lovely pan. I love that pan, by the way. It's great for quick breads and bundt cakes, and so far everything I have baked has come out really easily.
Quick Note: I cut the salt down to 1/2 tsp from 1 tsp in the original recipe because I used salted butter and thought 1 tsp sounded like too much.
Sally's Banana Bread
3/4 C softened butter
1 1/2 C sugar
2 eggs
3-4 mashed overripe bananas (you want about 1 1/2 C)
2 C flour
1 tsp baking soda
1/2 tsp salt
1/2 C buttermilk
1/2 C chopped walnuts or pecans, optional (I did not add them!)
Preheat oven to 350and grease a bread pan.
Mix butter and sugar until fluffy, then mix in eggs and bananas. Add baking soda, salt, and half of the flour to the mixing bowl and beat to combine. Stir in 1/2 of the buttermilk, then stir in the rest of the flour. Stir in the last of the buttermilk and the nuts (if you're using them) until everything is well combined. Spread batter in prepared bread pan and bake until a toothpick inserted into the center comes out clean, about 1 hour. You can cover the pan with foil if the bread browns too much. Let baked bread rest for about 20 minutes, then invert it onto a plate to finish cooling.
Monday, July 27, 2015
Lovely Lemon Bars
This is another recipe from Joanne Fluke, the cozy mystery author. I just love the Hannah Swensen series, they're the comfort food of the literary world for me! These lemon bars are from the first book in the series, The Chocolate Chip Cookie Murder. I made them when a friend came to visit a couple of months ago. We loved them so much that they all got devoured before I had a chance to take a picture. Okay, I take that back- there are some pictures of my puppy licking lemon bar off my friend's baby's hand, but that's it! In spite of being crazy about them, for some reason this was the first time I made lemon bars, but we liked this recipe so much that I don't see myself trying any others!
Lovely Lemon Bars
2 C flour
1/2 C powdered sugar
2 sticks butter, cold
4 eggs
2 C sugar
1/2 C lemon juice
1 tsp lemon zest (optional)
1 tsp baking powder
1/2 tsp salt
4 Tbsp flour
Preheat oven to 350 and grease a 9 by 13 inch baking pan.
In a medium bowl, stir together flour and powdered sugar, then cut in the cold butter with your fingers or a pastry blender until the mixture looks like coarse cornmeal. Dump the mixture into the greased baking dish and press it down evenly with your hands. Bake in preheated oven until golden around the edges, about 15-20 minutes.
While the crust cooks, prepare the filling. Whisk together the sugar, lemon juice, and lemon zest, then whisk in the baking powder, salt, and flour until smooth.
When the crust has finished cooking, immediately pour the filling over the top and return the baking dish to the oven. Bake until golden on top, about 20-30 minutes. Let cool before cutting into bars and serving.
Yield: About 12 bars
Lovely Lemon Bars
2 C flour
1/2 C powdered sugar
2 sticks butter, cold
4 eggs
2 C sugar
1/2 C lemon juice
1 tsp lemon zest (optional)
1 tsp baking powder
1/2 tsp salt
4 Tbsp flour
Preheat oven to 350 and grease a 9 by 13 inch baking pan.
In a medium bowl, stir together flour and powdered sugar, then cut in the cold butter with your fingers or a pastry blender until the mixture looks like coarse cornmeal. Dump the mixture into the greased baking dish and press it down evenly with your hands. Bake in preheated oven until golden around the edges, about 15-20 minutes.
While the crust cooks, prepare the filling. Whisk together the sugar, lemon juice, and lemon zest, then whisk in the baking powder, salt, and flour until smooth.
When the crust has finished cooking, immediately pour the filling over the top and return the baking dish to the oven. Bake until golden on top, about 20-30 minutes. Let cool before cutting into bars and serving.
Yield: About 12 bars
Friday, May 1, 2015
Tickled Pink Lemonade Cookies
This is another cookie recipe from Joanne Fluke's murder
mystery series and comes from the book The Red Velvet Cupcake Murder.
Winter is finally, slowly, leaving Interior Alaska, and that's always
very exciting. Before I moved here, I never thought a bare patch of
ground would be such cause for celebration! It's hardly summer yet, but
when everything started melting, I immediately thought of this happy,
summery cookie from a book I read in the dead of winter.
It was a good choice, too, because these cookies are quite good! They have a definite lemonade flavor without making your mouth pucker up, and the pink is rather charming. The cookies themselves are thick and cake-like, which is a nice change. They're good on their own, but the frosting definitely adds to the appeal. My only change for next time will be to make a double batch because I only got 24 cookies. I gave half of them to a neighbor (my entire excuse for making cookies to start with) and the two of us plowed through the remaining cookies in short order.
The only changes I made to Joanne's recipe were to
use less red food coloring and more milk and pink lemonade concentrate
and frosting. More milk because the frosting was very stiff, and more
concentrate so the lemonade flavor would be apparent.It was a good choice, too, because these cookies are quite good! They have a definite lemonade flavor without making your mouth pucker up, and the pink is rather charming. The cookies themselves are thick and cake-like, which is a nice change. They're good on their own, but the frosting definitely adds to the appeal. My only change for next time will be to make a double batch because I only got 24 cookies. I gave half of them to a neighbor (my entire excuse for making cookies to start with) and the two of us plowed through the remaining cookies in short order.

Tickled Pink Lemonade Cookies
for cookies:
1 stick butter, softened
1/2 C sugar1/2 tsp baking powder
1/4 tsp baking soda
1 egg
1/3 C frozen pink lemonade concentrate, thawed
1/3 C frozen pink lemonade concentrate, thawed
red food coloring, as desired
1 3/4 C flour
for frosting:
2 Tbsp butter, softened
2 C powdered sugar
5 tsp milk
4 tsp frozen pink lemonade concentrate, thawed
red food coloring, as desired
For Cookies:
Preheat oven to 350 and line baking sheets with parchment paper.
Cream
together butter and sugar until fluffy. Mix in baking powder, and
baking soda, then egg and lemonade concentrate. Beat until thoroughly
mixed. It will look curdled, don't worry! Stir in red food coloring to
make the dough as pink as you'd like. Stir in flour until well
combined, but don't over mix.At this point, you can refrigerate the dough for half an hour if it's too soft to work with, but mine was fine. Use two spoons or a small cookie scoop to scoop small walnut sized blobs of dough onto the prepared cookie sheets, 2 inches apart. Bake until the cookies are set and just barely beginning to turn very light golden in some spots, about 10-12 minutes. Let cookies cool completely, then frost with the frosting.
For Frosting:
Place butter and powdered sugar into a mixing bowl and beat until the butter is dispersed, it will look very dry. Add milk and lemonade concentrate, and beat until smooth. You can add more milk or more powdered sugar if it's too thick or too wet. You want a smooth, spreadable consistency. When you've reached that, stir in red food coloring so it's as pink as you'd like. I didn't use any for the frosting because the pink lemonade concentrate made it ever so slightly pink on its own.
Frost cookies with frosting, let them sit out until the frosting is dry to the touch, then store them in an airtight container. I can say they stay good for 3 days, maybe longer, but that's as long as they lasted here!
Yield: About 24 cookies
Wednesday, April 15, 2015
Peanut Butter Melts
This
recipe comes from the murder mystery book The Blueberry Muffin Murder
by Joanne Fluke. The book is from a series, and all the book titles
follow the "The (baked good) Murder" format. Each novel has several
recipes in it. I first purchased one of the books randomly at the
grocery store a couple of months ago, and have come to really enjoy the
series. The stories aren't particularly suspenseful, and the writing
style doesn't charm me like some authors, but they just really appeal to
me for some reason and are almost comforting to read. They're the
mashed potatoes and mac and cheese of my home library!
Anyway,
I have a lifelong love of all things peanut butter, but peanut butter
cookies rarely live up to my standards of peanut butteriness. The
flavor is usually too weak. I love a really good PB cookie, but have
only found two recipes that are good enough. One is this one and the
other I haven't posted on the blog yet. I decided to try this version
because the name appealed to me (Peanut Butter Melts, interesting!), the
melted butter seemed interesting, and I liked that it has molasses. It
also has a full cup of PB, which seemed promising!
Preheat oven to 375 and line cookie sheets with parchment paper.
Beat
together melted butter, sugar, vanilla, and molasses. Mix in baking
soda, baking powder, and salt, then mix in peanut butter until well
combined. Add eggs and mix again until well combined. Add flour and
mix just until the dough comes together.Yield: I got exactly 50 cookies from this recipe.
Subscribe to:
Posts (Atom)