Showing posts with label bacon. Show all posts

Sunday, October 21, 2018

Bacon Pumpkin Soup

This is the best pumpkin soup I've ever made!  I've tried a few over the years, but it's been a while because they've all been pretty disappointing.  My husband and I both really enjoyed this one, though.  It's a little sweet since pumpkin is sweet, but does not taste like dessert.  It's just all around delightful and nice and creamy without being too heavy, and of course the bacon crumbles make it extra yummy.
  
The recipe comes from the blog Spend with Pennies.  My only changes (other than to make a much larger batch) had to do with the preparation, a couple small changes with the seasonings, and I added soy sauce to boost the umami flavor.  It does not taste like soy sauce, of course- you can't identify the flavor as soy sauce at all.
  
I served the soup with baked butter herb chicken and steamed green beans.  The chicken was just something I tossed together- chicken breasts cut down the middle and topped with butter mixed with dried herbs, a little mustard powder, onion powder, garlic powder, salt, pepper, and paprika, then baked in a greased pan at 350 until cooked through.  It all made for a very tasty, perfect autumn dinner.
  
Below, I wrote you can use either 1/4 or 1/2 tsp nutmeg.  I used the smaller amount because I didn't want to be punched in the face with nutmeg, but next time I'll try using 1/2 tsp because the nutmeg was quite subtle and I think it would work just fine to use the full amount.  I also used half and half instead of cream because the store was out of cream, and it turned out really great that way.  Next time I'll probably use cream, because why not?
  
I took a bit of a gamble on us liking it because I quadrupled the recipe!  My husband and I are expecting our first child soon and I've been stockpiling food in our freezer, I thought this one would freeze well and be super cozy to enjoy after our baby arrives.  It also only takes, maybe 5 more minutes to make a quadruple recipe, since all you have to do is roughly chop some extra veggies.  You don't have to make them small since they will be blended.
 
One last thing- I'd like to add that you could easily do this in the slow cooker or Instant Pot.  I would have done that if my Instant Pot wasn't being used for something else already when I made this soup.  We really need to get another one!  Anyway, if you decide to do it in a slow cooker, you could just skip the step of sauteeing the veggies and just add everything except the half and half/cream and cooked bacon to the crock and cook it until the veggies are tender, then proceed with the recipe.  If you go the Instant Pot route, you should probably only try it if you have the larger 8 quart model.  Saute the veggies in the bacon grease on the saute setting, then add the remaining ingredients except the half and half/cream and cooked bacon, then put on the lid, seal it, and cook on Manual for probably 30 minutes.  A quick pressure release should be fine, then proceed with the rest of the recipe.
  
Bacon Pumpkin Soup
  
8 oz bacon
2 large onions, peeled and chopped roughly
2 C peeled and roughly chopped carrots
4 cloves garlic, peeled and crushed
4 tsp brown sugar
10 C chicken broth
4 16 oz cans pumpkin (not pumpkin pie filling, the only ingredient should be pumpkin)
4 Tbsp soy sauce
2 tsp dried parsley
1 tsp salt, plus more to taste (depends on how salty your chicken broth is)
1 tsp dried thyme
1/2 tsp pepper
1/4 to 1/2 tsp nutmeg, depending on how much you like it- I used the lesser amount
6 bay leaves
2 C half and half or cream
  
Set oven to 400 degrees.  Line a rimmed baking sheet with foil, being sure to cover the sides of the sheet with foil.  Evenly spread out the bacon and bake until crisp to your liking and the fat has rendered out.  Remove bacon, pat off grease, crumble, and refrigerate.  Pour the grease (you want about 1/4-1/3 C, this isn't an exact science) into a large pot.  
  
Heat pot over medium and add onions, carrots, and garlic.  Saute until the veggies begin to soften and turn lightly golden, about 10 minutes.  Add brown sugar and cook another minute.  Immediately stir in broth, then all the remaining ingredients except the cream and crumbled bacon.
  
Bring soup to a boil, then reduce heat to medium-low, cover, and simmer for an hour, stirring occasionally.
  
After an hour has passed and the veggies are completely soft, remove the bay leaves, puree the soup well with an immersion blender, stir in the cream or half and half, add salt to taste, and serve with a sprinkle of crumbled bacon.
 
Yield: About 14 approximately 2 C servings

Wednesday, November 18, 2015

Cheddar Bacon Potato Waffles

I came upon this recipe on Serious Eats and decided to make it the next day because by some coincidence, I had all of the ingredients in my refrigerator (even cooked bacon) except for the mashed potatoes.  After buying 3 of the biggest potatoes I've ever seen and making them into mashed potatoes, we were ready to go. 

The batter was easy to make, but the cooking process required some tinkering.  I started out cooking the batter in my panini press because I was worried it would gunk up my waffle iron (my waffle iron is well seasoned and I didn't want to ruin it by having to wash it to remove stuck on bits), but that didn't work so well.  The waffles ended up very thin and fragile.  However, I could see the batter didn't stick to the grill plates, so decided to chance it with my waffle iron after all.  It worked great!  No sticking at all.  

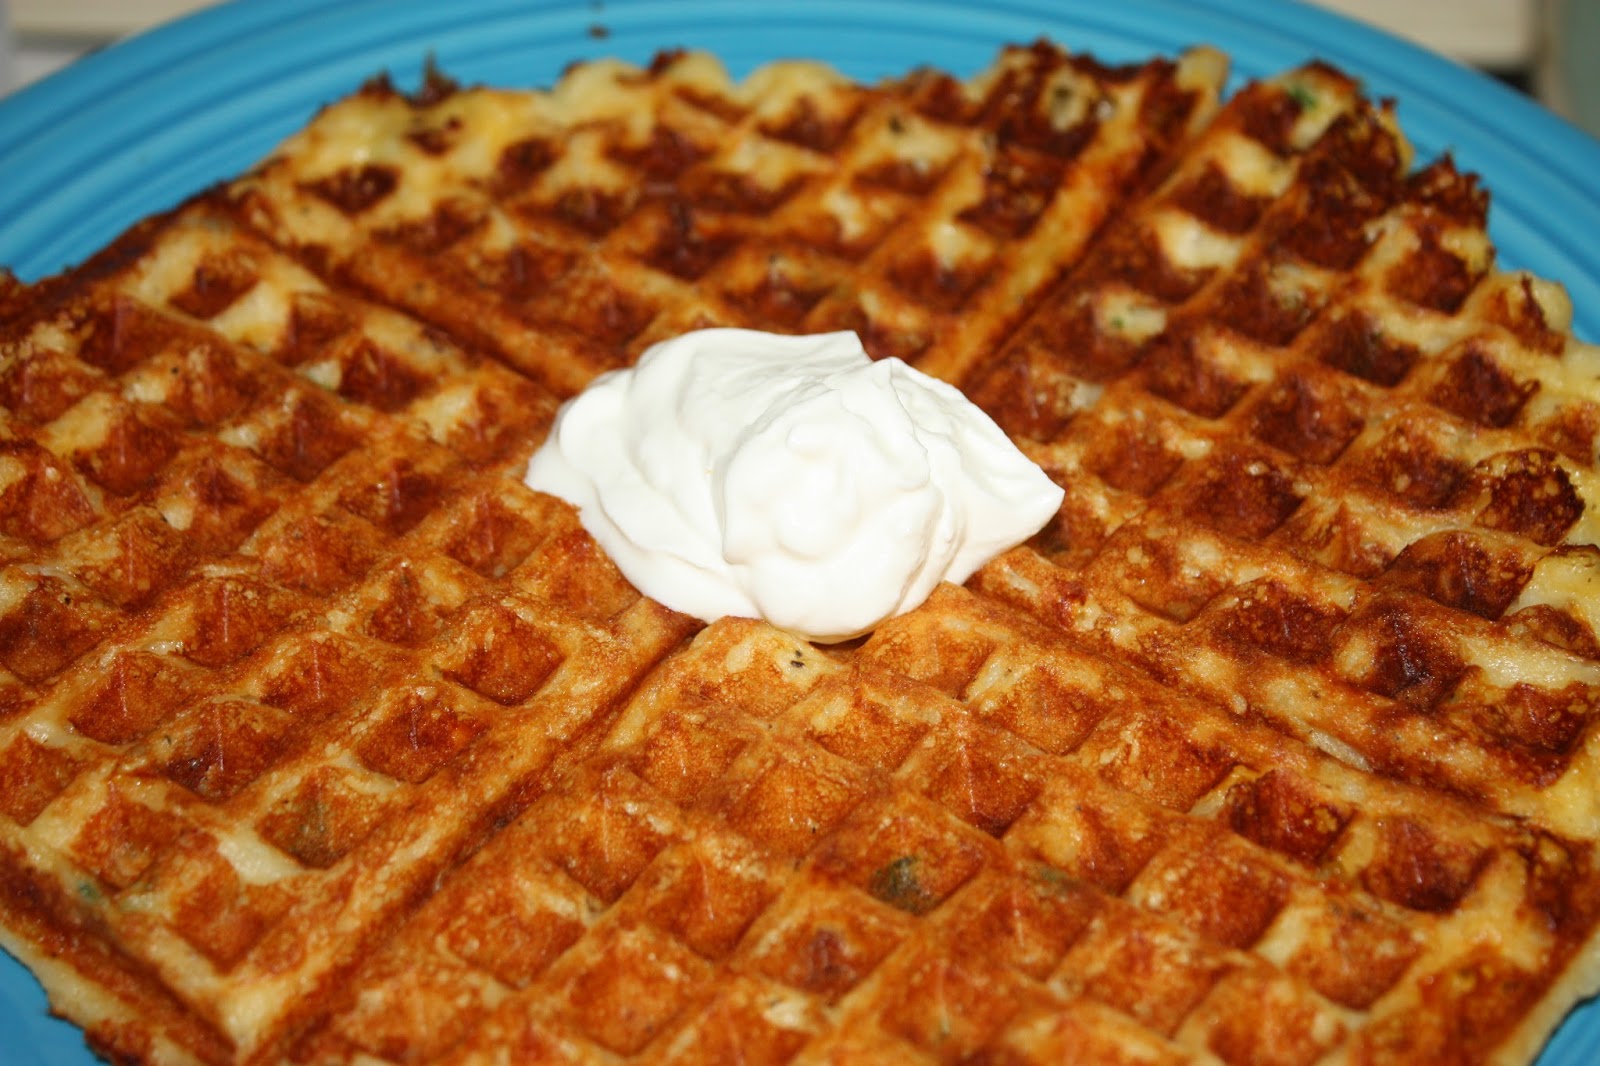
You do need to cook them just right, though.  The temperature should be low enough that the waffle can cook through nicely inside without getting overdone on the outside.  If you cook the waffles at too high of a temperature, they will turn golden on the outside, but will be very difficult to remove from the iron because the inside will be too soft.  You will need to experiment some with your waffle iron and use a timer, but in my Black & Decker waffle iron, 6 minutes with the temperature at to the lowest waffle setting was perfect.  Additionally, if you open the iron too early, the waffle will tear in half with half stuck to the bottom grate and half to the top, so leave it alone for 3 minutes or so before checking!  I also decided to make big waffles instead of smaller ones because the batter tended to join together in the waffle iron, anyway.  You can just cut them apart along the indentations if you want smaller ones.
All the fiddling paid off, though, because these waffles were awesome!  When I asked my husband how many stars they get, he said, "a million!"- high praise!  I really enjoyed them, too.  Very yummy.  Crispy on the outside, soft on the inside, and tons of flavor from the cheese, bacon, and green onions.  I also didn't mash my potatoes very finely, so the waffles had delightful little chunks of potato in them.  The waffles are great plain, but a little sour cream makes them extra special.  For some reason salad with waffles seemed kind of odd, so we had them with applesauce on the side.
Below is my slightly tweaked version of the recipe.  I doubled also doubled it.  To make the mashed potatoes, I just added about 4 Tbsp butter, enough milk to make them the right consistency, and salt and pepper to taste.  This would be a great use for leftover mashed potatoes, though!
Quick Note:  Leftover waffles can be reheated on a parchment paper lined baking sheet in an oven set to 350 until hot and crispy, about 15 minutes.
 
Cheddar Bacon Potato Waffles
about 5 C of your favorite mashed potato recipe (leftover or freshly made, mine were warm)
1/2 C buttermilk
1/4 C vegetable oil
4 eggs
2 C grated cheddar
3/4 C cooked, crumbled bacon
1/3 C sliced green onions
1 C flour
1 tsp baking powder
1/2 tsp baking soda
1/4 tsp salt
1/4 tsp pepper
Brush the plates of a waffle iron with canola oil, and preheat the waffle iron to medium.
Place the mashed potatoes into a large mixing bowl.  Add buttermilk, oil, eggs, cheddar, bacon, and green onions, and stir until combined.  In another bowl, stir together flour, baking powder, baking soda, salt, and pepper, then stir it into the wet ingredients until well mixed.
To make waffles, spoon about 1 C batter (amount depends on how much your iron holds!) into the center of the greased, preheated waffle iron, and cook until the outside is dark golden.  Don't check on the waffle for at least 3 minutes or you could accidentally tear the waffle in half.  Use a timer so you can get the number of minutes right for the other waffles.  If you can't easily remove the waffle when the outside is dark golden, lower the heat on your waffle iron and cook for another minute or two.
Keep already cooked waffles hot on a platter in the oven set to warm.
Serve waffles with sour cream if desired and fresh fruit or applesauce on the side.
Yield:  About 8 servings as a main dish

Sunday, July 12, 2015

Cheesy Ranch Potatoes

I stumbled upon this recipe on Natasha's Kitchen recently and have made it twice in the past month.  It's so simple and very, very tasty!  The first time, I used red potatoes with the skin on, bottled ranch dressing, and green onions, and this time I used peeled russet potatoes, homemade ranch dressing (actually homemade ranch dressing mix plus mayo and milk), and bacon.  Both were great!

This is very much a "do what you want" recipe.  You can make just a small amount of potatoes, or a whole lot, and pretty much any kind of potato will do.  You also don't have to measure anything, just use your own judgment!

Cheesy Ranch Potatoes

potatoes
ranch dressing
garlic salt
grated cheddar cheese
cooked, crumbled bacon (optional)
thinly sliced green onion or chives (optional)

Wash and peel the potatoes if desired, then cut them into 1 1/2 inch chunks.  Boil in salted water until they can be pierced with a fork, then drain thoroughly.  Carefully fold in desired amount of ranch dressing, you want them to be coated but not swimming in it.  Spoon evenly into a greased baking dish, season to taste with garlic salt, then bake at 400 until the potatoes start to turn golden in places on top, about 20-25 minutes.  Remove from oven and sprinkle with desired amount of grated cheese, plus the bacon if you're using it.  Return to oven for 5 minutes.  Remove and sprinkle with the green onions or chives if you're using them, then let the potatoes sit for a few minutes before serving.  Leftovers reheat really well!

Friday, December 5, 2014

Cheesy Bacon, Beef & Rice Casserole

Please do not judge this recipe by its photo!  Casseroles are inherently ugly, but oh boy, this one REALLY is.  I've been referring to it as "50 Shades of Brown Casserole", it's not often you see this many variations on the color brown.  Hideousness aside, this casserole is really good.  It was originally billed as Mexican Rice Casserole on the CopyKat Recipes blog where I found it (it was from a lady named Virginia McDowell in 1968!), but I don't think it really tastes like the rice you get in Mexican restaurants.  The bacon doesn't really help it seem Mexican, either, but it does help it be even more delicious!
 
You could serve the casserole with sour cream, cilantro, salsa, and the like if you want it to taste more Tex-Mex (I actually made a side salad with lettuce, tomatoes, and this Creamy Salsa Dressing), but on its own, it just tastes good and is a perfect comfort food.  You could also try adding more chili powder, some cumin, and some black beans to play up the Mexican factor.  I wouldn't leave the chili powder out, though, because it does add a special little something.

Note: The original recipe called for minute rice (quick cooking rice).  I don't like minute rice, so just used regular rice since the recipe looked like it had enough liquid and the simmering time of 20 minutes is just right for cooking it.  It turned out great this way!  I also used the whole bell pepper (yellow, in my case) and onion because I didn't want to waste the rest.
 
Now I'm no great shakes when it comes to photographing food, but isn't this ugly?  I almost feel bad for it!

 
Cheesy Bacon, Beef & Rice Casserole

4 oz bacon
1 small onion, diced
1 bell pepper, diced
1 C uncooked rice
1 lb ground beef
1 clove garlic, minced
1 3/4 C water
8 oz can tomato sauce
1 t chili powder
1 t salt
2 C cheddar cheese, grated
 
Cook bacon in a large skillet over low heat.  Remove bacon to a paper towel lined plate to drain.  Add diced onion and bell pepper to the bacon grease and cook until they begin to soften.  Add rice and cook for a couple of minutes, just until it starts to turn opaque and gets a little golden. 

Add ground beef and cook, stirring constantly.  Keep a close eye on the heat because the rice could burn easily!  It's okay if the beef isn't cooked all the way through if you run the risk of burning the rice. 

Add the water, tomato sauce, chili powder, and salt, bring skillet contents to a boil while stirring, cover, and reduce heat to low.  Cook without removing lid for 20 minutes.
While that's cooking, turn the oven to 400 and grease a 2 quart baking dish.  When rice and meat mixture is done, stir thoroughly, then spoon half of it into the baking dish.  Top with half of the cheese.  Layer with the rest of the rice mixture, the rest of the cheese, and the bacon.  Bake about 15 minutes, until cheese is golden.
Yield: 6-8 main dish servings

Wednesday, February 12, 2014

Garlicky Bacon & Cheddar Stuffed Burgers with Avocado

Tonight's dinner was originally going to be Chicken Cacciatore (a recipe that I'll share later if it turns out well), but right when I was about to put the ingredients in the slow cooker, I came upon some photos of a cheese stuffed burger called a Juicy Lucy.  The Juicy Lucy (or Jucy Lucy, if you prefer) is a cheese stuffed burger from Minneapolis.  Burgers aren't usually my favorite thing, but for whatever reason, a cheese stuffed one sounded perfect today!  When looking for a recipe, I decided to combine two of them:  the idea of adding bacon came from Cinnamon Spice and Everything Nice, the burger recipe itself came from this one on AllRecipes, and I used cheddar, lots of garlic, and served the burgers with avocado on top because I felt like it!

I'm happy to say that the burgers turned out awesome.  Sadly, all of mine did end up leaking cheese a bit (really seal those edges!), but the burgers don't seem to have suffered for it at all and the leaked cheese kind of cooked onto the bottom of the burgers.  My husband and I both agreed that this burger is better than just a bacon cheeseburger.  No issues with the bacon falling off the burger this way, and the cheddar was super melty and stretchy instead of just half melted on top..  The avocado was also a perfect, creamy addition.  Tomato and lettuce would have been nice on top, but the burgers were so thick already that they would have been impossible to eat!  Instead, we had a salad on the side.
 

Sorry if the half gnawed burger looks unappealing, I wanted to show the inside but didn't want to cut my burger in half!

Garlicky Bacon & Cheddar Stuffed Burgers with Avocado
 
1 T vegetable oil
4 slices sharp cheddar
6 slices bacon
2 T dried minced onion
1 T Worcestershire sauce
1 t garlic powder
1/2 t salt
1/2 t pepper
1 1/4 lb ground beef
1 avocado, peeled and sliced
hamburger buns and whatever condiments you like (we did ketchup, mustard, and mayo)
Fold each slice of cheese in half, then in half again so each slice ends up as a little stack of 4 small pieces.  Cook and crumble the bacon. 

Mix together meat, onion, garlic powder, salt, and pepper, just until well combined.  Divide meat mixture into quarters, then form each quarter into 2 equal sized balls.  Working with one burger's worth of meat at a time, flatten the two balls into uniform patties, each about 5 inches in diameter.  Place a quarter of the crumbled bacon into the center, then top with one of the folded stacks of cheese.  Top with the other patty and firmly pinch together the edges of the two patties.  Repeat process with the rest of the meat.
Heat oil in a large nonstick skillet over medium high, and when the pan is hot, add the burgers.  Cook until browned on one side, then flip them over and poke the center in a few places with a toothpick.  This will help release steam inside the burger and help prevent the cheese from gushing out while the burgers cook.  Cook the burger on the second side until the internal temperature of one of the burgers is 160 degrees, then remove them to a paper towel lined plate.

Let the burgers sit for a few minutes before serving because the cheese inside is very hot.  Serve on toasted buns topped with avocado slices and whatever else you'd like.

Yield: 4 burgers

Sunday, January 5, 2014

Slow Cooker Cauliflower Soup

This recipe requires a bit of an explanation.  I've been having a medical issue that's resulted in me cutting way down on starches/grains and sugar.  The sugar I can mostly do without, but avoiding pasta, potatoes, bread, and the like is harder.  Lucky for me, I've had quite a bit of success with finding recipes that are already okay for me to cook, and adapting other recipes.  The standards by which I judge a recipe haven't changed and I will only post recipes here that I think are really good, even for people (like my husband!) who can eat whatever they want.  As evidenced by all the dessert posts last month, I'll still be posting recipes for sweets and pasta and that type of thing, just not as frequently.
 
This is one of the adapted recipes.  When I came upon the Cauliflower Soup recipe on the Pioneer Woman blog, it occurred to me that cauliflower soup with baked potato toppings on it would probably be pretty good.  I adapted the recipe so it would work in the crock pot, and left out the butter, flour, and milk (the milk just because I thought the texture was perfect without it).  It turned out exactly how I hoped!  My husband really dislikes cauliflower, but really enjoyed the soup anyway.  It's pretty good on its own, but the toppings really enhance it, especially the sour cream.  The sour cream also helps thicken it a bit since it's a pretty thin soup. 

If you want the soup thicker and don't mind adding flour to it, you could make a roux by melting 4 tablespoons butter in a small pan on the stove, then whisk in half a cup of flour and let it cook for a minute, then slowly whisk in the half and half and a cup of milk.  Let it simmer for a couple of minutes while stirring, then stir it into the soup.  I haven't tried it this way because I thought the consistency was fine, but the Pioneer Woman does basically the same thing to thicken her version and I'm sure it works perfectly.
 
Slow Cooker Cauliflower Soup
 
36 oz frozen cauliflower florets
1 carrot, diced
1 1/2 cup diced onion
4 cloves minced garlic
2 tsp dried parsley
1 tsp salt (plus more later)
1/2 tsp pepper
1/4 tsp garlic powder
1/4 tsp onion powder
2 quarts chicken broth
1 C half and half
 
Toppings:
1 C sour cream
cooked, crumbled bacon
grated cheddar
thinly sliced chives or green onion

In the crock of a large slow cooker, combine all ingredients except half and half and toppings.  Cook until carrots and cauliflower are soft, about 4 hours on high or 6 hours on low (times will vary according to your slow cooker).  Use a potato masher to break up the cauliflower.  If you want it smoother, you can use an immersion blender next, but we think it's best with a bit of texture to it.  Stir in the half and half, then taste the soup and add more salt if necessary.  I ended up using 2 teaspoons total. 
 
To serve the soup, ladle it into individual bowls and then top with sour cream, bacon, cheese, and green onion.

Yield: About 8 servings

Wednesday, March 21, 2012

Sauteed Cabbage with Bacon and Onions

Okay. I wasn't sure if I should post this one because it's so, so basic and the name doesn't sound very appealing. Maybe calling it "rustic" adds a bit of charm? But believe me when I say it's good and you'll like it if you like bacon. My husband was very skeptical when I told him what I was making for dinner, but he took one bite and said, "I'm in love!" (and he actually told me to post that). It's kind of southernish-Germanish-stir fryish and goes great with steamed rice (either served on the side or with the cabbage on top) or egg noodles, and applesauce. I'm sure it would be good with soda bread, too! The recipe is also extremely versatile. You can use pretty much any size cabbage, whatever amount of onions you have, and just add sugar, salt, and pepper to taste.

Sorry, no photo, my husband suggested it but it's just too ugly!

Sauteed Cabbage with Bacon and Onions

1/4 lb bacon
1/2 large onion, halved and sliced into half rings
1 small green cabbage, quartered, cored, and cut into 1 inch slices (mine was 1.25 lb)
2 t sugar
1 t salt
1/4 t pepper

Place bacon in a large skillet and cook until crisp (use a splatter screen to avoid airborne grease!). I cook bacon over low heat on my stove, but bacon is one of those things I struggle with not burning and I get the feeling my approximately 500 year old stove cooks on the hot side. Remove bacon to a paper towel lined plate to cool, then crumble. Add onions to grease in skillet and saute until they start to soften a little bit (about 4 minutes). Add cabbage to skillet, breaking it up with your hand as you add it. Saute cabbage and onions until cabbage is as tender as you like, about 10 to 15 minutes. You can speed things along by covering the skillet. We like the cabbage so it's still a tiny bit crisp, but it's up to you. When finished, stir in sugar, salt, pepper, and crumbled bacon.

Yield: 4 servings