Showing posts with label beef. Show all posts

Tuesday, July 17, 2018

Baked Cheeseburger Sliders

These sliders are one of the easiest things you can make for dinner and involves less than 10 minutes of prep if you are working slowly.  They're also fun and yummy!  
 
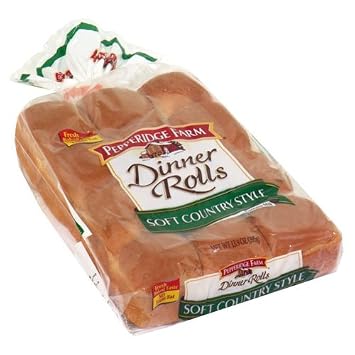
For the rolls, this is the kind I mean.  You don't have to buy that specific brand, but the rectangle of stuck together rolls is what you're looking for.  I have a couple of Crow Canyon enamelware baking pans and they are the exact right dimensions for the giant beef patty to match up with the rolls, but a regular 9 by 13 pan will be fine as well.
 
Baked Cheeseburger Sliders
 
1.25 lb ground beef
1/2 tsp salt
1/2 tsp pepper
1/2 tsp paprika
1/2 tsp garlic powder
1/4 tsp onion powder
sliced cheese
rectangular pack of 12 dinner rolls
desired toppings like ketchup, mustard mayo, and sliced pickles
 
Preheat oven to 425.
 
Squish beef evenly into 9 by 13 baking dish.  Mix together seasonings in small cup and sprinkle evenly over top.  Bake 30 minutes or until cooked through.
 
Slice rolls in half to make a giant bun.  Lift giant burger patty onto giant bottom bun.  Pour out any accumulated grease from the baking pan and put the giant bottom bun and patty back into the pan.  Top with sliced cheese, then top bun.  Place plan in oven, turn off heat, and leave until buns are toasty and cheese is melted, about 5 minutes.  Cut into individual sliders with a large knife.  Top individually with desired toppings and serve!
 
Yield: 4-6 main dish

Friday, April 8, 2016

BBQ Meatball Stew

This is a stew recipe I just made up a few days ago.  My husband and I were both very pleased with how it turned out.  He doesn't usually care for soups or stews, but to my surprise, he loved this one.  It's rather unlike any other stew I've had.  The carrots add a lot of sweetness, and that combined with the tomatoes and Worcestershire sauce give the entire stew a very BBQ-like flavor, even though there isn't any BBQ sauce in it.  Don't fear the plain, unseasoned meatballs.  I left them plain (other than the seasoned flour) to speed up the prep, but the stew has very vibrant flavor and the little meatballs are perfect in it.  They're very tender, too.  Like most stews, this one is better after a day or two in the fridge, so look forward to the leftovers!
  
Quick Note:  This recipe is for the Instant Pot, but it could be easily adapted for a normal pressure cooker.  If you don't have one of those, you can either cook it on the stove or use a slow cooker.  To cook it on the stove, proceed with browning the meatballs in a large skillet, but cook the onions in a large pot and add the remaining ingredients as described in the recipe, bring the stew to a boil, then reduce to a simmer and cook, covered, stirring occasionally, for about 40 minutes.  If you're using a slow cooker, cook the onions and garlic in a large skillet first, then brown the meatballs.  Place all the ingredients in your slow cooker as described in the recipe and cook on low for 6-8 hours, or until veggies and meatballs are cooked through.
  
  
BBQ Meatball Stew
  
4 Tbsp flour
2 tsp montreal steak seasoning
1 lb ground beef
3 Tbsp bacon grease, divided (or olive oil if you don't have bacon grease)
1 large onion, chopped
3 cloves garlic, minced
2 C beef or chicken broth
2 T soy sauce
2 T Worcestershire sauce
1 tsp dried rosemary
1/2 tsp salt
1/2 tsp pepper
3/4 lb baby carrots, chopped
1 russet potato, chopped
15 oz can stewed or diced tomatoes, pureed with blender or immersion blender
  
In a cereal bowl, mix together the flour and steak seasoning.  Form the ground beef into 3/4 inch meatballs and roll them in the flour mixture, then set on a plate.  Melt half of the bacon grease in a large, nonstick skillet, then add the meatballs.  Dump any remaining flour mixture in with the meatballs.  Brown the meatballs on all sides (they will cook through completely later), then remove them to a plate.  
  
Turn the Instant Pot to the saute function and add the remaining bacon grease.  Add chopped onion and cook, stirring frequently,  until it begins to turn translucent and brown slightly.  Add the garlic and cook for another minute or two.  Pour in the broth, soy sauce, Worcestershire sauce, rosemary, salt, and pepper, then add the carrots and potato.  Place the meatballs on top and gently push them down so they're submerged in liquid as much as possible.  Pour the blended tomatoes on top.
  
Seal Instant Pot and set the manual setting to 30 minutes.  When the time is up, do a quick release, then gently stir the stew and serve.
  
Yield: 6 main dish servings

Thursday, March 10, 2016

Sour Cream Noodle Bake

This recipe is from the Pioneer Woman.  I didn't mess with it too much, except to use greek yogurt instead of sour cream because sour cream upsets my husband's stomach.  Greek yogurt is also undoubtedly healthier and has more protein.  This was a really easy, quick casserole and it turned out pretty well.  Very simple, homey, and comforting.  My husband adored it and gave it a rating of 10 out of 10.  We'll make it again for sure.  I served it with Stir Fried Lemony Green Beans (also from the Pioneer Woman!) and it was a nice dinner.
   
  
Sour Cream Noodle Bake
  
1 lb ground beef
3 cloves minced garlic
15 oz can tomato sauce
salt and pepper to taste
8 oz egg noodles
1 1/4 C cottage cheese
5 oz container plain greek yogurt (or sour cream)
1/4 C sliced green onions
1 C grated cheddar
  
Preheat oven to 350 and grease a 2 quart baking dish.  Set aside.
  
Heat a large nonstick skillet over medium-high and add ground beef.  Break up with a spoon and cook, stirring frequently.  When it's about half cooked, add the minced garlic.  Continue to cook and stir until beef is cooked through.  Drain off any excess fat, then add the tomato sauce.  Add salt and pepper to taste.  Set pan aside.
  
While you make the sauce, cook the egg noodles just until al dente in a large pot of salted water.  Drain and set aside.
  
Stir together cottage cheese, greek yogurt, and green onions, then add salt to taste.  Add mixture to noodles and stir to combine.
  
Pour noodle mixture in prepared baking dish and top evenly with ground beef mixture.  Sprinkle evenly with grated cheddar.  Bake until cheese is melted and dish is hot, 15-20 minutes.
  
Yield: 6 servings

Wednesday, February 10, 2016

Stout Chili

This is my version of a chili recipe from Nick Kindelsperger over at Serious Eats.  It's originally from Bon Appetit.  After going to a local restaurant called Silver Gulch for years now, my husband and I finally tried their chili a couple of weeks ago, and were blown away.  It was so good!  It had stout in it, so of course I immediately planned to try making it myself.  My version is probably not as rich, uses ground beef instead of steak, has a lot more beans, and smaller pieces of veggies, which is just how I like it.  The flavor of this chili is awesome, especially for one that's simmered such a short period of time.  Honestly, I think this chili would be good without the beer, but the beer deepens the flavor in an indescribably good way.  I'm pretty sure this recipe will supplant the favorite red chili recipe I've been making for the past 5 years.  Next time I may even make a double batch because chili freezes so well.  Yum!  (Update: I actually never made my old red chili recipe again because we love this one so much, and I do always make a double batch of this one!)
 
This chili lasted for several meals, but for dinner the first night, I served the chili in corn bread bowls.  A couple of weeks ago, we impulse purchased a waffle bowl maker and I had the idea to cook corn bread batter in it.  Turned out awesome, and that's what's pictured below.
   
Quick Note:  I'm not fond of big pieces of onion in chili, so I chopped my onions in the food processor.  I also minced the jalapeno and garlic in it.  For the tomatoes, you can either drain them (reserve the juice!) and chop them, or blend them with a food processor.  I am weird and don't like chunks of canned tomato (fresh are fine), so I blended mine.
 
 
Stout Chili
1 1/2 lbs ground beef
2 onions, diced
1 bell pepper, diced
1 jalapeno, minced
5 cloves garlic, minced
4 Tbsp chili powder
3/4 Tbsp ground cumin
1/2 Tbsp ground coriander
4 tsp salt (or to taste)
12 oz bottle stout beer (I used Alaskan Stout)
28 oz can whole tomatoes (chopped with a knife/kitchen shears or blended smooth)
2 28 oz cans pinto beans, drained (or 1 lb dried pinto beans, soaked, simmered until soft, and drained)
    
In a large pot over medium-high heat, cook ground beef until it's cooked through.  Scoop out beef into a bowl and drain any excess fat.  Reduce heat to medium or medium-low.  Add onions, peppers, and jalapenos, and cook, stirring frequently, until the vegetables get tender and the onions begin to turn clear, about 10 minutes.  Add garlic, plus the chili powder, cumin, and coriander, and stir constantly for another minute or two, being careful not to let it burn.  Stir in beer and remaining ingredients, including the cooked, ground beef.  Bring to a boil, stir, then reduce heat to low and simmer chili for 30 minutes.
Serve topped with grated cheese, sour cream, or whatever else you'd like.
 
Yield:  About 8 main dish servings

Thursday, December 10, 2015

Tamale Pie

This is another recipe from Catherine Newman over at Ben & Birdy.  I've meant to make it for a while, and am glad I finally did!  It turned out really well, my husband loved it.  He's not a fan of regular tamales and liked it a lot more than them.  I personally love tamales, and this tamale pie doesn't bear many similarities to them, but that's okay.  This honestly turned out better than I expected.  I've seen many recipes for tamale pie and always passed them by because I thought they'd be kind of boring, but I've had great success with all of Catherine's recipes, so decided to try her version.  I'll certainly make this one again! 
 
This recipe is tweaked a bit from the original.  I had to add a bit more buttermilk (just milk plus a little vinegar) to make the batter... batter (instead of dough) and decided to put all the cheese on top because cheese seems to disappear into baked goods.  In the future, I'd like to experiment with using another can of beans instead of the corn and leave out the sugar, but it sure was good this way!


Tamale Pie

1 lb ground beef
2 cloves garlic, minced
15 oz can pinto beans, drained
8 oz can plain tomato sauce
2 C frozen corn
1/2 tsp salt
1/2 tsp chili powder
1 tsp sugar
2 tsp white vinegar
 
for cornbread topping:
2/3 C cornmeal
1/3 C whole wheat flour (or you can use white)
1 tsp baking powder
1/2 tsp salt
1 Tbsp sugar
2/3 C buttermilk
2 Tbsp canola oil
1 egg
1 C grated cheddar
 
Preheat oven to 400 and grease a 2 quart baking dish.
 
Heat a nonstick pan over medium and add ground beef and minced garlic.  Break up with a spatula and cook until the meat is cooked through and crumbled.  Add beans, tomato sauce, and seasonings.  Stir to combine, reduce heat to low, and simmer while you prepare the cornbread topping.
 
In a medium bowl, stir together dry ingredients for cornbread topping.  Add buttermilk, oil, and egg, and stir just until well combined.
 
Spoon meat filling evenly into prepared baking dish, then pour cornbread batter over top.  Spread with a spatula.
 
Bake 15 minutes, then sprinkle on cheddar cheese.  Bake 5 more minutes, or until golden brown and a toothpick inserted into the center comes out clean. 
 
Yield: 6 servings

Thursday, December 3, 2015

Spaghetti and Meatballs

This recipe for meatballs and sauce comes from Serious Eats.  It was actually the first recipe I made from Serious Eats, the description about the author's Friday Night Meatball tradition intrigued me.  I first made it a year ago and absolutely loved it.  The sauce is perfectly savory and flavorful, even though it doesn't have many ingredients, and the meatballs are among the best I've ever had.  I'm particular about tomato sauce and meatballs, so you know these are good!  The meatballs are great served over raw spinach, roasted veggies, or as meatball subs, too.  This recipe is simple, but takes at least two hours to get on the table, so plan accordingly!
  
Quick Note:  I've changed this recipe a little.  The biggest thing is that I use a lot less salt.  I also put the entire 1/2 C parsley into the meatballs.  Didn't realize until I'd made it a couple times that half the parsley was supposed to go in the sauce, but it doesn't hurt the meatballs at all!  Also, this most recent time I served the sauce and meatballs over whole wheat penne.  The plan had been to use spaghetti, but the box I thought was in the pantry had been used up!  Turns out the sturdiness of the penne really held up well to the sauce, I may do it this way in the future occasionally.
  
  
Sauce:
  
2 Tbsp butter
7 cloves garlic, freshly minced
6 oz can tomato paste
2 28 oz cans whole tomatoes, crushed with hands
1/2 tsp salt
1/2 tsp pepper
  
Meatballs:
4 slices bread in crumbs
1/2 C minced parsley
1 1/2 Tbsp Goya seasoning
2 T dried minced onion
3/4 tsp black pepper
2 eggs
2 lb ground beef
2 Tbsp olive oil
grated parmesan to serve
cooked pasta
  
Heat butter/oil in a large pot over medium.  Add garlic and cook 1 minute, stirring constantly.  Add tomato paste and stir constantly for 1 more minute.  Add crushed tomatoes, salt, and pepper.  Bring to a simmer, cover pot, and reduce heat to low while you make the meatballs.
  
Stir together bread crumbs, parsley, Goya seasoning, onion, pepper, and eggs.  Add ground beef and mix gently just until well combined (don't over mix).  Form meat into 1 1/2-2 inch balls and place on a foil lined baking sheet.
 
Heat oil in a large nonstick skillet over medium and add a single layer of meatballs.  Brown meatballs on all sides, turning gently with tongs.  Place meatballs into simmering sauce and brown the rest of the meatballs.
 
When all the meatballs are browned, stir them gently in the sauce making sure not to break them up, and simmer over low heat, uncovered (but use a spatter screen!), for 1 hour 15 minutes (you can go as long as 2 hours), stirring occasionally.  You'll have to stir more frequently as the sauce cooks down.  Serve sauce and meatballs over cooked pasta, sprinkled with parmesan.
  
Yield:  About 8 servings

Friday, November 6, 2015

Basic Meatloaf

I honestly couldn't decide whether or not to post this meatloaf recipe because it's rather similar to another meatloaf I make.  The main difference is that this recipe has sour cream and parmesan in it.  In the end, I decided to post this anyway because the entire reason I made it is because I had half a container of sour cream that needed to be used up, and I can see that happening again!  The recipe is from AllRecipes and was originally called Eileen's Meatloaf.
 
Waffling aside, this is a good meatloaf recipe.  Nothing fancy, but tasty and with a good texture.  My husband gave it a score of 10/10.
 
Basic Meatloaf
 
1 1/2 C Italian seasoned dry bread crumbs (I actually used plain panko and added a little dried basil, parsley, oregano, rosemary, and salt)
1 packet dry onion soup mix
1 egg
2 Tbsp Worcestershire sauce
1 C sour cream
1/2 C grated parmesan
1 1/2 lbs ground beef
ketchup for on top (about 1/2 C, use your judgment)
 
Preheat oven to 375 and grease a 9 by 11 baking dish.
 
In a large bowl, stir together everything except ground beef and ketchup.  Crumble in ground beef and stir until well combined, or mix with your hands.
 
In the prepared baking dish, form meat into an approximately 8 by 10 inch loaf.  Spread desired amount of ketchup on top.
 
Bake meatloaf until a thermometer inserted into the center registers 160 degrees, about 50 minutes, then remove from oven and let sit 5 minutes before serving.
 
Yield:  About 8 servings.

Thursday, August 27, 2015

Ravioli Lasagna

I came up on this recipe at the blog Peaceful Parents, Confident Kids and made it that night, it just looked so good and easy!  You don't even have to cook the ravioli first.  Best of all, it turned out REALLY well.  My lasagna loving husband said he liked it better than regular lasagna, which is saying a lot.  I was worried it may end up a little watery from all the raw spinach, but the ravioli absorbs all the excess liquid very nicely and the entire thing is just divine.
 
 
 Ravioli Lasagna
 
1 lb ground beef
1 26 oz jar/can prepared spaghetti sauce (it doesn't have to be fancy, I used Hunt's Four Cheese)
about 20 oz uncooked, refrigerated cheese ravioli
3 C grated mozzarella
1/3 C grated parmesan
4 oz raw baby spinach
Grease 9 by 13 dish and preheat oven to 350.
 
Cook ground beef in a large skillet over medium high, and then stir in spaghetti sauce.
 
To assemble the lasagna, spread a small amount of the meat sauce in the baking dish, then make a single layer of ravioli, half of the spinach, 2 Tbsp of the parmesan, 1 C of the mozzarella, half of the remaining sauce, the rest of the ravioli, the rest of the spinach, 2 Tbsp of the parmesan, and the rest of the sauce.  Cover with foil and bake 40 minutes.  Remove the foil, top with the remaining 2 C mozzarella and the remaining parmesan.  Bake 20 minutes longer or until it's bubbly throughout and the cheese is browned.  Let the lasagna cool for 10 minutes before serving.
 
Yield: 6-8 servings

Saturday, July 4, 2015

Smashburgers

I have been making so many burgers this year!  This is unusual because I've never been known for my love of hamburgers, but it turns out I like them a lot better when I make them myself.  This is my newest burger adventure, I came upon the recipe on the Pioneer Woman blog a couple of weeks ago and immediately decided to make them for the 4th of July today, along with Cheesy Ranch Potatoes and watermelon.  I've never had a burger like this before because we don't have a Freddy's, Steak 'n Shake, Smashburger, Culver's, or any place like that around here, but the idea of smashing two plain meat patties very thin and melting cheese between them intrigued me.

I will definitely make these again because they turned out really well!  These are the most tender burgers I've made, I think because the meat is handled very little.  They have an awesome, browned crust as well, which makes them super yummy.  I plan to make these when my in-laws visit us next, and I only make our favorite recipes for them!

Quick Note:  I use Stacey's Hamburger Seasoning recipe from AllRecipes and leave out the paprika.  I made a quadruple batch and have it in a little shaker in my spice cabinet.  Also, I found the perfect method for smashing the burgers flat.  Based on all the reading I did online, it can be tricky to flatten the burgers, but my approach was great.  All I did was wrap a medium (about 6 inches in diameter), flat bottomed glass bowl in aluminum foil and then pressed down on it with both hands.  The meat did not stick at all to the foil and it was very easy to clean up.


Smashburgers

1 lb ground beef
butter
hamburger seasoning
sliced cheese
hamburger buns
condiments of choice

Preheat griddle or large nonstick skillet to 350/medium high.  Form the meat into 8 evenly sized balls and place on a plate.

When the griddle/skillet is hot, grease it by melting a burger sized circle of butter in 4 spots on the cooking surface.  Place a ball on each buttered spot, then immediately smush very flat (about 1/6 inch) and sprinkle generously with hamburger seasoning.

Let patties cook until nicely browned on the bottom, then carefully flip with a spatula or tongs.  Sprinkle the uncooked side with more hamburger seasoning, then continue to cook until the patties are cooked through.

Flip 2 of the patties over again, then top those two with a slice of cheese each and the remaining 2 patties.  It will look like you have two sandwiches with layers of meat, cheese, then meat again.  You can add another slice of cheese on top of each if you would like.  Cook until cheese is melted, then remove to the hamburger buns.

Repeat with remaining 4 balls of meat.

Yield: 4 double layer cheeseburgers.

Monday, January 26, 2015

BBQ Bacon Cheeseburger Meatloaf

This is definitely one of the best meatloaf recipes I've ever made, or eaten!  My husband liked it a lot, too, but what's not to like?  We weren't even tired of it on day 4 of leftovers.  This recipe comes from the blog Buns in my Oven, and as usual, I made a few changes.  I'd like to note that using both the cheese and the bacon isn't strictly necessary.  It's certainly good this way (and how I did it!), but I think it would be good too with one or the other of you're reluctant to dump both cheese and bacon into meatloaf.
 
Quick Note:  I used lean ground beef, I believe 93% lean.  Probably because of this, none of that gross looking meatloaf sludge formed around the bottom of my meatloaf!  Something to consider if you usually use beef with a higher fat content.
 
 And we're back to ugly photos...
 
BBQ Bacon Cheeseburger Meatloaf

1 1/2 lb lean ground beef
2 C Panko bread crumbs
6 oz diced cheddar cheese (by weight, not volume)
1/2 C mayo
1 egg
2 Tbsp dried minced onion
1 tsp salt
1 tsp garlic powder
1/2 tsp pepper
1 C BBQ sauce
1/2 C yellow mustard
4 slices bacon, cooked and crumbled
 
Preheat oven to 350 and line a 9 by 11 baking dish (or similar sized) with greased foil.  In a large bowl, stir together everything except beef, BBQ sauce, mustard, and bacon.  In a separate bowl, stir together BBQ sauce and mustard.  Add half of it to the bowl with the other ingredients.  Crumble the ground beef over top and stir together just until everything is incorporated.

Place meatloaf mixture in prepared pan and form into a loaf, about 2 inches tall and 8 by 10 inches wide.  Spread the other half of the BBQ sauce/mustard mixture over meatloaf and sprinkle with crumbled bacon.  Bake until internal temperature reaches 160 degrees, about 45 minutes.
 
Yield:  About 8 servings

Friday, December 5, 2014

Cheesy Bacon, Beef & Rice Casserole

Please do not judge this recipe by its photo!  Casseroles are inherently ugly, but oh boy, this one REALLY is.  I've been referring to it as "50 Shades of Brown Casserole", it's not often you see this many variations on the color brown.  Hideousness aside, this casserole is really good.  It was originally billed as Mexican Rice Casserole on the CopyKat Recipes blog where I found it (it was from a lady named Virginia McDowell in 1968!), but I don't think it really tastes like the rice you get in Mexican restaurants.  The bacon doesn't really help it seem Mexican, either, but it does help it be even more delicious!
 
You could serve the casserole with sour cream, cilantro, salsa, and the like if you want it to taste more Tex-Mex (I actually made a side salad with lettuce, tomatoes, and this Creamy Salsa Dressing), but on its own, it just tastes good and is a perfect comfort food.  You could also try adding more chili powder, some cumin, and some black beans to play up the Mexican factor.  I wouldn't leave the chili powder out, though, because it does add a special little something.

Note: The original recipe called for minute rice (quick cooking rice).  I don't like minute rice, so just used regular rice since the recipe looked like it had enough liquid and the simmering time of 20 minutes is just right for cooking it.  It turned out great this way!  I also used the whole bell pepper (yellow, in my case) and onion because I didn't want to waste the rest.
 
Now I'm no great shakes when it comes to photographing food, but isn't this ugly?  I almost feel bad for it!

 
Cheesy Bacon, Beef & Rice Casserole

4 oz bacon
1 small onion, diced
1 bell pepper, diced
1 C uncooked rice
1 lb ground beef
1 clove garlic, minced
1 3/4 C water
8 oz can tomato sauce
1 t chili powder
1 t salt
2 C cheddar cheese, grated
 
Cook bacon in a large skillet over low heat.  Remove bacon to a paper towel lined plate to drain.  Add diced onion and bell pepper to the bacon grease and cook until they begin to soften.  Add rice and cook for a couple of minutes, just until it starts to turn opaque and gets a little golden. 

Add ground beef and cook, stirring constantly.  Keep a close eye on the heat because the rice could burn easily!  It's okay if the beef isn't cooked all the way through if you run the risk of burning the rice. 

Add the water, tomato sauce, chili powder, and salt, bring skillet contents to a boil while stirring, cover, and reduce heat to low.  Cook without removing lid for 20 minutes.
While that's cooking, turn the oven to 400 and grease a 2 quart baking dish.  When rice and meat mixture is done, stir thoroughly, then spoon half of it into the baking dish.  Top with half of the cheese.  Layer with the rest of the rice mixture, the rest of the cheese, and the bacon.  Bake about 15 minutes, until cheese is golden.
Yield: 6-8 main dish servings

Sunday, November 2, 2014

Stuffed Pepper Soup

For some reason I've never made a stuffed pepper recipe worth repeating.  They've never turned out gross or anything, just not anything special.  I'll undoubtedly try more stuffed pepper recipes in the future because I love them when done well, but it's not very urgent because this soup has amazing stuffed pepper flavor!  This was dinner last night, and it was one heck of a dinner.  The recipe is simple for sure, but extremely tasty.  Everything just works together really nicely.  My husband and I made it together.  Our new kitchen is so much bigger than the old one and we had a lot of fun cooking this.  We made Garlic Butter Dips to go with it.  We just loved this soup, my husband even handed out a rare 10 out of 10 rating.

This recipe is from AllRecipes.  I made a few changes, namely more bell pepper, garlic, crushed tomatoes instead of diced, and more broth (since crushed tomatoes have thicker juice than diced).


Stuffed Pepper Soup
1 Tbsp butter
1 lb ground beef
1 red bell pepper, diced
1 green bell pepper, diced
1 small onion, diced
2 cloves garlic, minced
3 C chicken (or beef) broth
28 oz can crushed tomatoes
15 oz can tomato sauce
1/2 t salt
1/2 t pepper
1/4 t dried thyme
1/4 t dried sage

for serving:
1 C uncooked rice
fresh minced parsley

Place butter in a large pot and melt over medium-high heat.  Add ground beef and break it up with a spoon.  Add bell pepper and onion and cook, stirring frequently, until meat is cooked through and onions are translucent.  Add garlic and cook another minute.  Drain fat if necessary.  Stir in broth, tomato products, and seasonings, bring to a boil, cover pot, and reduce heat to a simmer.  Let simmer 30 minutes, stirring occasionally. 

After 30 minutes, steam rice in a separate pot.  Meanwhile, continue to simmer the soup.  To serve, either stir the rice directly into the pot of soup (only if you're planning to eat all the soup immediately), or scoop individual portions of rice into bowls and top with the soup and a sprinkle of minced parsley.

Yield: 6-8 main dish servings

Wednesday, February 12, 2014

Garlicky Bacon & Cheddar Stuffed Burgers with Avocado

Tonight's dinner was originally going to be Chicken Cacciatore (a recipe that I'll share later if it turns out well), but right when I was about to put the ingredients in the slow cooker, I came upon some photos of a cheese stuffed burger called a Juicy Lucy.  The Juicy Lucy (or Jucy Lucy, if you prefer) is a cheese stuffed burger from Minneapolis.  Burgers aren't usually my favorite thing, but for whatever reason, a cheese stuffed one sounded perfect today!  When looking for a recipe, I decided to combine two of them:  the idea of adding bacon came from Cinnamon Spice and Everything Nice, the burger recipe itself came from this one on AllRecipes, and I used cheddar, lots of garlic, and served the burgers with avocado on top because I felt like it!

I'm happy to say that the burgers turned out awesome.  Sadly, all of mine did end up leaking cheese a bit (really seal those edges!), but the burgers don't seem to have suffered for it at all and the leaked cheese kind of cooked onto the bottom of the burgers.  My husband and I both agreed that this burger is better than just a bacon cheeseburger.  No issues with the bacon falling off the burger this way, and the cheddar was super melty and stretchy instead of just half melted on top..  The avocado was also a perfect, creamy addition.  Tomato and lettuce would have been nice on top, but the burgers were so thick already that they would have been impossible to eat!  Instead, we had a salad on the side.
 

Sorry if the half gnawed burger looks unappealing, I wanted to show the inside but didn't want to cut my burger in half!

Garlicky Bacon & Cheddar Stuffed Burgers with Avocado
 
1 T vegetable oil
4 slices sharp cheddar
6 slices bacon
2 T dried minced onion
1 T Worcestershire sauce
1 t garlic powder
1/2 t salt
1/2 t pepper
1 1/4 lb ground beef
1 avocado, peeled and sliced
hamburger buns and whatever condiments you like (we did ketchup, mustard, and mayo)
Fold each slice of cheese in half, then in half again so each slice ends up as a little stack of 4 small pieces.  Cook and crumble the bacon. 

Mix together meat, onion, garlic powder, salt, and pepper, just until well combined.  Divide meat mixture into quarters, then form each quarter into 2 equal sized balls.  Working with one burger's worth of meat at a time, flatten the two balls into uniform patties, each about 5 inches in diameter.  Place a quarter of the crumbled bacon into the center, then top with one of the folded stacks of cheese.  Top with the other patty and firmly pinch together the edges of the two patties.  Repeat process with the rest of the meat.
Heat oil in a large nonstick skillet over medium high, and when the pan is hot, add the burgers.  Cook until browned on one side, then flip them over and poke the center in a few places with a toothpick.  This will help release steam inside the burger and help prevent the cheese from gushing out while the burgers cook.  Cook the burger on the second side until the internal temperature of one of the burgers is 160 degrees, then remove them to a paper towel lined plate.

Let the burgers sit for a few minutes before serving because the cheese inside is very hot.  Serve on toasted buns topped with avocado slices and whatever else you'd like.

Yield: 4 burgers

Thursday, November 8, 2012

Homemade Taco Seasoning

If you've never mixed up your own taco seasoning, you should really give it a try!  I have been making it myself since I came across this recipe on AllRecipes a couple of years ago.  If you have tacos a lot, you will save yourself quite a bit of money, especially if you buy spices in bulk.  This mix also tastes better than packaged seasoning and doesn't have any weird ingredients.  And if you need any more convincing, it doesn't take any more time to cook taco meat with this than the packaged kind.  If you mix up a big batch of the seasoning, all you have to do when you're cooking the meat is measure out the taco seasoning, sprinkle on a little flour, add water, and cook and stir.  Easy peasy!  Oh, and great served on homemade tortillas.

This base recipe is pretty mild heat wise, though that will depend on your chili powder and other ingredients to some extent.  It shouldn't be too hot for kids or people who don't like spicy.  If you want it hotter, just add more cayenne!  You can also leave out the salt (though I already cut down on the salt by 1/3 in the recipe I posted) or change any other ingredients.  Maybe even add a smidge of cocoa powder.  There are lots of options.  Oh, and you can use this for things other than meat- I'll bet it would be good in chili or sprinkled on popcorn or french fries.  In a couple weeks I plan to make roasted cashews sprinkled with this taco seasoning.  Yum!

Seasoning all mixed up:
  

and cooked with ground turkey:


Homemade Taco Seasoning

4 T chili powder
3 1/2 T paprika
3 T cumin
2 T onion powder
2 T garlic powder
4 t salt
1/4 t cayenne pepper

Place ingredients in a glass jar, put on the lid, and shake to mix.  To make taco meat, brown 1 lb ground beef or turkey in a large skillet.  Drain off fat.  Sprinkle on 2 T taco seasoning and 1 scant T flour (about 3/4 T).  Stir well until meat is coated, then add 3/4 C water and cook, stirring, until liquid has thickened, about 2 minutes.  Serve however you would regularly serve taco meat.

Yield: Enough taco seasoning for about 8 lbs of meat.

Wednesday, May 30, 2012

Best Hamburgers Ever (aka Umami Hamburgers)

On Monday night we bought an inexpensive propane grill!  I've been wanting one for a while because I'm terrible at cooking anything other than veggies, steak, or hot dogs on our hand-me-down round charcoal grill.  My one attempt at grilling chicken resulted in what appeared to be charcoal briquettes.  Last night we had grilled barbecue chicken using Christie Jordan's barbecue sauce from her Southern Plate cook book.  They chicken turned out amazing and I would love to share the recipe for the sauce, but I feel kind of weird doing that since she specifically chose not to post it on her own blog.  The sauce was great but I want to make a few changes next time and will share my version then.  Tonight we decided to go with our favorite hamburger recipe and in the next week we're planning to do portobello mushroom burgers and grilled pizza, too.  Yum!  If anyone has a favorite grill recipe that they think I should try, I would love to hear about it!

Now, on to the recipe.  If you can believe it, I had never cooked a hamburger until about a year ago.  Once or twice I'd made turkey burgers, black bean burgers, and portobello mushroom burgers, but never hamburgers.  They just aren't my thing.  The only ones I ever really cared for are the ones my uncle makes, which are full of garlic.  But then I came across this recipe over at White on Rice Couple and was intrigued by the addition of fish sauce to the meat.  Diane and Todd promised it made the meat extra savory and I just had to try it!  The burgers ended up being out of this world delicious and I've made them several times now over the past months.  I still don't like hamburgers from other places, but we both think these ones are incredible.  This is my tweaked version of the original recipe (with lots of garlic, like my uncle's hamburgers!) and how we love them best.  If you've never tried fish sauce before (or have a bottle languishing in your fridge already), this is a great recipe to use it in!

Sorry there's no picture, I meant to take one but we were hungry!  They just look like your standard hamburger though.  The flavor is what makes them special.

Best Hamburgers Ever

1 lb ground beef (I've used lean and fattier beef with great success)
1 T fish sauce
1 t garlic powder
1/2 t pepper
1/4 t salt

Gently mix together ingredients, being careful not to handle it too much or the burgers will be tough.  Form into 4 patties.  Make them thinner and wider than you want the finished burgers to be because they will shrink when cooked.  Poke a hole in the center with your fingertip so the burger will cook evenly.  To cook the burgers on a stove, heat about 2 T oil in a large nonstick skillet (believe me on the nonstick!) over medium-high heat and cook on one side until browned, then flip and cook on the other side until the burgers reach an internal temperature of 160 degrees Fahrenheit.  You can add a bit of water to the skillet if the bottoms of the burgers start cooking too much.

If you want to cook the burgers on a grill, just grease the grate and cook the burgers on one side until browned, then flip and cook on the other side, being sure to cook them to an internal temperature of 160 degrees Fahrenheit.  If you want cheeseburgers, when the burgers are done you can top each one with cheese and close the lid on the grill for about a minute or until the cheese melts.  Serve the burgers on toasted buns with whatever toppings you'd like.  A bit of mayonnaise and sliced avocado is especially good!

Yield: 4 hamburgers

Sunday, January 29, 2012

Peperoncini Beef Sandwiches

I made these sandwiches for dinner last night and we just loved them! With only 3 ingredients in the meat, it's also one of the easiest things you could possibly make. If you know you like peperoncini peppers and beef, you will probably really like this one. If you don't know, I suggest you buy a jar and taste a pepper before making the recipe because it does have a strong peperoncini/vinegar flavor. Lucky for us, we both love peperoncinis, so the sandwiches are right up our alley. They are a little spicy- probably too much so for kids or those with delicate taste buds- but not too much for me and I'm fairly wimpy when it comes to heat. We shared a big bowl of cold green grapes while we ate and they helped keep things manageable.

Quick note: The original recipe called for a beef chuck roast but I came home from the store with a beef eye of round roast, which is very lean. The meat was fairly tough after cooking, but after I shredded it and let it cook in the juices, it turned out just perfect.

Peperoncini Beef Sandwiches

3 lb beef chuck roast or eye of round roast
5 cloves garlic, minced (I used the stuff in the jar because I had it!)
16 oz jar of sliced peperoncinis
sub rolls
sliced provolone or mozzarella

Place roast in a 4 quart slow cooker and top with garlic. Pour peperoncinis, juice and all, over top. Cover and cook on low until meat is tender, 6 to 8 hours. Remove meat, shred, and stir into liquid in slow cooker. Turn heat to high and cook, uncovered, about 1 hour so the meat has a chance to soak up the liquid and some of the excess juice can cook off. Top sub rolls with meat and cheese, then broil to melt the cheese.

Yield: 8 to 12 sandwiches

Thursday, December 15, 2011

Cranberry Meatballs

Earlier this year, my mother-in-law gave me a Christmas cook book from Gooseberry Patch that she found at a garage sale. I've liked Gooseberry Patch stuff since I was a little kid and my mom received the catalogs. It's so darned charming! I have a couple of their cook books and each one has a lot of yummy looking things in it.

The other night I decided to cook meat for the first time since I made Cincinnati Chili and whipped up Cranberry Meatballs (aka Tangy Barbecued Meatballs) from the Gooseberry Patch book. In the past I've made similar meatballs with jelly (grape on one occasion, currant on the other) and they were good but they're amazing with cranberry sauce! The meatballs themselves were great, too. Meatballs are one of those things I'm particular about and while I've tried many recipes, not a single one held a candle to the meatballs my mom makes (I will post that recipe sometime soon!). Her meatballs are so tender and have a ton of grated parmesan. These ones are cheeseless but also very, very good and perfect for a sauce that doesn't really go with parmesan. Next time I'm going to try them with ground turkey because I prefer ground turkey and turkey and cranberry kinda sorta go together :)

Update:  I've made these with extra lean ground turkey and they are awesome, too.  Next time I will probably experiment with whole berry cranberry sauce because I can.

Without further ado,

Cranberry Meatballs

Meatballs:
1 C crumbs (bread, cornflake, cracker, whatevs)
2 T dried minced onion or 1 t onion powder
2 t dried parsley
1 t salt
1/2 t garlic powder
1/4 t black pepper
2 T soy sauce
6 T ketchup
2 eggs
2 lbs lean ground beef

Sauce:
16 oz can jellied cranberry sauce
12 oz bottle chili sauce (the kind next to the ketchup, not the spicy Asian kind)
2 T brown sugar
1 T lemon juice

For the meatballs, preheat the oven to 350 and grease a 9 by 13 baking dish. In a bowl (or gallon plastic bag if you're me!), combine the dry ingredients for the meatballs, then add the soy sauce and eggs until well mixed. Add the ground beef and gently stir/squish until thoroughly combined. Form into meatballs and place in the prepared dish.

To make the sauce, add all ingredients to a medium pan. Mash with a potato masher to break up the cranberry sauce. Cook over medium heat, stirring frequently, until cranberry sauce has melted. Pour over the meatballs. Bake, uncovered, until meatballs have reached an internal temperature of 160 degrees, which will take about 40 minutes. Enjoy over egg noodles or rice.

Yield: 8 servings, about 3 meatballs per person

Thursday, October 13, 2011

Beef and Bean Burritos

I had never actually made beef and bean burritos until I stumbled upon this recipe over at The Pioneer Woman blog about a year ago. It looked so simple and quick that I had to try it! As usual, I changed it around a bit to make the recipe even more straightforward and to suit our tastes. Of course, it doesn't matter HOW easy a recipe is if it doesn't actually taste good, but I'm happy to report that this one is a winner. Uncomplicated but delicious, my husband especially likes them.  You can either enjoy them as they are (in which case they are highly portable) or lay them on a plate and spiff them up with more El Pato sauce, salsa, guacamole, sour cream, cilantro- whatever floats your boat!

I should also say that most of my favorite dinner recipes I don't make more than once a year at best. Not because I don't like them (obviously) but because I love trying new recipes! This is one of those things that I've made at least four times in the past year.

The key ingredient in these burritos is the El Pato tomato sauce. I'd never tried it before this recipe but it's great! It's quite spicy and has tomatoes, chiles, garlic and onion. You can find it in the Mexican food aisle at the grocery store. I'd imagine if we have it here in Alaska, if you're in the United States you'll be able to find it too :) If you can't get it, you could probably just use an 8 oz can of tomato sauce and add a boatload of hot sauce and garlic to it, but no guarantees on how the burritos will turn out! This is what you want to look for at the store:


I'd like to note that these burritos freeze great, too. Just cool them in the fridge completely, then individually wrap each burrito in foil and toss in the freezer.  Remove the foil (obviously) then microwave on a plate for a couple of minutes.  If you thought far enough ahead, you can also thaw the burritos in the fridge, then bake (still wrapped in foil) for 20 minutes in a 350 degree oven.

Many apologies for this exceptionally uninspiring photo, my husband was eating them as I made them and I had to take a picture quickly before they all disappeared:


Beef and Bean Burritos

1 lb ground beef (or ground chicken or turkey)
2 16 oz cans refried beans
1 8 oz can El Pato sauce (the yellow one)
1 t garlic powder
1 t onion powder
1/2 t oregano
1/2-1 t salt (this will depend on how salty your beans are and your own tastes)
1 lb shredded cheese
12 medium (8 inch) flour tortillas

Brown the ground beef in a skillet and add beans, sauce, and seasonings. Heat through. Put a spoonful of the filling down the center of a tortilla. Top with about a quarter cup of the cheese and fold in the ends of the tortilla before rolling it up. Repeat with the other tortillas.

You can either enjoy them as they are (in which case they are highly portable) or lay them on a plate and spiff them up with more El Pato sauce, cheese, salsa, guacamole, sour cream, sliced olives, cilantro- whatever floats your boat!

Yield: 12 burritos