Sunday, August 5, 2018

Banjo Picker Sandwich

This is a recipe I've made about once a year for the past 5 years, basically since it was originally published on Southern Plate.  It has become our traditional "dinner after visiting the fair" meal.  Fair food is so expensive, unhealthy, and I'm always worried about getting food poisoning, but it's also fun and tasty.  This is our answer!  We always get Dippin' Dots or a soft pretzel or something at the fair, but then come home and I make this for dinner.  It is also not exactly healthy what with the hot dogs and white bread, but undoubtedly a nutritional upgrade from fair food.  It's also very, very good!  The ingredient combination is a little odd, but a real winner.
 
As I mentioned, this recipe is originally from Southern Plate. I never would have thought of it on my own and am glad I came upon it years ago.  Of course, I changed it a bit.  Basically, I tweaked it (mostly the method rather than the ingredients) every year for a few years before settling on the perfect approach that's  minimally messy and involves the least number of hot dogs rolling off. 
 
For the bread, you need to choose carefully.  You want a nice, wide loaf that is not too tall (unless you can unhinge your jaw), and it's good if it's crusty rather than like white bread.  You also don't want ciabatta, though.  Just check out your options and pick whatever seems like it will work best, no big deal.
 
Banjo Picker Sandwich
  
1 loaf french or italian bread (not a baguette), cut in half horizontally
1 Tbsp butter
6 hot dogs of your choice, cut in half lengthwise (they are less roly poly this way)
mayo
mustard of your choice (I use spicy)
5 slices of your favorite cheese (I like sharp cheddar)
sauerkraut to taste, drained (put a pile on a couple layer of paper towels, wrap it up tight, and squeeze it dry over the sink)
sliced peperoncinis to taste
 
Melt butter in a large skillet over medium heat and brown hot dogs.  
 
Preheat oven to 350 and line a baking sheet with foil or parchment paper.
 
Place the two halves of bread on the baking sheet.  Spread mustard over the bottom half and mayo over the top.  Arrange hot dogs on bottom half of bread so that they run perpendicular to the length of the bread.  Spread drained sauerkraut over the top half of bread and sprinkle with peperoncinis.  Lay 3 slices of cheese over the hot dogs and 2 over the peperoncinis.  
 
Bake the sandwich halves until the cheese is melted and the bread is toasty, about 15 minutes.  Flip the top half onto the bottom, let sit for a few minutes, then cut into serving pieces.
 
Yield: 4 large servings, or you can cut them smaller.  Leftovers reheat well wrapped in foil and baked until hot.

Friday, July 27, 2018

Spicy, Smoky, Sweet Chili

I found this recipe on Iowa Girl Eats and was so intrigued and wanted to try it so badly that I made it that night.  We love chili, but had never had sweet chili before.  The reviews on the blog were glowing and the woman who writes the blog said it is their all time favorite, so how could I resist?
 
As usual for me, I have messed with the recipe in a few ways.  I use extra lean ground turkey and that basically produces no fat for sauteing anything, and I actually cut back on the amount of chili powder (usually I add more than recipes call for!).  Chili powder intensity varies wildly according to what kind you get.  Mine is from Mountain Rose Herbs.  It's very delicious, but quite potent and spicy.  The original recipe calls for 6 tablespoons (this is with the recipe doubled as written below), but I recommend you add 4 to start with like I did and then you can add more if it's needed.  I also left out the cayenne because it was spicy enough without, thanks to the chili powder.  I also saute the spices with the onion, garlic, and meat to help the flavors develop, something not specified in the original recipe.
  
The other big change is that I use all black beans instead of part canned baked beans so the sugar could be reduced a bit, but the first time I made it, I did use the baked beans and it was very good. Usually I prefer main dish recipes without added sugar, but figure making this once or twice a year will not hurt anything.  It would not be the same without the sweetness!  This recipe makes 12 generous servings and each serving has 1 teaspoon of brown sugar, which isn't too bad, all things considered.
 
So, the verdict?  Pretty amazing and unlike any other chili I've either made or eaten.  It is indeed spicy, smoky, and sweet!  The trifecta of perfection.  The flavors really combine beautifully and it turns out sweet chili totally works.  I had a pretty specific idea in my head of what this chili would taste like (guessing the result of me cooking half my life), and it was exactly how I expected.  It became an instant favorite in our house and I now make it in double batches so we can freeze some of it.  We still love Stout Chili and White Chili (which I still need to post on the blog, funny considering it's been a favorite of mine since childhood!), but we have love enough in our hearts for 3 "essential" chili recipes and the many other quick chili recipes I've posted here.  Plus, this chili recipe is quite different in flavor from Stout Chili and White Chili.
 
If you don't want to cook this on the stove, you can do it in the Instant Pot or a slow cooker.  For the Instant Pot, just cook everything as described on Saute, then put the lid on and set it to Chili for 20 minutes, do a quick pressure release, and serve.  For a slow cooker, cook everything as described on the stove top, but instead of simmering it, transfer the chili to the slow cooker and cook it for 6-8 hours.
 
Quick Note:  Have your cup of water and cans of tomato sauce open before you start.  The spices can burn quickly so you want to have that liquid ingredient ready to go!
  
Spicy, Smoky, Sweet Chili
 
4 Tbsp butter
1 large onion, diced
2 lb ground turkey
 8 cloves garlic, minced
4 Tbsp chili powder
1 Tbsp smoked paprika
1 tsp cumin
1 C water
2 28 oz can tomato sauce
2 28 oz cans black beans, drained
4 Tbsp brown sugar
  
First things first, have your spices in a small bowl so you can add them quickly and all at once.  Set aside.
  
Melt butter in a large pot over medium heat.  Add onion and saute until they turn translucent, then add the ground turkey.  Cook the turkey and onion together, being sure to break up the meat with your spoon.  When the meat is no longer pink, ad the minced garlic and spices.  Saute for another minute or so, being very careful not to burn the spices.  Immediately pour in the water and tomato sauce, then add the remaining ingredients.  Bring to a simmer, then cover and reduce the heat to medium low.  Simmer for 30 minutes, stirring occasionally.
  
Yield: 12 servings

Friday, July 20, 2018

Speedy Greek Salad

This is one of my favorite lunches and something I have pretty often!  It's super quick to toss together and is definitely one of those "more than the sum of its parts" concoctions.  The crunchy, mild cucumbers, sweet, acidic tomatoes, super salty and slightly bitter olives, tangy, salty, creamy feta, and pucker of vinegar are just perfect together.  You don't even need any oil, though a splash of olive oil wouldn't hurt anything.  I'm not sure it actually qualifies as a recipe, but who cares?  The amounts for all these ingredients are completely up to you.
  
Speedy Greek Salad
 
cucumber, cut into small bite sized pieces
halved cherry tomatoes (or big tomatoes cut into bite sized pieces)
pitted kalamata olives
feta cheese
salt to taste
small sprinkle of oregano (sometimes I add it, sometimes I don't)
a splash or two of raw apple cider vinegar or red wine vinegar
 
Consider how many people you'll be serving and whether this will be the main dish or a side.  Put however much cucumber and tomatoes you want into an appropriately sized bowl and sprinkle with salt, toss.  Add however many olives and how much feta you want.  Sprinkle with the optional oregano then drizzle on a little vinegar.  Toss to combine.  Taste and add more of anything.
 
Enjoy!

Tuesday, July 17, 2018

Baked Cheeseburger Sliders

These sliders are one of the easiest things you can make for dinner and involves less than 10 minutes of prep if you are working slowly.  They're also fun and yummy!  
 
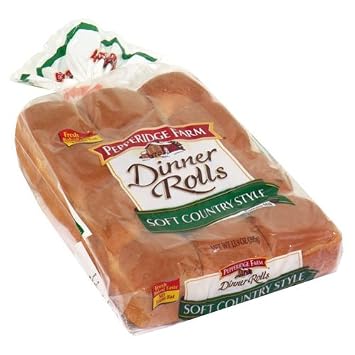
For the rolls, this is the kind I mean.  You don't have to buy that specific brand, but the rectangle of stuck together rolls is what you're looking for.  I have a couple of Crow Canyon enamelware baking pans and they are the exact right dimensions for the giant beef patty to match up with the rolls, but a regular 9 by 13 pan will be fine as well.
 
Baked Cheeseburger Sliders
 
1.25 lb ground beef
1/2 tsp salt
1/2 tsp pepper
1/2 tsp paprika
1/2 tsp garlic powder
1/4 tsp onion powder
sliced cheese
rectangular pack of 12 dinner rolls
desired toppings like ketchup, mustard mayo, and sliced pickles
 
Preheat oven to 425.
 
Squish beef evenly into 9 by 13 baking dish.  Mix together seasonings in small cup and sprinkle evenly over top.  Bake 30 minutes or until cooked through.
 
Slice rolls in half to make a giant bun.  Lift giant burger patty onto giant bottom bun.  Pour out any accumulated grease from the baking pan and put the giant bottom bun and patty back into the pan.  Top with sliced cheese, then top bun.  Place plan in oven, turn off heat, and leave until buns are toasty and cheese is melted, about 5 minutes.  Cut into individual sliders with a large knife.  Top individually with desired toppings and serve!
 
Yield: 4-6 main dish

Sunday, July 8, 2018

Rhubarb Crumble with Custard, aka My Favorite Dessert

This has become my all time favorite dessert.  Yes, of all the wonderful desserts that I love, rhubarb crumble is It for me.  The tart rhubarb, sweet and buttery crumble with a tiny hint of cinnamon, and custard poured on top all just come together to make something truly amazing.  It tastes like joy. comfort, love, and well being.  I urge you to try it if you have access to rhubarb and want a really special treat.  Lucky for us, we have a ridiculously huge and robust rhubarb patch!
 
This recipe is from the book Great British Cooking: A Well-Kept Secret by Jane Garmey.  She apparently got the recipe from a nun in cooking class while in school, very cute little story.  I altered it a bit by moving the cinnamon from the filling to the topping, increasing the filling amount by half, increasing the baking temperature, and baking it much longer than the original recipe states.  The book says to bake it for 20 minutes and you'd be crunching your way through raw rhubarb if you made it like that!
 
Rhubarb Crumble with Custard
 
filling:
1 1/2 lbs rhubarb, cut in 3/4 inch pieces
3/4 C sugar
3 Tbsp lemon juice
 
crumble:
1 1/2 C flour
1 1/2 C dark brown sugar
1/4 tsp cinnamon
6 oz cold salted butter, cut into small cubes
 
topping:
warm vanilla custard (I used Bird's custard powder, but you could look up a recipe)
 
Preheat oven to 350.  You do not need to grease the baking dish.
 
Place filling ingredients in a 2 quart baking dish and toss with a spoon to coat.
 
Combine dry ingredients for crumble in bowl and mix well.  Add butter.  Rub mixture together with fingers until the ingredients are well combined and look like wet sand with pea sized clumps.  Sprinkle evenly over filling.
 
Bake for 45 minutes, then check on it and cover with foil if the crumble starts looking like it's browned enough.  Continue baking until rhubarb is tender and bubbly throughout.  It should be bubbly in the center and a fork stuck in should not meet any resistance from the rhubarb.  This will take about an hour and a half total.
 
Let the crumble sit for 10-20 minutes before digging in.  Serve crumble in a bowl with warm custard poured over top.
  
Yield: 8 servings

Sunday, July 1, 2018

Chocolate Coconut Bars

My husband loves these chocolate coconut bars!  He requests them for special occasions.  They're essentially a no-bake cookie base topped with coconut buttercream and a thin layer of chocolate.  The first time I made them with Oreos, like the original recipe over at Taste of Home says, but they were so over the top sweet that I've made them with Nabisco Famous Wafers since.  They're still very sweet, but not as sweet as with Oreos.  Someday I would like to make them with chocolate graham crackers, but I can never find them at the store when I'm planning to make these.  My husband has a huge sweet tooth though and you probably won't mind all the sugar if you do, too!
 
The recipe below has a few changes from the original, other than the type of cookies used.  I basically added more coconut flavor.
 
Also, if you ever find yourself needing a coconut buttercream, you could use the coconut filling recipe and end up with a really delicious frosting!  Just double the recipe and only add powdered sugar until it reaches a normal frosting consistency.  As written, the filling recipe is quite stiff, which is needed for this bar recipe, but less powdered sugar will change that.
 
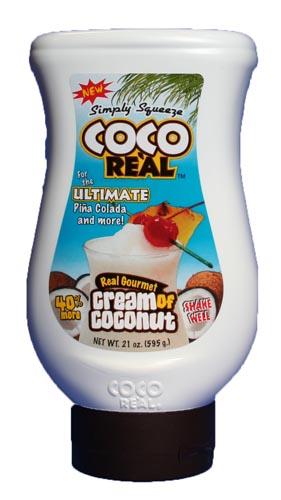
Note that the cream of coconut is not canned coconut milk, it's the sweetened goopy stuff used in mixed drinks.  The brand we purchase is called Coco Real.
 
Chocolate Coconut Bars
 
cookie base:
3 C Famous Wafers crumbs or chocolate graham cracker crumbs (this is about 1 1/2 packs of wafers)
2 C sweetened, shredded coconut
1/2 C cream of coconut
2/3 C butter, melted
 
coconut filling:
1/3 C butter, softened
4 Tbsp cream of coconut, or more as needed
1/2 tsp coconut extract
3 C powdered sugar
 
chocolate layer:
1 1/2 C semisweet chocolate chips
4 tsp canola oil
 
To make the base layer, just stir together all of the base ingredients until well combined.  Press it evenly and firmly into the bottom of an ungreased 9 by 13 dish.  Refrigerate for an hour so it can firm up, then make the coconut filling.
 
To make the coconut filling, beat together butter, cream of coconut, and coconut extract, then mix in the powdered sugar.  It will be quite thick, you want it to be thin enough to spread but still pretty thick so it doesn't squirt out the side of your bars when you slice them.  Add more cream of coconut if you need to thin it any more.
 
Spread the coconut filling evenly over the cookie base and set aside while you make the chocolate layer.
 
To make the chocolate layer, melt the chocolate and oil together however you'd like: over a double boiler, or on 50% power in the microwave for 1 minute to start with, then 20-30 second increments afterwards, stirring between stints in the microwave.  Don't let the chocolate get too hot or it will seize.
 
When chocolate is melted, pour it over the bars and spread with a spatula.
 
Refrigerate bars until the chocolate has firmed up.  After that, you can store the bars at room temperature.
 
Cut into pieces and enjoy!
 
Yield: about 12 servings

Friday, June 22, 2018

Bowtie Spinach Alfredo

Here's another great and healthier version of fettuccine alfredo!  It's also really quick and easy to make, you could have this on the table in 20 minutes.  My husband and I both really like it and think the spinach is the perfect addition.  We like the bowties, but you could use a different shape of pasta.  Also, if you prefer using fresh spinach, just leave out the frozen (obviously) and saute 6 C fresh baby spinach with the garlic while making the sauce.  You could toss in some shredded chicken at the end or saute some chopped chicken breast or shrimp before adding the garlic and spinach if you wanted, too.  Heck, even add a can of drained, chopped artichoke hearts if you want a spinach artichoke dip inspired pasta dish.  There are tons of options!
  
The inspiration for this recipe came from Budget Bytes, but it's basically a tweaked version of my Pumpkin Fettuccine Alfredo.  The cornstarch is necessary to thicken the sauce up a bit since it doesn't have pumpkin to help out. Like the Pumpkin Fettuccine Alfredo, it reheats very well, just microwave it and add a little milk if necessary to keep it from being dried out.
  
Bowtie Spinach Alfredo
  
1 lb bowtie pasta
12 oz bag frozen spinach
4 Tbsp butter
4 cloves garlic, minced
8 oz cream cheese, cubed
2 1/2 C milk
1 tsp salt
1/2 tsp black pepper
3 Tbsp milk with 2 Tbsp cornstarch dissolved in it 
1 C freshly grated parmesan
 
Cook pasta in salted water until almost done, add spinach and cook another minute or two. Drain thoroughly and return to pot.  Stir in a small amount of butter if the sauce is not almost done so the pasta won't stick together.  Cover with lid and set aside
 
Make the sauce while the pasta cooks.  Melt butter in saucepan over medium-low heat.  Saute garlic until tender.  Add cream cheese and 1/2 C milk.  Whisk until as smooth as possible.  Add remaining milk, salt, and pepper.  Bring to a simmer.  Make a slurry with the milk and cornstarch, pour it into the simmering sauce, and stir for a minute or so until thickened. Stir in parmesan until melted
 
Pour sauce over pasta and spinach, toss to combine, and serve.
Yield: 6 servings