Whenever I visit my mom in Washington, we always have a Girls' Night and invite my aunt and cousins over to eat, have girly drinks, chat, and watch a movie. Usually my mom and I cook something. This time, she chose the recipes. Together we made a delicious roasted green chile and corn lasagna (still need to get the recipe from her!) and I made this hideous yet delicious cake. The recipe is from a restaurant called Hyde Park Bar & Grill and was featured in Bon Appetit a number of years ago. It's probably the ugliest dessert you will ever make- sorry there aren't any pictures, just trust me- but it's also one of the most amazing ones! Wonderful fresh peaches, a hint of cinnamon (which was entirely my doing, the recipe doesn't call for cinnamon sugar), and perfect, moist cake. It's heart breakingly old fashioned and absolutely a must try recipe. And if you really must, you can cover the ugliness with whipped cream or ice cream :oD
Quick note: A great way to peel peaches is to bring a big pot of water to a boil and submerge the peaches, one or two at a time, for about 30 seconds to a minute for ripe peaches or up to 3 minutes for less ripe peaches. Scoop the peaches out of the water with a slotted spoon, let them cool (you can speed this along by dunking them in cold water), and the skins will slip right off.
Peach Pudding Cake
1 3/4 C flour
2 1/4 t baking powder
3/4 t salt
1/2 t baking soda
3/4 C softened butter (1 1/2 sticks)
1 3/4 C sugar
2 T vanilla extract (yes, 2 tablespoons!)
2 eggs
3/4 C buttermilk
4 C peeled, sliced peaches (about 3 lbs- I just covered the entire surface of the cake with peaches)
3 T sugar
1/2 t cinnamon
Preheat oven to 350 and grease a 9 by 13 inch baking dish as well as a piece of aluminum foil large enough to cover the top.
Whisk together flour, baking powder, salt, and baking soda, and set aside. In a medium bowl, beat butter until creamy. Beat in sugar in 3 additions. Beat in vanilla extract, then eggs one at a time. Alternately mix in dry ingredients and buttermilk in 3 additions each. Batter should be smooth. Spread batter in prepared baking dish and cover with a layer of peaches. Don't worry too much about whether they're arranged prettily because they will sink to the bottom of the cake! Combine the sugar and cinnamon and sprinkle on top.
Cover the baking dish with the foil and bake for 45 minutes, then remove foil (don't worry if some of the cake sticks, like I said earlier it is an ugly cake!) and bake until a toothpick inserted into the center comes out clean, about 20 to 40 minutes longer. If your cake turns out anything like mine, the surface in the middle will look shiny and raw even when it's baked through, so start testing the cake after 20 minutes! Let cake set for about 15 minutes and then serve warm.
Yield: about 12 servings

Wednesday, August 8, 2012


Friday, August 3, 2012
Beer Mac and Cheese
Alright, time to play catch up with my backlog of recipes that need to be posted! This one is for Beer Mac and Cheese. One of our favorite restaurants has an amazing beer cheese soup on the menu, and we love the Welsh Rabbit I make for Easter every year, so my mac and cheese loving brain logically made the leap between those dishes and mac and cheese. I pretty much winged the recipe and the sauce was based on the one from Welsh Rabbit. Got the idea for the pretzel topping from this recipe on AllRecipes.
The resulting mac and cheese was divine. The amount of beer flavor was perfect, and it was nice and cheesy. And the pretzel topping? Also great! By only broiling individual servings with the pretzels, the mac and cheese stayed nice and saucy without getting gritty, and leftovers didn't suffer from mushy topping since. I just reheated it in the microwave, stirred in a little milk to keep it creamy, then sprinkled the individual bowls with a bit more cheddar and the pretzel topping before tossing the bowls under the broiler with the topping. What could be better?


Beer Mac and Cheese
12 oz macaroni
3 T butter
2 T flour
1 1/4 C milk
3/4 C wheat beer (I used Pyramid Hefeweizen)
2 t Worcestershire sauce
2 t dijon mustard
3/4 t salt
1/4 t pepper
1/4 t paprika
3 C grated sharp cheddar
Topping:
extra grated cheddar
1/2 C roughly crushed pretzels
2 T melted butter
1/4 C parmesan cheese
1/4 t dried parsley
Boil macaroni in a large pot of lightly salted water. Drain, return to the pot, cover the pot so the macaroni stays warm, and set it aside. While the macaroni cooks, make the sauce. Melt the butter in a medium saucepan and add flour. Whisk until golden, about 1 minute. Add the milk, about 1/4 C at a time, whisking until smooth after each addition. When all the milk has been added, pour in the beer all at once and whisk until smooth. Whisk in the Worcestershire sauce, dijon mustard, salt, pepper, and paprika. Bring sauce to a simmer and cook about 2 minutes until thickened, whisking the whole time. Remove sauce from heat (this is important!) and stir in the grated cheese until melted. Add the sauce to the pot with the drained pasta and stir to combine.
Preheat the broiler and move the oven rack to the highest position. To make the topping, just toss together everything but the extra grated cheddar in a small bowl. Spoon macaroni and cheese into either individual broiler safe dishes or into 1 larger dish. Sprinkle with a bit of cheddar, then the topping. Place under broiler and broil until golden brown, being sure not to walk away or it could burn! This should only take a couple of minutes.
Enjoy! This is great with Cucumber Dill Salad.
Yield: About 8 servings.
The resulting mac and cheese was divine. The amount of beer flavor was perfect, and it was nice and cheesy. And the pretzel topping? Also great! By only broiling individual servings with the pretzels, the mac and cheese stayed nice and saucy without getting gritty, and leftovers didn't suffer from mushy topping since. I just reheated it in the microwave, stirred in a little milk to keep it creamy, then sprinkled the individual bowls with a bit more cheddar and the pretzel topping before tossing the bowls under the broiler with the topping. What could be better?


Beer Mac and Cheese
12 oz macaroni
3 T butter
2 T flour
1 1/4 C milk
3/4 C wheat beer (I used Pyramid Hefeweizen)
2 t Worcestershire sauce
2 t dijon mustard
3/4 t salt
1/4 t pepper
1/4 t paprika
3 C grated sharp cheddar
Topping:
extra grated cheddar
1/2 C roughly crushed pretzels
2 T melted butter
1/4 C parmesan cheese
1/4 t dried parsley
Boil macaroni in a large pot of lightly salted water. Drain, return to the pot, cover the pot so the macaroni stays warm, and set it aside. While the macaroni cooks, make the sauce. Melt the butter in a medium saucepan and add flour. Whisk until golden, about 1 minute. Add the milk, about 1/4 C at a time, whisking until smooth after each addition. When all the milk has been added, pour in the beer all at once and whisk until smooth. Whisk in the Worcestershire sauce, dijon mustard, salt, pepper, and paprika. Bring sauce to a simmer and cook about 2 minutes until thickened, whisking the whole time. Remove sauce from heat (this is important!) and stir in the grated cheese until melted. Add the sauce to the pot with the drained pasta and stir to combine.
Preheat the broiler and move the oven rack to the highest position. To make the topping, just toss together everything but the extra grated cheddar in a small bowl. Spoon macaroni and cheese into either individual broiler safe dishes or into 1 larger dish. Sprinkle with a bit of cheddar, then the topping. Place under broiler and broil until golden brown, being sure not to walk away or it could burn! This should only take a couple of minutes.
Enjoy! This is great with Cucumber Dill Salad.
Yield: About 8 servings.
Cucumber Dill Salad
This recipe comes from an old cookbook of my grandmother's called The Magnolia Collection and is by Gene Westbrook (it's autographed, too!). Let me give a bit of backstory: My grandmother was born and raised in Kentucky and was a wonderful cook. For every big family gathering, she would cook food for 40 or 50 people as if it were nothing. Everything she made was delicious, too! I honestly don't know her history with this particular cookbook. Not even sure why I ended up with it after she died, but on one of my visits to my father in Louisiana, this book was waiting for my and my dad said one of his siblings had sent it to him to give to me. The book itself is quite beat up and there are a few notes from her in margins so I think she used it a lot! Although I've had the book for several years now, I'm sad to say I've only made 2 recipes from it even though so many of them look delicious. However, both recipes- this one and a chicken salad recipe- are incredible and I make them a lot!
In the book, this recipe is listed in the Appetizers section and is called "Eloise's Cocktail Cucumbers." Not sure who Eloise was or how exactly you're supposed to serve the cucumbers, but we just have them as a side dish. I have altered the recipe so it has much less sugar than the original and it works out just great for a sweet, vinegary, dilly cucumber salad. You can even make a big bowl of it and serve it 2 nights.

Cucumber Dill Salad
1/4 C sugar
1/2 C white vinegar
1/4 C water
1 t salt
1 t dried dill
2 cucumbers, sliced thinly
Place everything but cucumbers in a small saucepan and bring to a boil. Cook until sugar has dissolved, which should only take a minute or so. Pour over sliced cucumbers and toss to coat. Refrigerate for a couple of hours or overnight. The recipe says to make 1 day ahead but they're actually still good warm, too!
Yield: About 4 servings
In the book, this recipe is listed in the Appetizers section and is called "Eloise's Cocktail Cucumbers." Not sure who Eloise was or how exactly you're supposed to serve the cucumbers, but we just have them as a side dish. I have altered the recipe so it has much less sugar than the original and it works out just great for a sweet, vinegary, dilly cucumber salad. You can even make a big bowl of it and serve it 2 nights.

Cucumber Dill Salad
1/4 C sugar
1/2 C white vinegar
1/4 C water
1 t salt
1 t dried dill
2 cucumbers, sliced thinly
Place everything but cucumbers in a small saucepan and bring to a boil. Cook until sugar has dissolved, which should only take a minute or so. Pour over sliced cucumbers and toss to coat. Refrigerate for a couple of hours or overnight. The recipe says to make 1 day ahead but they're actually still good warm, too!
Yield: About 4 servings
Tuesday, July 31, 2012
Tuesdays with Dorie: Blueberry Nectarine Pie
Holy moly, how did I go a month and a half without posting?! Not to fear my dears, I am still alive and cookin'. We went on vacation and had some other stuff going on and my blog just fell by the wayside a bit. I have lots of recipes to post, though!
On to business: today's Tuesdays with Dorie recipe is the amazing Blueberry Nectarine Pie. As soon as I read the name I knew we would love it, and I was right! Good crust, delicious and rather unique filling. Yum. Followed the directions exactly and my only suggestions would be to 1) increase fhe flour by 1 T to help thicken the sauce, and 2) let the pie cool for at least an hour and a half before serving. The book said to wait 30 minutes and we managed to resist for 45, but it was still quite hot and the filling ended up pouring everywhere, Regardless, we loved the pie and I will definitely make again, maybe even the filling alone as a topping for pound cake. I recommend it to anyone who owns the Baking with Julia book. If you don't have the book, you can get the recipe over at That Skinny Chick Can Bake or Manchego's Kitchen.

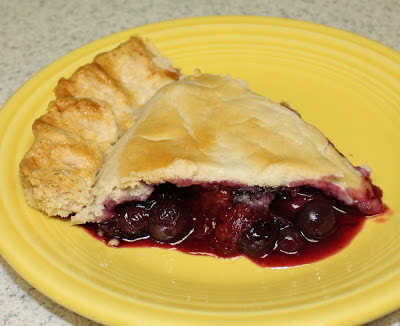
I actually made this for my second wedding anniversary. My husband loves cake, but loves pie even more and was heartbroken when we couldn't have pie at our wedding reception in addition to the cake. We wanted pie, but the venue would not allow any desserts from outside (except the wedding cake) and couldn't/wouldn't make pie. They did make lots of little lemon tarts-- which ended up costing about twice as much as the cake, I might add-- but they weren't very good. Bah. So I decided this pie would be the perfect dessert for our wedding anniversary and my husband agreed :)
On to business: today's Tuesdays with Dorie recipe is the amazing Blueberry Nectarine Pie. As soon as I read the name I knew we would love it, and I was right! Good crust, delicious and rather unique filling. Yum. Followed the directions exactly and my only suggestions would be to 1) increase fhe flour by 1 T to help thicken the sauce, and 2) let the pie cool for at least an hour and a half before serving. The book said to wait 30 minutes and we managed to resist for 45, but it was still quite hot and the filling ended up pouring everywhere, Regardless, we loved the pie and I will definitely make again, maybe even the filling alone as a topping for pound cake. I recommend it to anyone who owns the Baking with Julia book. If you don't have the book, you can get the recipe over at That Skinny Chick Can Bake or Manchego's Kitchen.


I actually made this for my second wedding anniversary. My husband loves cake, but loves pie even more and was heartbroken when we couldn't have pie at our wedding reception in addition to the cake. We wanted pie, but the venue would not allow any desserts from outside (except the wedding cake) and couldn't/wouldn't make pie. They did make lots of little lemon tarts-- which ended up costing about twice as much as the cake, I might add-- but they weren't very good. Bah. So I decided this pie would be the perfect dessert for our wedding anniversary and my husband agreed :)
Sunday, June 10, 2012
Quick Garlic Aioli
Yes, yes. I am aware that real aioli is made with raw egg yolks instead of mayonnaise. I would have made a more authentic recipe, too, if the idea of raw eggs didn't skeeve me out. Food poisoning is something I have happily avoided for the past 27 years (though my parents did get terrible food poisoning after eating celebratory soft serve ice cream when they found out my mom was pregnant with me) and I don't care to experience it any time soon. I also don't care to experience purchasing super expensive pasteurized eggs. So mayo it is. I honestly just threw the ingredients together (measured everything though!) and it isn't based on any recipe, but after I made it I looked on AllRecipes and this one is pretty similar. The garlic aioli was originally made to go along with my awesome portobello mushroom burgers, but I decided it deserved its own post because it's SO good and SO versatile! It was perfect on the burgers, but also great on the fries I baked to go along with the burgers, would be good on sandwiches, and odd as it sounds, it's really good on steamed broccoli. Just put a little bitty puddle of it on your plate, fork a broccoli floret, and dunk it (just a little bit!) in the aioli. A little goes a long way! I think it would also be great on artichokes or salmon cakes or pretty much anything else.

Quick Garlic Aioli
1/3 C mayonnaise
1 clove minced garlic
1 1/2 t lemon juice (can do more if you want it lemony, I held back for once in my life)
1/8 t pepper
1/8 t salt
Mix together all the ingredients in a little bitty bowl. It's fine if served immediately, but even better if you let it sit in the fridge for a couple of hours. It keeps for several days in the refrigerator.

Quick Garlic Aioli
1/3 C mayonnaise
1 clove minced garlic
1 1/2 t lemon juice (can do more if you want it lemony, I held back for once in my life)
1/8 t pepper
1/8 t salt
Mix together all the ingredients in a little bitty bowl. It's fine if served immediately, but even better if you let it sit in the fridge for a couple of hours. It keeps for several days in the refrigerator.
Simple Grilled Portobello Mushroom Burger
Prepare for more less than mediocre photos, my friends! I recently found out about yet another cooking group that I really want to join. It's called, you can read about it at that link. They only let you join if your blog has 100 recipes with photos. I have more than 100 recipes, but not all of them have photos. Added 'em up and about 75 have photos. That means everything I post for the next while will be accompanied by a photograph unless I absolutely cannot stand to post one. I'll also go back and add photos to some posts that don't have one. You may want to shield your eyes, don't let my pictures deter you from trying the recipes :) Oh and of COURSE I will not just be posting random recipes to get a photo up. My standards are always that I only post recipes that I love, turn out great, and are ready for you to successfully whip up in your own kitchen!
On to the recipe! I actually have a backlog of recipes (AND photos) to post, but for some reason I prefer waiting a couple days between posts. Don't want to bury my recipes too quickly, you know? I will probably pick up the pace though as I have like 10 recipes waiting in the wings and the pile will only keep growing.
I am still loving my new grill and today's recipe is for grilled portobello mushroom burgers. You may look at the ingredients and not be very impressed, since the actual burger is just a big ol' mushroom, olive oil, salt, and pepper, then it's topped with a bit of garlic aioli. But sometimes simpler is better, and this burger is for people who really love mushrooms. I have tried other portobello burgers where the mushroom flavor was completely covered up with a marinade or glaze or something. They were good, but we LIKE the flavor of mushrooms and do not feel it needs to be covered up. Cooked this way, they still taste like mushrooms, and the garlic aioli accentuates the flavor instead of obliterates it. Plus, if you're paying $6.99 a pound for these overgrown button mushrooms (really) like we are, where's the sense in making it taste like something else? In any case, we really, really liked these burgers and will definitely make them again! Next time I am thinking of adding a slice of swiss cheese and making the mother of all mushroom swiss burgers.

Simple Grilled Portobello Mushroom Burger
portobello mushrooms, 1 for each person
olive oil
salt
pepper
buns (make sure they are vegan if you're serving someone who is vegan)
garlic aioli (leave off if you want the burgers vegan!)
any other toppings you want, like lettuce, tomato, or grilled red onion slices (yum!)
Let your grill preheat. While that happens, wash and thoroughly dry your mushrooms, then cut off the stems of all the mushrooms so the stems are flush with the rest of the cap. Brush olive oil all over the mushrooms (I used oil on a paper towel), then sprinkle with salt and pepper to taste. When grill is ready, stick the mushrooms on the grill, gill side up, and grill for 5 minutes over medium-high heat with the cover down. You may want to check to make sure they aren't burning (though a little bit of black is tasty). Before flipping them, one at a time pick the mushrooms up with tongs and pour out any accumulated oil and juices in the gills. They will cause flare ups if you don't. Cook the burgers on the other side for the same amount of time. Flip again and cook a couple minutes on the first side, then flip once more. By this time, the mushroom should feel soft when you poke it with your tongs. Lower the heat and toss your buns, cut side down, on the grill and grill until toasted. Drain the mushrooms briefly on paper towels, then serve on the buns with the garlic aioli and any vegetabley toppings you want.
On to the recipe! I actually have a backlog of recipes (AND photos) to post, but for some reason I prefer waiting a couple days between posts. Don't want to bury my recipes too quickly, you know? I will probably pick up the pace though as I have like 10 recipes waiting in the wings and the pile will only keep growing.
I am still loving my new grill and today's recipe is for grilled portobello mushroom burgers. You may look at the ingredients and not be very impressed, since the actual burger is just a big ol' mushroom, olive oil, salt, and pepper, then it's topped with a bit of garlic aioli. But sometimes simpler is better, and this burger is for people who really love mushrooms. I have tried other portobello burgers where the mushroom flavor was completely covered up with a marinade or glaze or something. They were good, but we LIKE the flavor of mushrooms and do not feel it needs to be covered up. Cooked this way, they still taste like mushrooms, and the garlic aioli accentuates the flavor instead of obliterates it. Plus, if you're paying $6.99 a pound for these overgrown button mushrooms (really) like we are, where's the sense in making it taste like something else? In any case, we really, really liked these burgers and will definitely make them again! Next time I am thinking of adding a slice of swiss cheese and making the mother of all mushroom swiss burgers.

Simple Grilled Portobello Mushroom Burger
portobello mushrooms, 1 for each person
olive oil
salt
pepper
buns (make sure they are vegan if you're serving someone who is vegan)
garlic aioli (leave off if you want the burgers vegan!)
any other toppings you want, like lettuce, tomato, or grilled red onion slices (yum!)
Let your grill preheat. While that happens, wash and thoroughly dry your mushrooms, then cut off the stems of all the mushrooms so the stems are flush with the rest of the cap. Brush olive oil all over the mushrooms (I used oil on a paper towel), then sprinkle with salt and pepper to taste. When grill is ready, stick the mushrooms on the grill, gill side up, and grill for 5 minutes over medium-high heat with the cover down. You may want to check to make sure they aren't burning (though a little bit of black is tasty). Before flipping them, one at a time pick the mushrooms up with tongs and pour out any accumulated oil and juices in the gills. They will cause flare ups if you don't. Cook the burgers on the other side for the same amount of time. Flip again and cook a couple minutes on the first side, then flip once more. By this time, the mushroom should feel soft when you poke it with your tongs. Lower the heat and toss your buns, cut side down, on the grill and grill until toasted. Drain the mushrooms briefly on paper towels, then serve on the buns with the garlic aioli and any vegetabley toppings you want.
Wednesday, June 6, 2012
Sauteed Spinach and Mushrooms
There is a distinct lack of veggie side dish recipes on my blog. It's not because I don't serve vegetables with meals- I definitely do- it' s just that I tend to go really simple. We like most vegetables as they are and of course the less stuff (butter, cheese, etc) added to them, the healthier they stay. So the majority of veggies at my house just get steamed, roasted, or eaten raw. No recipe required. Keeping with that trend, this is hardly a recipe and pretty much anyone can figure it out, but I've decided to post it anyway in case you haven't made it before. In spite of its simplicity, I had never actually prepared sauteed spinach as a side dish until recently. Of course I had sauteed spinach to go in other recipes, but never served it on its own. It's really good though and a great way to get your greens! My husband has actually mentioned it a couple of times since I first made it because he wants it again.
The recipe is very easy, quick, and flexible. You can use chopped onion instead of (or in addition to) the mushroom, or just cook the garlic and spinach. Willing to bet some toasted sliced almonds would be a great addition, too- just cook them in the skillet over medium-low heat for a few minutes, stirring frequently until toasty brown, then set them aside to cool while you proceed with the recipe and add 'em back in at the end. Yummy!
Sauteed Spinach and Mushrooms
2 t olive oil
2 large button mushrooms, halved and sliced thinly
2 cloves garlic, minced
10 oz bag baby spinach
salt and pepper to taste
Heat oil in a large nonstick skillet over medium-high. Add mushrooms and saute for a couple of minutes, until they begin to turn translucent. Add garlic and saute for 30 seconds or so. Add the spinach to the skillet, a large handful at a time. Cook and stir until it wilts (tongs are a great tool for this!), then add another handful of spinach. Continue in this fashion until all of the spinach has been added to the pot. Saute until the spinach is as tender as you would like, another minute or so. Add salt and pepper to taste. Serve the spinach in bowls if you don't want spinach juice on the rest of your food!
Yield: 2 servings
The recipe is very easy, quick, and flexible. You can use chopped onion instead of (or in addition to) the mushroom, or just cook the garlic and spinach. Willing to bet some toasted sliced almonds would be a great addition, too- just cook them in the skillet over medium-low heat for a few minutes, stirring frequently until toasty brown, then set them aside to cool while you proceed with the recipe and add 'em back in at the end. Yummy!
Sauteed Spinach and Mushrooms
2 t olive oil
2 large button mushrooms, halved and sliced thinly
2 cloves garlic, minced
10 oz bag baby spinach
salt and pepper to taste
Heat oil in a large nonstick skillet over medium-high. Add mushrooms and saute for a couple of minutes, until they begin to turn translucent. Add garlic and saute for 30 seconds or so. Add the spinach to the skillet, a large handful at a time. Cook and stir until it wilts (tongs are a great tool for this!), then add another handful of spinach. Continue in this fashion until all of the spinach has been added to the pot. Saute until the spinach is as tender as you would like, another minute or so. Add salt and pepper to taste. Serve the spinach in bowls if you don't want spinach juice on the rest of your food!
Yield: 2 servings
Subscribe to:
Posts (Atom)